
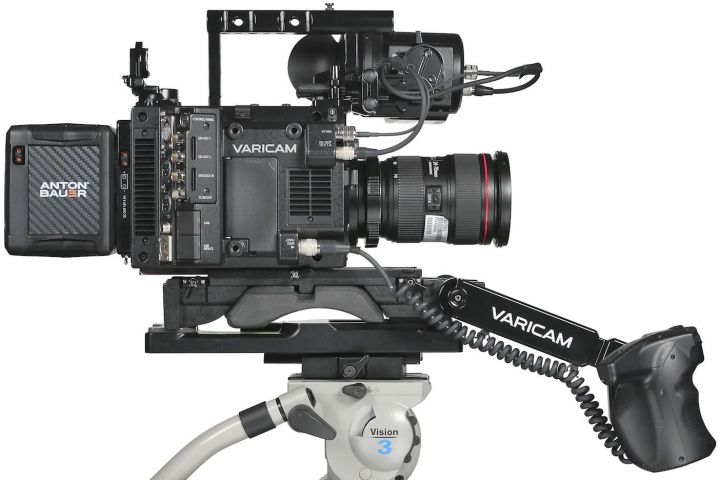
The VariCam LT is Panasonic’s “affordable” large single sensor VariCam, putting the core of the $55,000 VariCam 35 in a more compact package. The LT lists for $18,000 for the body alone, to $28,950 for a full shooting kit with EVF, shoulder mount, and a couple of 512 GB P2 Express cards (though there’s a $4,500 rebate on many configurations running now through March 2017). This pricing puts it in roughly the same league as the Sony F5 and F55, Canon C700, or RED Scarlet, depending on the various options you bundle with each.

The VariCam LT uses the same Super35mm-sized 4K MOS sensor as the VariCam 35, with a dual-ISO readout, 14+ stops of dynamic range, and improved color discrimination. The camera shoots various flavors of AVC-Intra and ProRes (ProRes in 1080-line formats only) to P2 Express cards and provides a raw output over one or two SDI cables for offboard raw recording. Like many LSS cameras the LT has a dual personality, operating in a cine-friendly log-recording mode with ASC CDL on-board grading and LUT support options, as well as a more traditional video mode with extensive knee, matrix, and color-correction controls. The camera ships with a mount for Canon EF lenses; a PL mount is available too and is bundled in many of the kit configurations.
“Yeah, so what?”, you might say. “Don’t we already have F5s and F55s and FS7s, ever more Canon C-whatevers, and more REDs than we can shake a stick at?” All that is true: the LT enters a crowded field a bit late in the game. Yet the camera comes with VariCam colorimetry: a natural, unforced color rendering that’s reminiscent of ARRI Alexa color, only in 4K and for less money. Now are you interested?
I tested the LT-PROEX-B kit which bundles the body with the sliding shoulder mount, articulated control grip, EF and PL mounts, Panasonic EVF, two 256 GB P2 Express cards, and a USB 3.0 P2 card reader. The kit lists for $27,600 but sells for $23,100 with Panasonic’s rebate. The review camera came with a Canon EF 24-70mm f/2.8L II zoom, an Anton Bauer Cine 90 battery, A-B Tandem onboard AC adapter/charger, and a quick-release tripod plate. I also used my own Canon 70-200mm f/2.8L and 24-70mm f/2.8L lenses. I used a Convergent Design Odyssey 7Q+ for raw recording, and added a few “tinkertoys” (15mm rods, articulating arms, follow-focus, etc.) as needed to make the package hang together.
Design and Handling
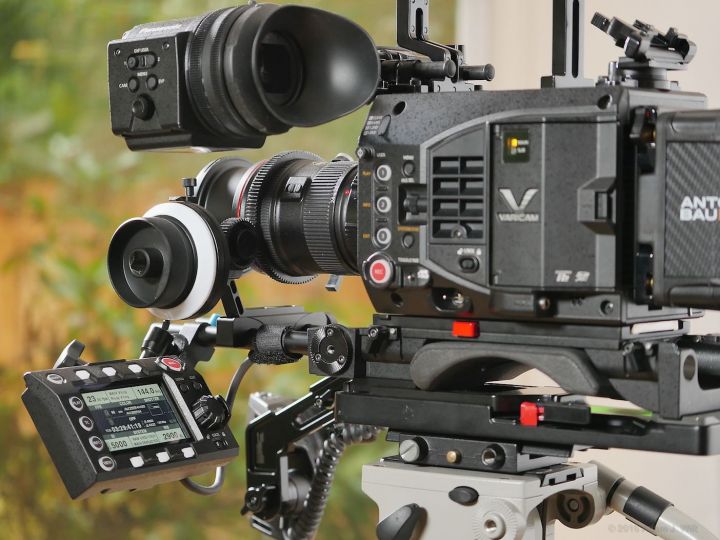
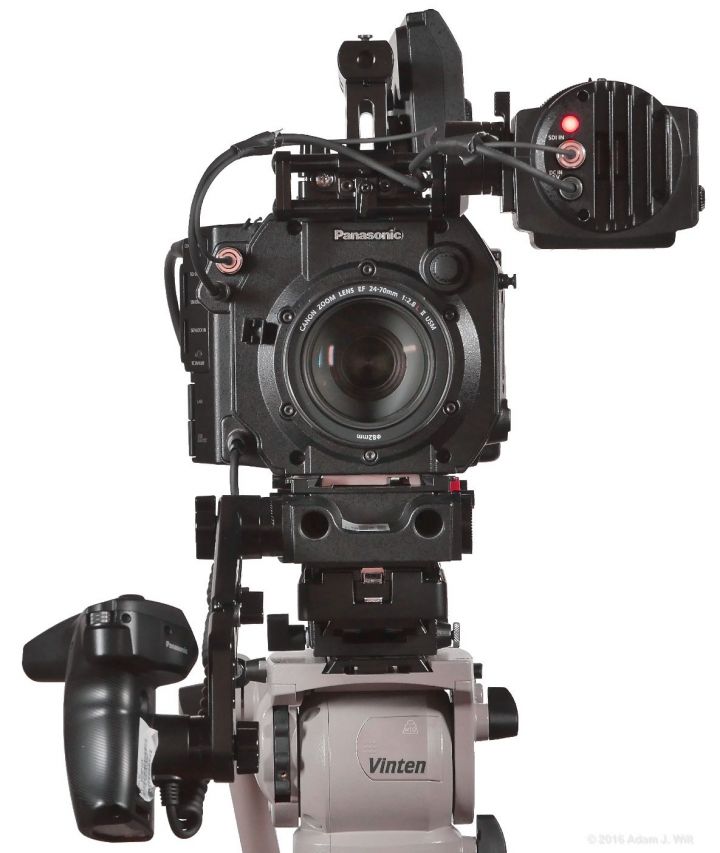
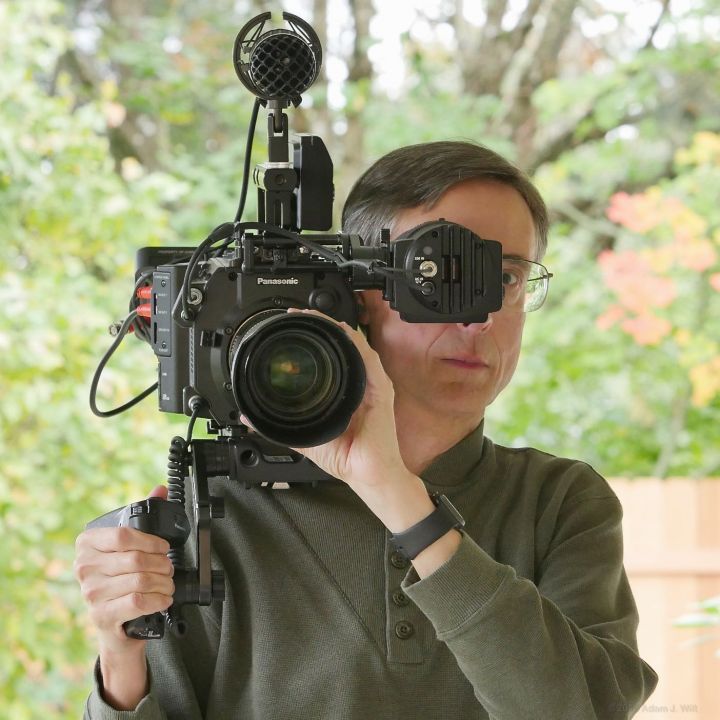
The Varicam LT is a large lump: 7.25” wide by 9.75” long (184 x 247mm). The body alone is about 6” tall (143mm); add the handle and it’s a bit over 9” tall (231mm). Body and handle weigh 6.6 lbs or 3 kg, while a minimal shooting kit (shoulder mount, EVF, and a light prime or small zoom like the Canon 24-70mm f/2.8) runs around 17 lbs or 8 kg.
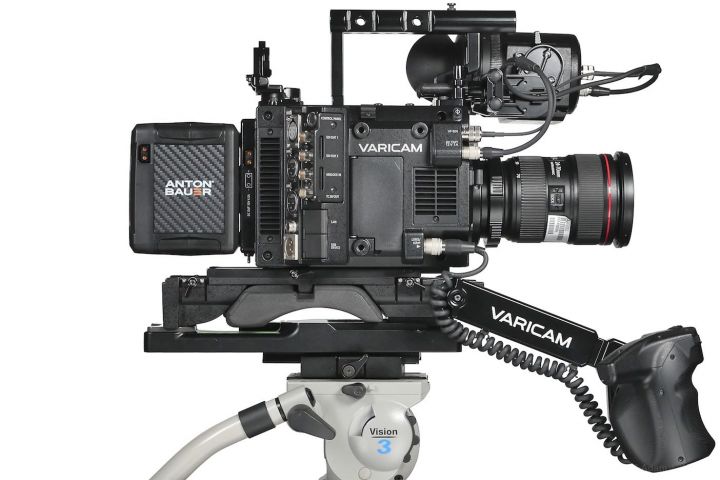
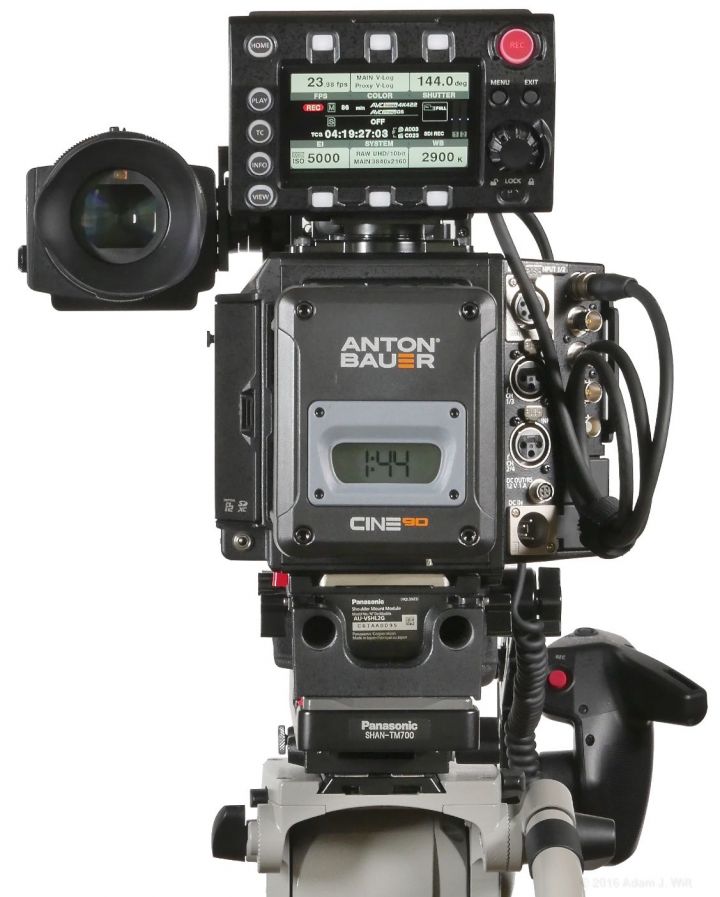
VariCam LT minimal handheld kit with Canon 24-70mm f/2.8 zoom
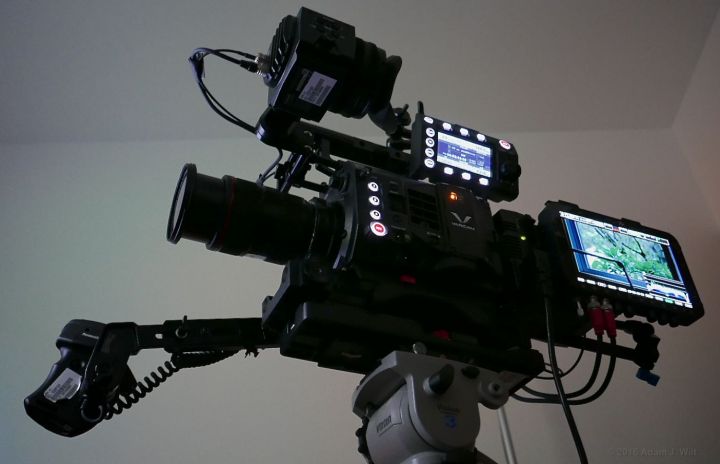
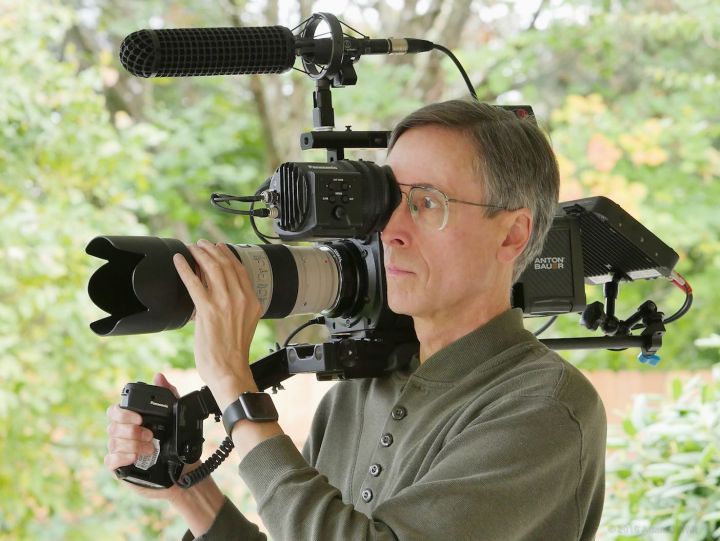
Add the control panel, a 70-200mm f/2.8 lens, and an Odyssey 7Q+ for raw recording, and you’ll get a kit tipping the scales at 24 lbs / 11 kg.
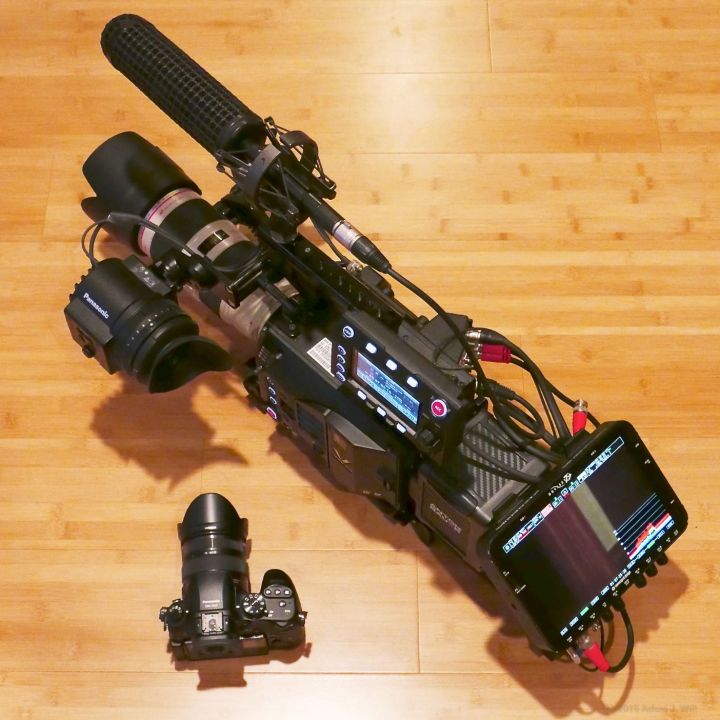
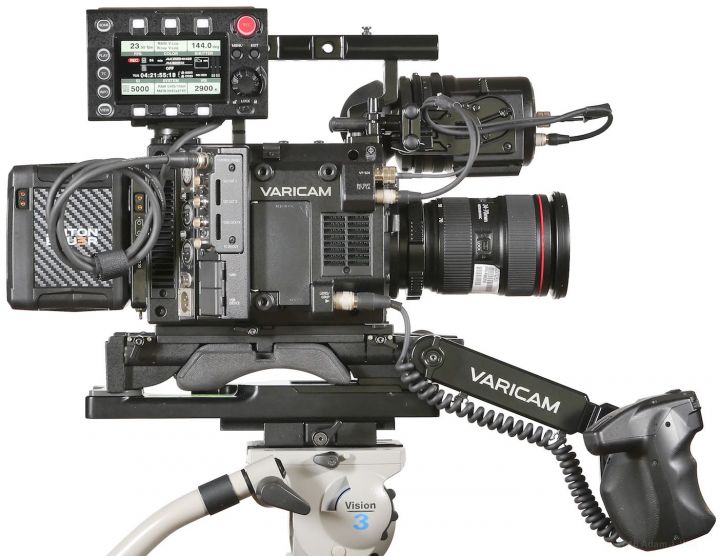
VariCam LT with control panel, Canon 70-200mm, Odyssey 7Q+, and a GH4 for comparison
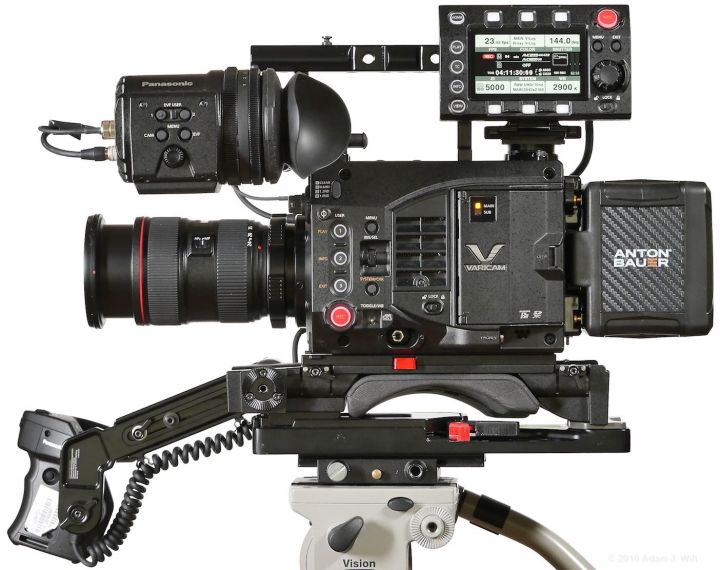
The camera is unusual in that there aren’t many controls on the body itself. Instead, a tethered control panel with a 3.5” screen and a 3’ cable (0.9 m) clips to a tilt-and-swivel mount atop the body.
The operator’s side of the body itself has an abbreviated control area, an inlet grille for cooling air, and a door guarding the P2 and SDXC media slots.
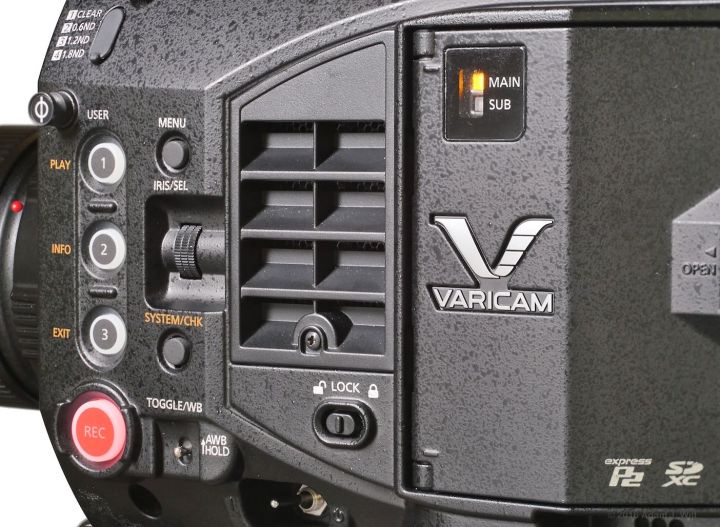
Three large, white, numbered buttons and a big, fat REC button line the front edge, beneath a focus hook. The squishy buttons are gently illuminated with white LEDs, and the REC button glows red when the camera is recording. Two non-illuminated gray squishy buttons and a recessed thumbwheel are next in line. The top gray button invokes the menus, and the thumbwheel normally controls iris on Canon EF lenses, or moves through the menus. Button 3 exits the menus when they’re active; the other labeled functions — PLAY, INFO, and SYSTEM CHK — only apply when the control panel is not attached. Buttons 1, 2, and 3 can have custom functions assigned.
With most important buttons illuminated, the LT is easily operable in the dark. Shown with Odyssey 7Q+ raw recorder
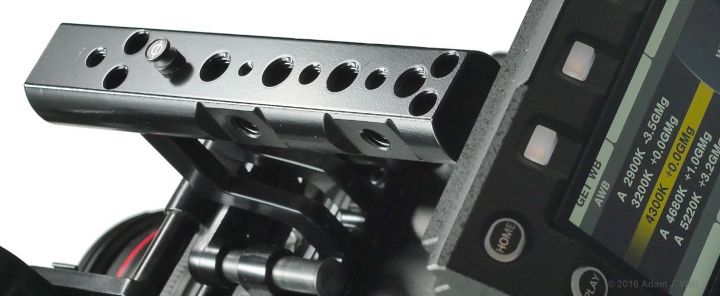
A vertical flip switch is used to cycle through white balance settings or, when held in the up position, to perform a white balance operation. Below and behind it in a deep recess is the flip switch for camera power.
A LOCK switch below the air-intake grille lets you disable unwanted buttons.
The rest of the operator’s side is taken up by the weather-sealed media compartment.
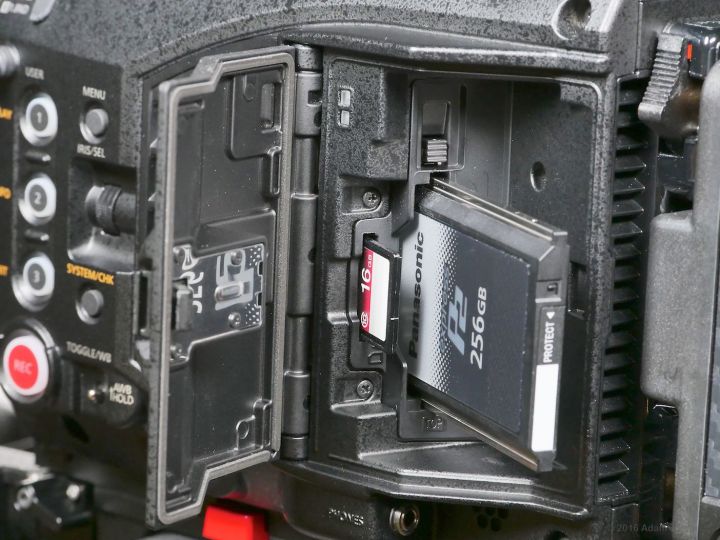
Open its door to gain access to P2 Express and SDXC media slots. The P2 card is used for recording full-res clips and can also capture 1080p, 6 Mbps long-GOP proxies. The SDXC card is used for storing camera setup files, LUT and CDL files, and may also be used for proxy clips.
Control panel in VIEW mode
The control panel appears to be the same one used on the VariCam 35, but there’s no room for it on the side of the smaller LT, so it’s mounted on the top of the camera. It can be swiveled to either side or any point in between, and it can tilt to accommodate high or low-mode work. It detaches with the flip of a locking lever for handheld use or relocation elsewhere. There’s a 1/4” socket on the back for alternative mounting configurations; I tried hanging it off a 15mm rod, below the EVF, where it was easier to use with the camera on my shoulder.
 It looks funky there, but it worked quite well—mind you, I’m always menu-diving as part of my testing; most peoples’ normal shooting workflows probably aren’t quite so control-panel-centric. No matter: the beauty of a floating control panel like this is that it can be placed where you want it, not where the camera designer thinks it should go.
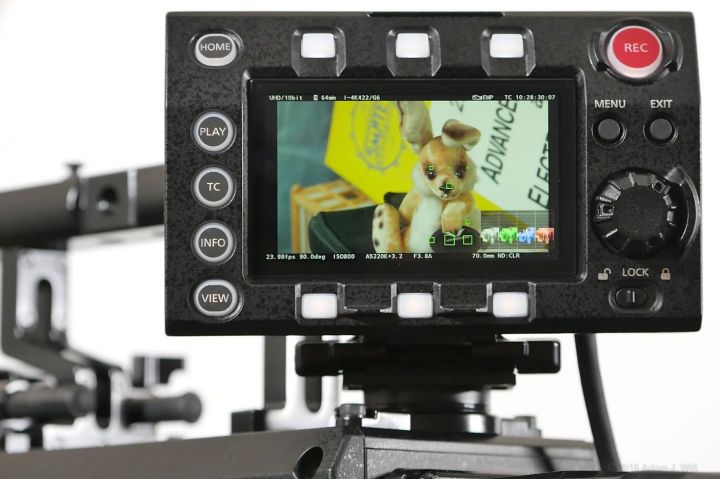
VariCam LT control panel, home screen while recording
A HOME button returns to the top-level “side panel” menu; PLAY enters playback mode; TC displays a dedicated timecode menu; INFO shows various system status pages; VIEW flips the display into a mirror of the EVF’s feed. Another big, fat REC button allows camera triggering; MENU and EXIT buttons provide access to setup menu. A navigation knob allows menu traversal and a LOCK button lets you disable as many of the other controls as you choose.
Six unmarked softkeys surround the display. As on the Alexa, C700, or F55 side panels, these normally trigger top-level functions, but they can also be assigned custom functions for use in a “six user buttons” mode.
VariCam LT with Cine90 battery
The camera uses a gold mount battery plate with a D-tap power port. The cine-style shoulder mount is set up, front and rear, for LWS 15mm rods.
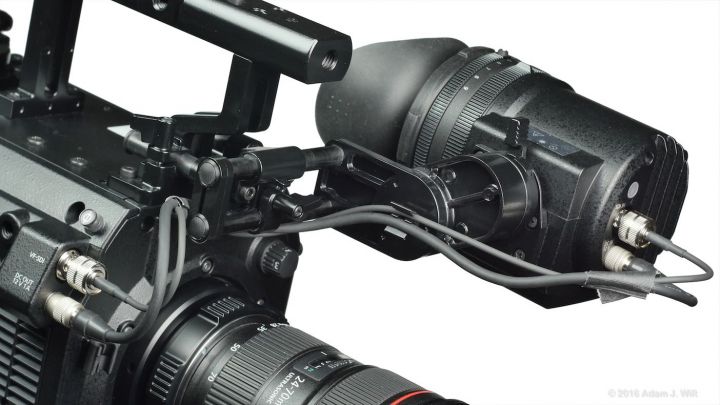
The right side of the camera has another air inlet towards the front. Below the right-side focus hook you’ll find a BNC for EVF SDI video and a 4-pin Lemo for EVF power and control. There’s a 12-pin terminal at the bottom for either a broadcast-style lens connector, or for the operator’s grip and its controls. A flip-open door covers a slot for an optional Wi-Fi module, with a USB HOST port for connecting the Wi-Fi module or a 4G/LTE modem. Three 1/4” accessory mounting points are provided.
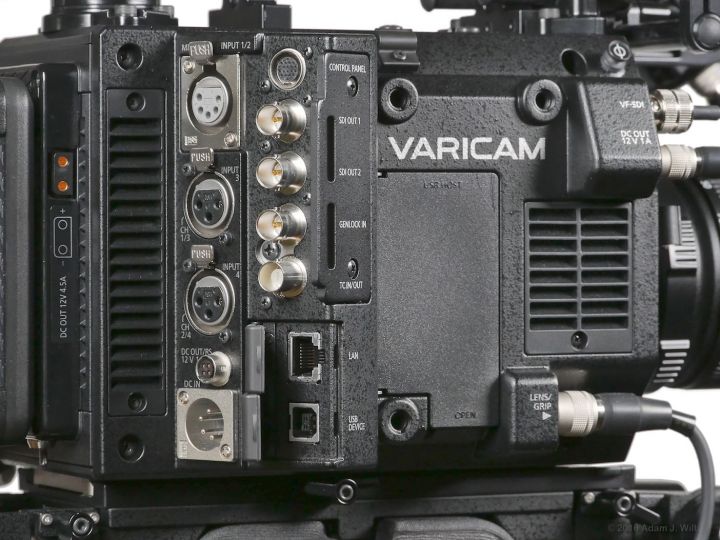
An angled panel holds the camera’s I/O ports:
- CONTROL PANEL – multipin port for the control panel.
- SDI OUT 1, SDI OUT 2 – dual 3G SDI ports for 1080p video or 4k raw data.
- GENLOCK IN, TC IN/OUT – BNCs for genlock feeds and for timecode.
- LAN – an RJ-45 socket for 100BaseT Ethernet, with a flip-open rubber door.
- USB DEVICE – USB type A port for connecting the camera to a computer, also with a flip-open door.
- INPUT 1/2 – 5-pin XLR for a dual-channel mike feed.
- INPUT 3, INPUT 4 – 3-pin mic/line connectors, with phantom power.
- DC OUT – 4-pin Lemo for powering camera accessories.
- DC IN – 4-pin XLR for camera power.
Aft of that is the exhaust grille for the camera’s cooling system.
It’s worth noting that there’s no 4K monitoring output; the SDI feeds are 1080p only.
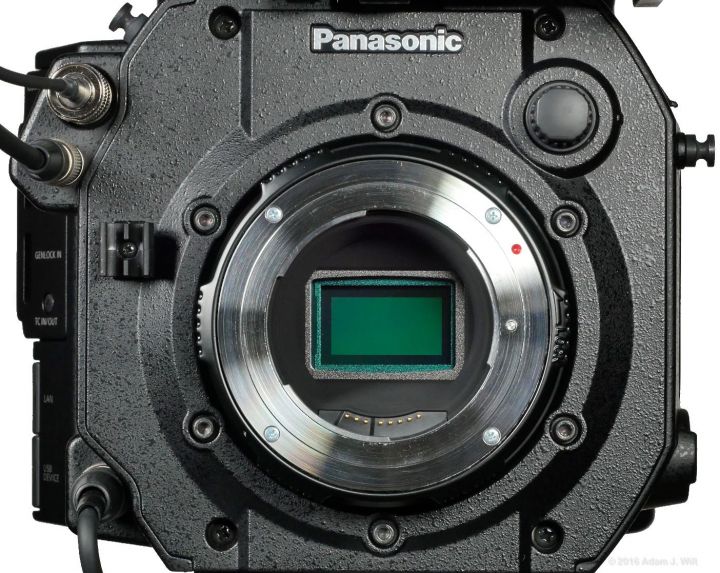
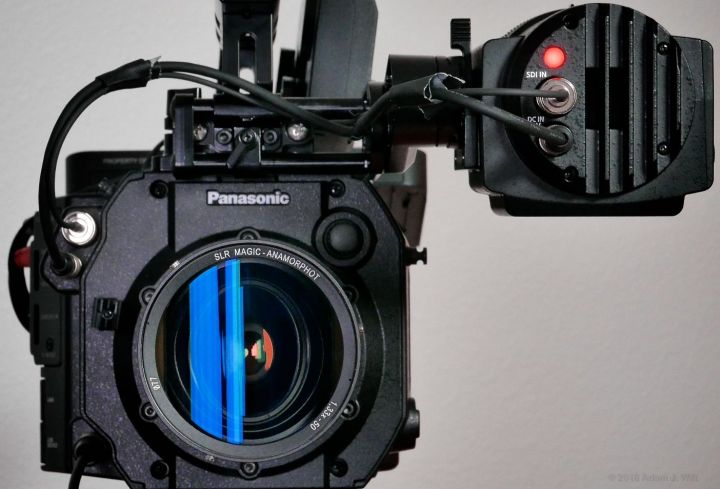
The front of the camera has a four-position ND filter wheel selector (clear / 0.6 / 1.2 / 1.8), and the lens mount. The camera comes standard with a Canon EF mount, allowing full lens communications and control.
It’s a positive, breech-lock style mount: you fit the lens to the camera in its upright orientation, then rotate a locking collar counterclockwise to secure the lens. Ramped cams, rather than squishy leaf springs, hold the lens rigidly in place, making for a solid and stable connection. This is the way all lens mounts should work.
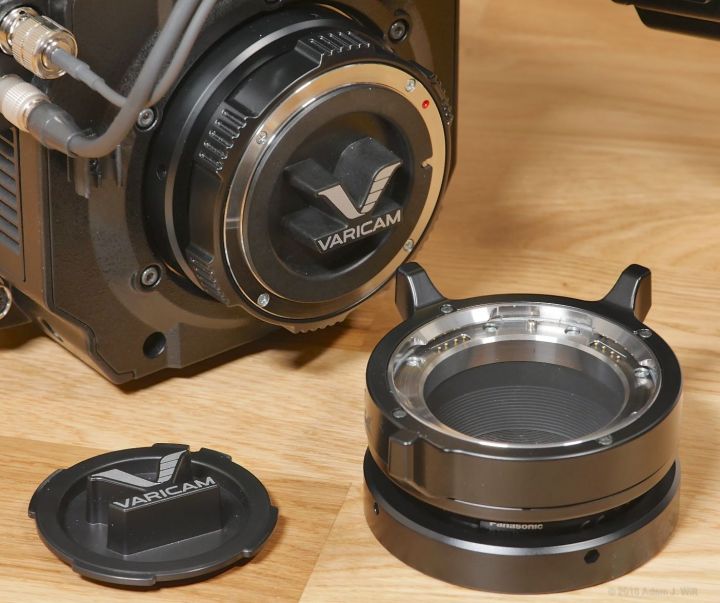
If PL glass is your thing, you can replace the EF mount with a PL mount. The PL mount has both Cooke /i and Zeiss LDS data pins (be sure to dive into the menus and select the data protocol appropriately). The mounts are field-swappable, requiring a few minutes with a 1.5mm hex key to loosen two locking screws. Flange depth is adjustable with a screw on the camera body, but my impression is that Panasonic would prefer you don’t tweak it casually. The manual states, “The camera will not operate properly when the screw in the lens flange back adjustment hole is turned excessively”, and, “Contact your dealer for information about the adjustment method.”
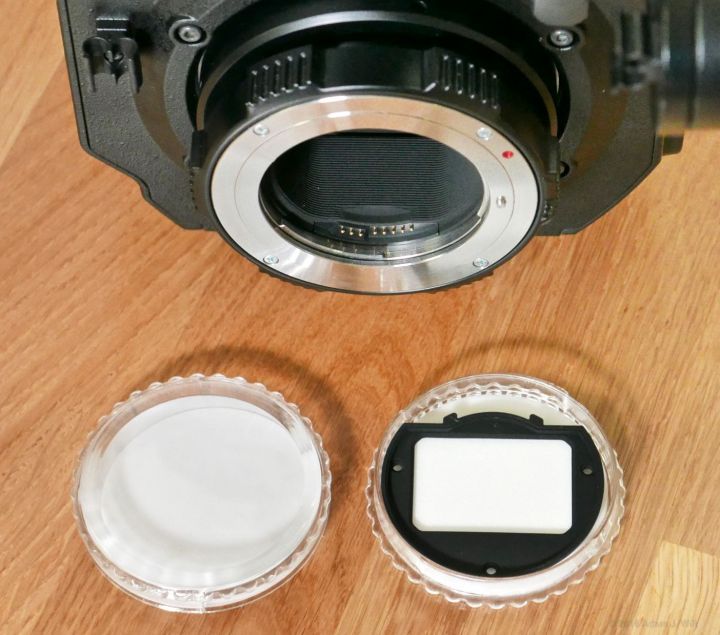
The camera also comes with a user-installable IR-pass filter (clear) to use in place of the standard IR-cut filter (light blue), so you can use the camera for infrared photography. Pull the lens mount, loosen three screws, swap the filters, and you’re good to go.
The camera’s top plate is smooth and uncluttered aside from the EVF mount, control panel mount, and handle attachment points, all of which can be removed if so desired. Those wishing for more places to mount accessories can find cheeseplates from the likes of Wooden Camera or Berkey System, but fresh out of the box you’ll have to stick any extras on the handle itself, which has three 1/4” and four 3/8” sockets on top, and two 3/8” sockets on either side. And yes, there’s another focus hook on top of the handle itself.
There is one argument for leaving the top plate unencumbered: there’s a GPS receiver under it that works best if it has a clear “view” of the sky. GPS data, along with all other shooting parameters, are stored in XML files on a clip-by-clip basis—think of the XMLs as EXIF files for clips instead of stills.
Panasonic’s $5400 OLED EVF is expensive, but (I would argue, especially with the rebate pricing) worth it. Like the similar EVF on the VariCam 35, it has a nearly 2:1 optical zoom:
VariCam LT EVF “zoomed out”
VariCam LT EVF “zoomed in”
I didn’t think to measure its resolution because I never noticed any issues: its pixels are so small, even at full magnification, that they never called attention to themselves, and focusing was always precise and certain.

The EVF has dedicated CAM and EVF buttons to bring up simple onscreen menus for the most common functions: EVF lets you control viewfinder brightness, contrast, color, and peaking, while CAM lets you set frame rate, ISO / EI, shutter angle, and white balance. The knob lets you move between parameters; press it in to switch to changing the current parameter. It’s a very fast way to adjust the camera while still looking through the finder. Two user-assignable buttons let you assign various functions for quick access.
The EVF’s mounting bracket has a fair amount of front-to-back, side-to-side, and up-and-down adjustability, and each axis has its own locking lever. The EVF is easy to position to taste, and once positioned, you can lock it securely in place.
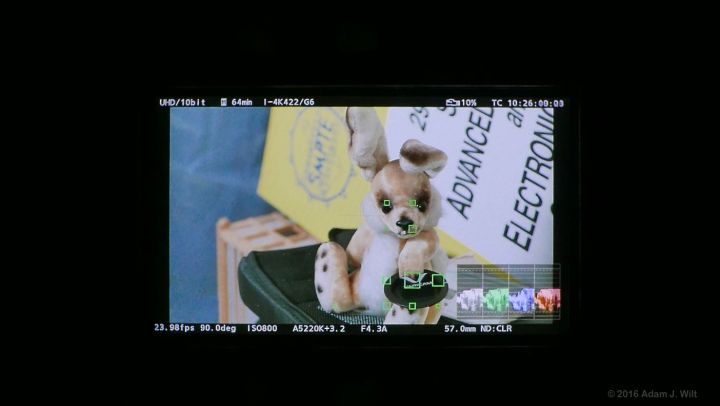
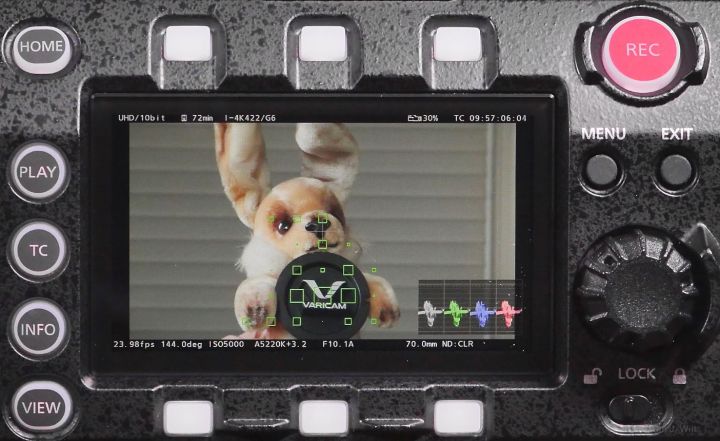
The EVF takes a standard SDI video feed, so you can use any other SDI-equipped EVF if the Panasonic unit isn’t to your liking. While the EVF and CAM menus are generated internally, the rest of the display, including markers, WFM, focusing aids, and lookaround, is carried in the video signal. Here’s the EVF feed as captured on a Video Devices PIX-E5 recorder:
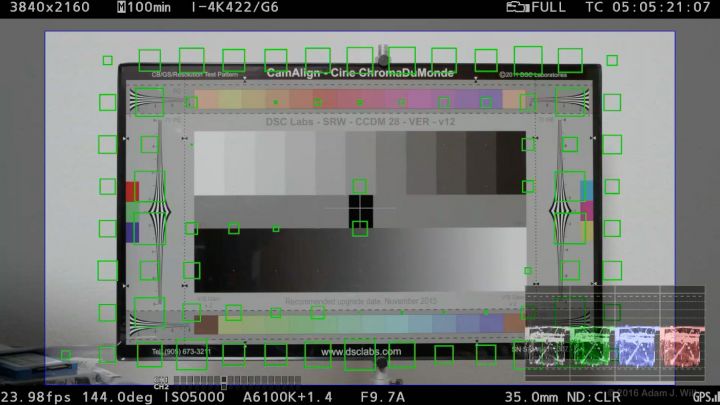
In this screenshot, lookaround is enabled with a blue boundary and 50% dimming outside the active picture. “Focus Squares”, an array of green squares that grow in size when their local area appears to be sharp, are shown, along with a YRGB waveform monitor. The WFM is high-resolution and instantly responsive, and in V-Log mode it always shows the log signal regardless of grading, so you can keep an eye on what your recorded levels actually are even if the graded viewfinder picture looks like it’s getting into over- or underexposure. Granted, I’m a ‘scopes geek, but this WFM display is the best exposure monitor I’ve used: far more information at a glance than a histogram, less distracting to me than zebras or false color. Of course, you can enable zebras and/or false color if you prefer them.
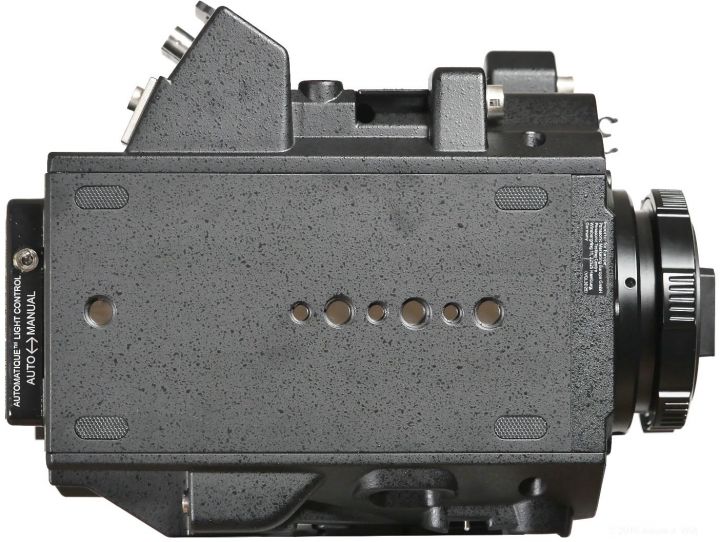
The camera’s base has a good selection of 1/4” and 3/8” mounting sockets.
If you get one of the shoulder mounts (there’s a “Cinema Style” and an “ENG Style”; both have 15mm LWS rod sockets and mounting rosettes in front, while the Cinema Style I tested has a longer front extension and allows 15mm rods in the rear), its dovetail plate attaches to a couple of the baseplate sockets while still leaving others free.
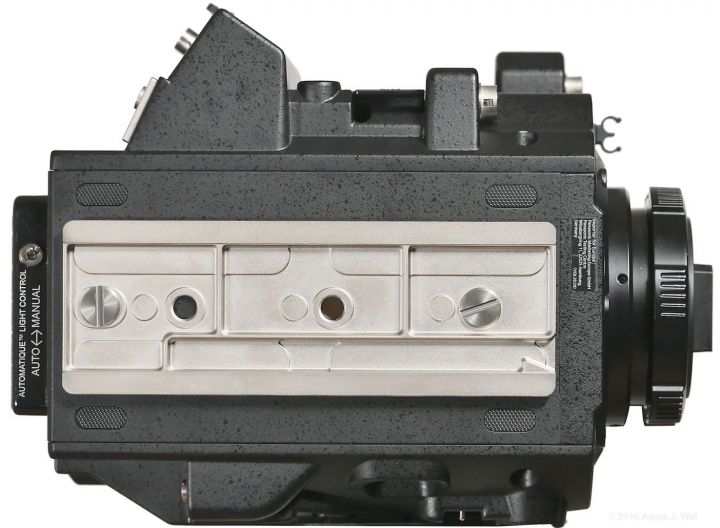
Thus you can bolt the camera to a tripod without the shoulder mount, but with the dovetail plate fitted: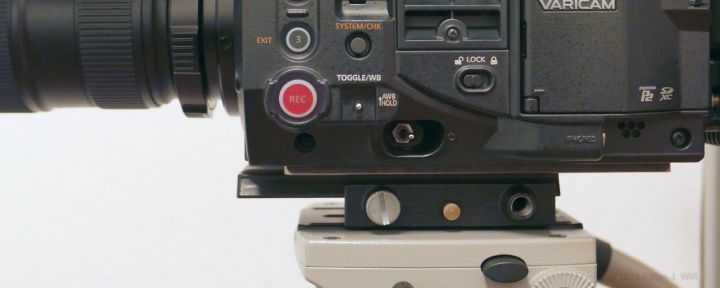
The shoulder mount itself docks into a standard broadcast quick-release plate:

The long dovetail plate and its mating channel in the shoulder mount allow considerable flexibility in camera positioning:
Rosettes allow the control grip on its arm to be attached at any angle. The arm itself allows 2.25” (57mm) of extension adjustment. The grip is secured with its own rosette, so it too can be angled to taste.
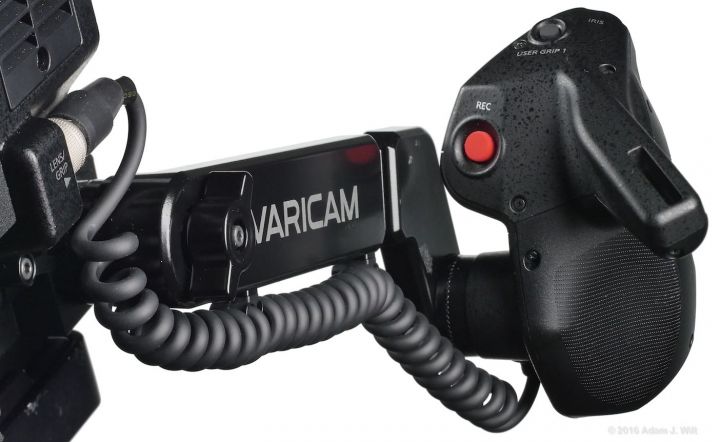
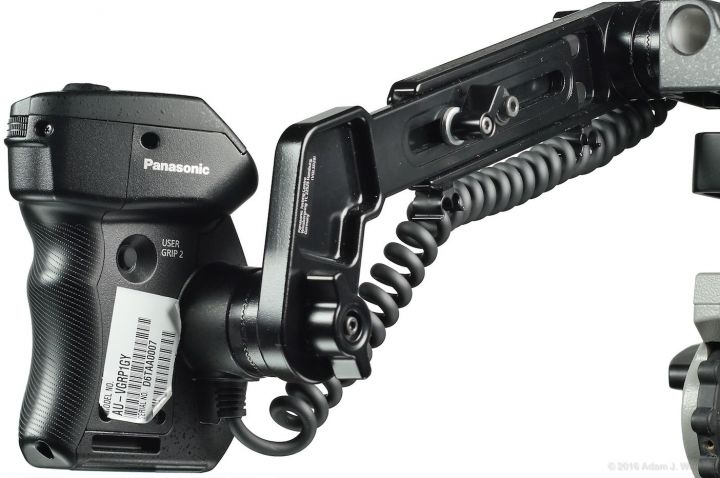
The grip has a rear mounted REC button, two user-assignable buttons (neatly placed on the inside and on the top where they’re unlikely to be mashed accidentally), and a control dial at the front. The dial normally controls the iris on EF lenses but can also be switched to adjust audio input levels. The grip is made of hard plastic with light texturing for traction.
The entire assembly is quite rigid and has a robust feel, as is appropriate when you’re flinging 17+ pounds of camera around with it.
Controls and Menus
Panasonic’s physical controls are well done: buttons are large, need firm but not excessive pressures, are easily findable by touch, and many are illuminated for use on dark stages. Knobs are nicely textured and suitably damped. The adjustment dial on the grip is perfectly designed, being stiff enough that it’s unlikely to be turned by accident yet loose enough that it’s easily adjusted with a single finger.
Camera setup is centered around the control panel, which, like the ones on the Alexa, F5 and F55, and C700, has six context-sensitive softkeys and a rotary knob for settings. The panel gives you a large, clear status display and speedy access to most high-level settings; 90% of what you need to fiddle with during a shoot is available with a couple of button-presses, without having to dive into the setup menus (the most common tweaks—white balance, shutter angle, frame rate, and exposure index—can be set using the EVF menus without even bothering with the control panel).
Yet the control panel isn’t required: remove it, and the amber-labeled side-panel buttons become active, so you can still configure the camera on the fly without menu-diving. It’s not quite as convenient, perhaps, but it still works, just as the Starship Enterprise can still be conned from Auxiliary Control when the saucer section is detached or the main bridge is occupied by obstreperous Klingons. You may not have the fancy swivel chair or the big screen, but you can still get the job done with reasonable dispatch, and that’s what counts.
Klingons aside, a quick tour of the control panel and menu system is in order. If you want to play at home, head on over to http://pro-av.panasonic.net/en/varicam/vcs/index.html and load the VariCam LT Simulator (tip: just “press” the HOME key when the simulator tells you to reboot).
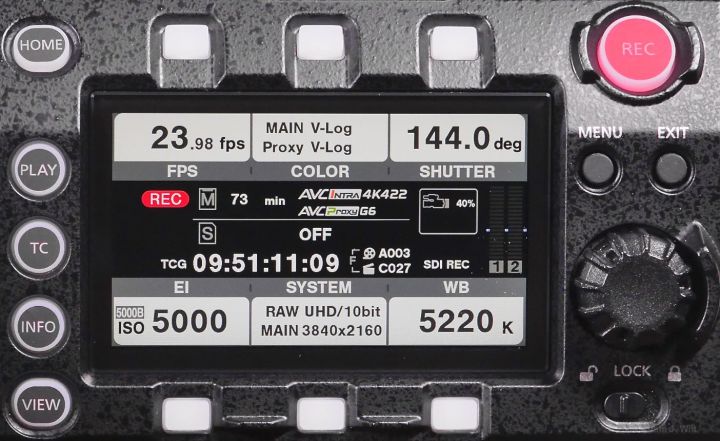
The HOME page for the control panel has six primary settings assigned to its six buttons, along with status. Note that different color renderings can be set for main and proxy recording; the EI status shows not only a setting of ISO 5000 but a base ISO of 5000; that raw output is set to 10-bit UHD while UHD is also recorded on the P2 card. In the central band, the Main (P2 card) and Sub (SDXC card) slot statuses are shown, complete with time remaining and the codecs in use. Timecode, clip naming, battery and audio levels are also shown.
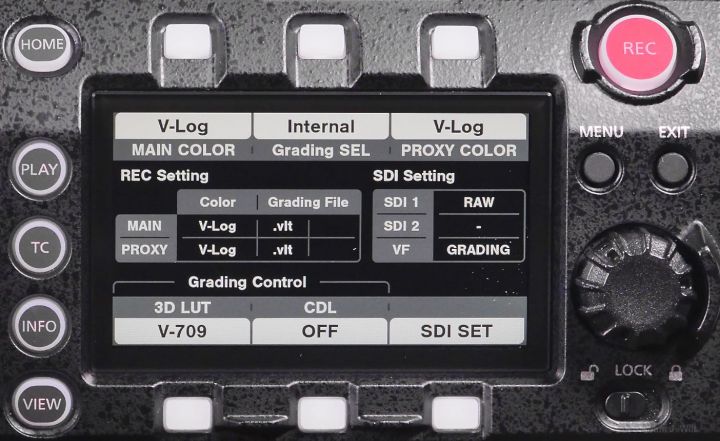
Pressing COLOR on the home screen displays the dedicated color submenu. You can set MAIN COLOR to a variety of looks; here we’re in V-Log, so we also have access to grading controls: we can choose separate LUTs for main and proxy recordings, and/or CDLs (Color Decision Lists, with R,G,B offset, power, and slope settings—essentially lift, gamma, and gain—plus saturation). CDLs can be defined and LUTs chosen on-camera, or they can be controlled by an external app connected via Wi-Fi, wired Ethernet, or a 4G modem. You can also define whether the grading settings are applied to the various SDI outputs, including the EVF feed.
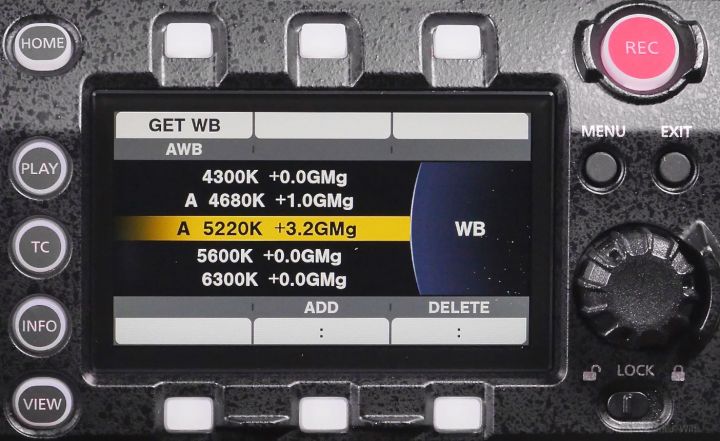
Here’s what the WB page looked like after I’d saved a couple of custom white balances. Most of the parameter pages are like this: you can save up to 12 settings in each one, and they sort numerically, so you can save a whole bunch of custom white balances, frame rates, or shutter angles / shutter speeds for quick recall.

Pressing the MENU button drops you into conventional scrolling menus. The top line of the screen shows the “breadcrumb trail” of how deep into the menus you are; here we’re in the COLOR SETTINGS submenu of SYSTEM SETTINGS (which is where you fiddle with LUTs and CDLs in cine color mode. In video color modes, you’d use MENU > SCENE FILE SETTINGS instead). Those frustrated with various Sonys that can’t use a LUT during playback will be happy to note that the VariCam allows LUTs and CDLs to apply for playback as well as while recording.
Pressing the INFO button gives you six pages of status information. The MEDIA page also give you a quick way to reformat the main and sub slot cards.
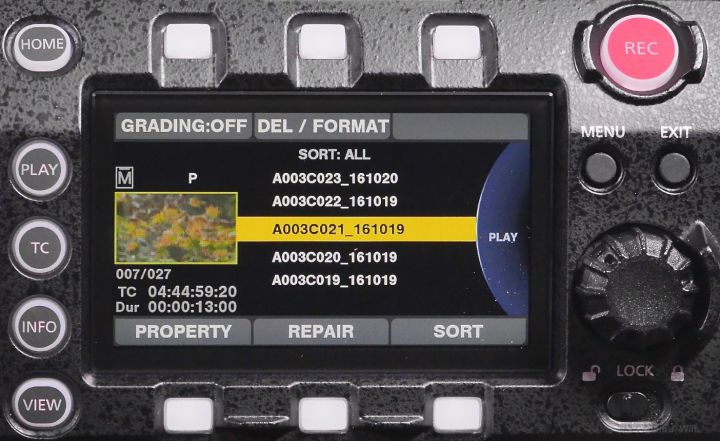
The PLAY button displays the recorded clip list and lets you view metadata, repair damaged clips, sort them according to clip marks and text memos, and play them back. Yes, there’s a washed-out, weedy little 80×45-pixel icon, backwards-compatible with icons from the earliest days of P2 cameras! Here, too, you can toggle grading corrections for playback.
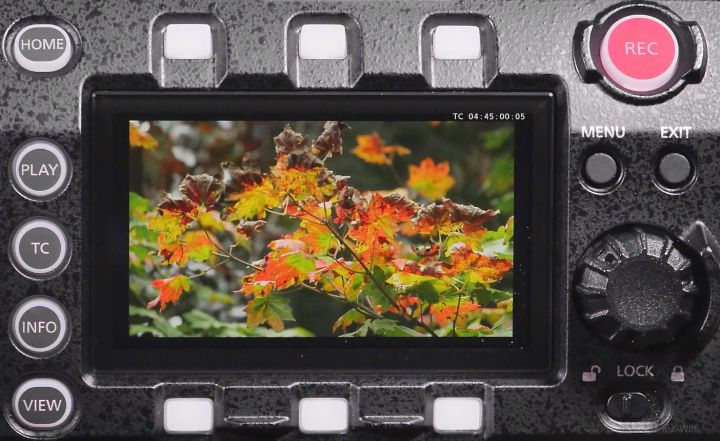
VariCam LT control panel, playing a clip
Pressing the knob plays back the clips. Press again to pause; turn the knob to jog through the clip. There is no timeline, playhead, or mode indicator shown, just the current timecode.
 Pressing VIEW turns the screen into a monitor, showing the same information displayed in the EVF.
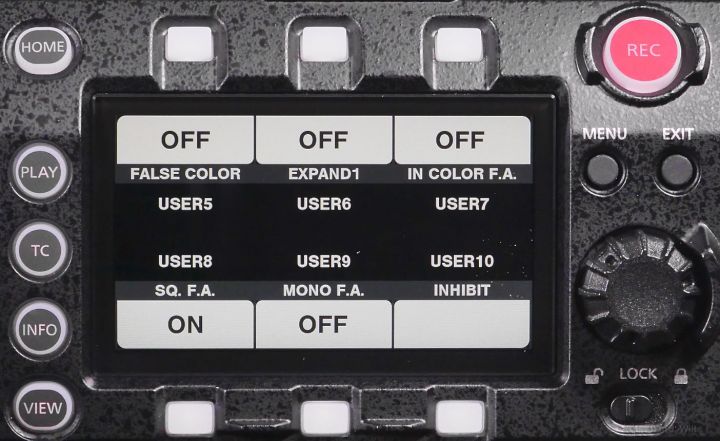
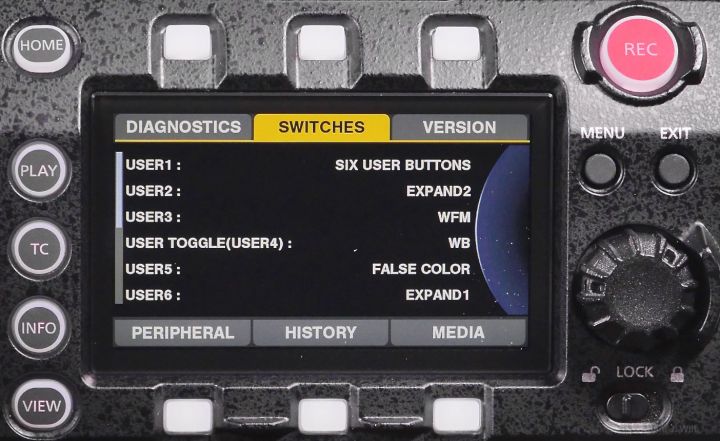
If you’ve set one of the main-body softkeys to SIX USER FUNCTIONS, pressing that button flips the control panel into, well, six user functions, with the six buttons themselves customizable. Here I’ve set five of them for viewfinding extravagance: false color toggling, expanded focus (focus magnification, which works while recording!), in color focus assist (colored peaking), square focus assist (focus squares), and monochrome focus assist to turn the EVF display black and white. I left button 6 at “inhibit” just to show it could be done; I’m not normally one to let a user button go unassigned.
The LT rewards careful study
VariCams have a unique menu structure and organization, different from other Panasonic cameras and (of course) from cameras from other manufacturers. The way the system is set up is logical overall, but it’s different enough from other cameras that it took me a while to figure it out.
Many cameras have a “master mode switch”, some overall controlling setting that determines how the camera works and how the rest of the camera’s functions are presented. For example, many modern cameras have a log- or raw-shooting mode that usually allows adjustment of gain and white balance but disables all other image controls, and a video or WYSIWYG mode with sharpness, pedestal, gamma, matrix, knee, and the like. Panasonic’s HVX200 of a decade ago worked in either DV tape mode or P2 card mode, and that switch similarly split the camera’s functionality into two flavors.
Here’s the trick: the VariCam LT essentially has four such settings, one level deep in the control panel’s home screen: COLOR > MAIN COLOR, SYSTEM > MAIN CODEC, SYSTEM > MAIN PIXEL (e.g., recorded frame size), and SYSTEM > SDI RAW. And a fifth, deeply buried: MENU > OUTPUT SETTINGS > SDI OUT > RAW OUTPUT, a necessary and critical qualifier when SDI RAW is set to a 10-bit format (10-bit raw can be output as single-link or dual-link, and which one you choose determines what frame rates are available). These four—um, five—settings in combination determine what the camera will let you do.
Furthermore, these key settings interact with each other, and no one is truly the master of all the others. So, for example, if you need a certain frame rate but can’t seem to enable it, you need to check—at a minimum—MAIN CODEC and MAIN PIXEL and SDI RAW, and possibly RAW OUTPUT, too. If you’re wondering why you can’t tweak chroma or knee, check MAIN COLOR to make sure you’re in a mode that allows such tweaks, but also check SDI RAW, because raw output forces MAIN COLOR to V-Log, where no tweaks are allowed.
That’s the key to configuring this camera: get those four main settings right (and RAW OUTPUT if you’re set up for 10-bit raw), and for the most part, everything else you expect to have working should be available to you.
Frame Sizes, Frame Rates, and Recording
The LT uses a 4K-native single sensor with a conventional Bayer-pattern color filter array. The camera captures pixel-for-pixel 4K (4096×2160) and UHD (3480×2160) material; downsampled 2K (2048×1080) and HD (1920×1080) from the same sensor area, and pixel-for-pixel center-cropped 2K and HD. The active area in 4K (or full-frame 2K) is 24.576mm x 12.96mm; in UHD or full-frame HD it’s 23.04mm x 12.96mm. Crop-mode 2K and HD sizes are (not surprisingly) half as big.
The VariCam LT is a “world camera” supporting all the world’s popular base frame rates (or “system frequencies” in Panasonic parlance): 23.98p, 24p, 25p, 29.97p, 50p, and 59.94p. In 1080-line modes, it also records 50i and 59.94i interlaced signals. And because it’s a VariCam, it supports variable frame rate recording (VFR), with the rates depending on the frame size, sensor scan, and codec setting.
The basic rundown is that the LT will shoot full-frame up to 60 fps (50 fps at “PAL” frequencies), and crop-mode up to 240 fps (200 fps PAL). For a system frequency of 23.98 Hz, here’s the detailed breakdown by frame size and codec:
4K or UHD:
- 1–30fps using AVC-Intra4K 422
- 30–60fps using AVC-Intra4K LT
2K full-frame:
- Native frame rate (no VFR) using AVC-Intra2K 444
- 1–60fps using AVC-Intra2K 422
HD full-frame:
- Native frame rate (no VFR) using AVC-Intra2K 444
- 1–30fps using ProRes4444
- 1–60fps using AVC-Intra422
- 1–60fps using AVC-Intra100
- 1–60fps using ProRes422 HQ
2K crop mode:
- 1–120fps using AVC-Intra2K 422
- 120–240fps using AVC-Intra2K LT
HD crop mode:
- 1–120fps using AVC-Intra422
- 1–120fps using AVC-Intra100
- 120–240fps using AVC-Intra-LT
Other “NTSC” frequencies yield similar numbers, while “PAL” frequencies, as usual, run a bit slower: 1–25fps instead of 1–30, 25–50 rather than 30–60, and so on. Tables with all the permutations start at page 40 in the operating manual, if you’re interested.
The AVC-Intra codecs are mostly 10-bit, 4:2:2 chroma-subsampled intraframe compressors, but the 444 variant has full color resolution and 12-bit recording.
The ProRes codecs (licensed from Apple, but implemented by Atomos) are intra-frame, 10-bit 4:2:2 and 12-bit 4:4:4 compressors.
Clips are recorded on P2 Express cards, a thicker, faster version of the original P2 card, though some of the older P2 cards can be used when recording the lower-bitrate, legacy AVC-Intra100 format. The VariCam LT has a single P2 Express slot—the VariCam 35 has two—so you don’t have the option of card-to-card relay recording, or of recording one log clip and a parallel full-quality clip with a LUT applied.
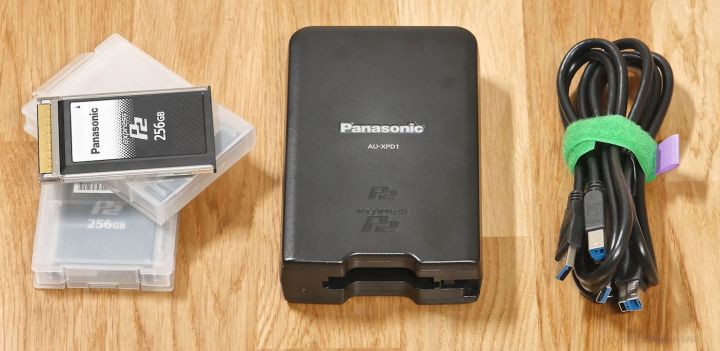
P2 Express cards and USB 3.0 reader. The reader needs two USB cables to feed it sufficient power
A single 256 GB P2 Express card holds about 90 minutes of AVC-Intra4K 422 at 24fps, or 73 minutes at 30fps; 60fps AVC-Intra4K LT will fill the card after 63 minutes. Very roughly speaking, AVC-Intra4K 422 runs around 400 Mbps while AVC-Intra4K LT is a bit over half that data rate (at normal playback speed).
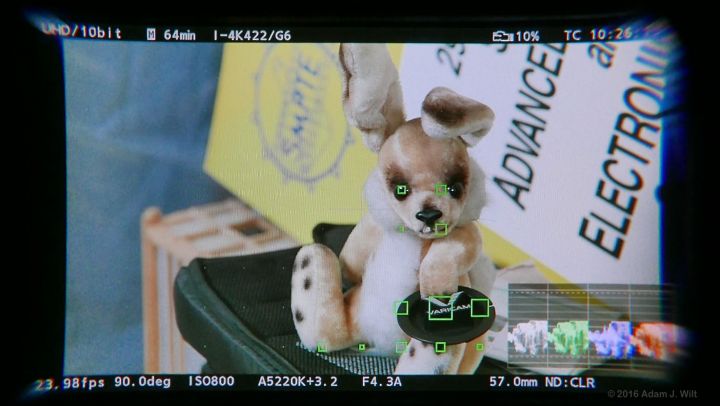
The LT also lets you record a proxy in the aptly-named AVC-Proxy format, a 6 Mbps, long-GOP 1080p H.264 file in a .mov wrapper. Proxies can be recorded on the P2 card or on the separate SDHC/SDXC card; a 64 GB card will hold 655 minutes of material. Proxies can have LUTS and CDLs “burned in”, along with a wide range of camera and project metadata and even logos or copyright notices. You can also apply a mask to recorded proxies. Here’s a sample frame with camera info and a 2.39:1 mask:
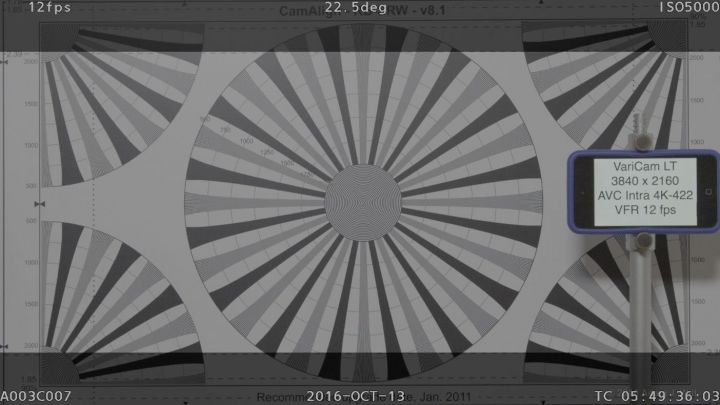
The 6 Mbps proxy video is of surprisingly high quality, showing artifacts on fast motion but still quite good enough for evaluating performances and lip-syncing audio.
Interestingly, proxies can track VFR recording up to 60fps for NTSC frequencies or 50fps for PAL frequencies, or they can be recorded as “NORMAL+Audio”, essentially the same realtime feed seen while recording VFR, with whatever skipped or repeated frames are needed to generate the native frame rate.
Proxies can be recorded regardless of whether your main codec is AVC-Intra or ProRes. However, you can’t record proxies by themselves (MAIN CODEC off), which would come in handy when recording raw externally.
Audio
The LT has four analog audio inputs and records four tracks of 24-bit 48 kHz audio. Inputs 1 and 2 are ganged together on a 5-pix XLR and have ganged settings: mic vs. line, mic level (-40, -50, or -60 dB), and phantom power. Inputs 3 and 4 are on separate 3-pin XLRs and have individual settings. All mic inputs have individually selectable low-cut filters to reduce handling noise and rumble, and limiters to catch peaks. You can set headroom—the inverse of “reference level”—to 18db or 20dB.
Each recorded channel is individually settable in terms of manual or auto gain control, and manual level. Even-numbered channels can take their feeds from either of the even-numbered inputs, and the odds from the odds, but you can’t route an even-numbered input to an odd-numbered channel or vice versa.
Features and Functions
This is just a bullet list; the brochure and operating manual at the VariCam LT website will have more fulsome descriptions.
- Super35mm-sized 4K sensor with 14+ stops of dynamic range and dual-native-ISO capability; ISOs range from 200–4000 in “800Base” mode and 1250–12800 in “5000Base” mode.
- V-Gamut wide-gamut color capture with on-chip filtration designed for improved color discrimination; V-Log log-encoding curve.
- On-board AVC-Intra and ProRes recording (full-frame and cropped, up to 240fps); uncompressed raw output (full-frame, 1-60fps). 1080p proxy recording.
- Interchangeable EF and PL lens mounts.
- Variable frame rate recording and raw output.
- Full shading controls in “video” color modes with matrix, 24-pole color corrector, multiple gamma settings, highly adjustable knee, skin detail, etc.
- Comprehensive grading control in “cine” mode (V-Log color) allowing use of LUTs and CDLs (see below).
- Infrared capture with user-swappable IR filters.
- 3-second pre-record capability.
- Interval recording (time lapse), as slow as 1 frame/hour.
- One-shot recording (single-frame advance) for animation. You can set the number of frames recorded per push of the REC button and an initial delay (When I set the number of frames to 1, I actually got 4 frames in my clip, but I was using the function for single-frame shots of test charts and the like).
- Focusing aids: Two presets for image magnification, available while recording; colored peaking; focus squares. You can also set up a user button for “open iris focus assist”: the camera will open the lens all the way for the shallowest depth of field, using shutter to keep the exposure setting.
- Exposure aids: dual zebras; luma or YRGB waveform monitor; Y Get (essentially a center-of-frame spotmeter displaying the average picture level of a box on the center of the image; false-color mode.
- Wired and optional wireless connections for realtime control of LUTs and CDLs and FTP transfer of clips.
Color and Grading
The VariCam LT runs in two color modes: V-Log, in which the capture image is recorded to card using Panasonic’s V-log encoding, and everything else: V-709, a couple of V-Looks, and a couple of BC (broadcast) looks.
In V-Log, you have the option of seeing the log image directly, applying a built-in V-709 LUT (look-up table) that yields a very watchable and client-friendly image, applying your own LUTs, and/or using ASC CDLs (Color Decision Lists) to grade the image. Grades can be sent to the EVF feed (and shown on the control panel in View mode) as well as to the two SDI outputs individually. The graded image can also be recorded as the proxy clip. The current LUT and CDL are recorded to the P2 card for every clip, so you can tweak your grade on a shot-by-shot basis and those tweaks will travel with the clip without any extra work required.
CDLs, with slope, offset, and power parameters for each of the red, green, and blue channels, plus overall saturation, can be built and edited using the control panel or the SYSTEM SETTINGS > COLOR SETTINGS menus. Or, switch the grading control to EXTERNAL, and you can control LUT selection and CDLs directly using a network-connected app like Pomfort LiveGrade. Abel Cine’s Andy Shipsides has a good overview of the process (on the VariCam 35) here.
If LiveGrade is too rich for your blood, the free version of DaVinci Resolve 12.5 can export LUTs in the VariCam’s .vlt format. You can put ‘em on an SD card and load ‘em into the LT that way.
When the VariCam is set up for raw output, the recorded color is locked to V-Log.
When raw output isn’t enabled, you can select gamma-coded recording, using one of five customizable Scene Files based on five basic looks. V-709 maps V-Log into a Rec.709-friendly look, with smoothly S-curved shadows and highlights surrounding a crisp, contrasty midrange. V-Looks—VariCam Looks—similarly grade the image to preserve as much of that 14-stop range as possible. Broadcast looks offer a more conventional approach with a video-style knee to handle highlights instead of a defined (and unchangeable) S-curve compression.
In all of these Scene Files, you have both standard color matrix controls and a 24-pole color corrector.

Matrix adjustments, from the Operating Guide
The matrix lets you adjust the mix of color channels. When you look at a vectorscope, matrix controls generally let you squash, stretch, and skew the pattern symmetrically around the center of the ‘scope. The VariCam’s matrix controls go one step further than most, with separate positive and negative controls for each component mix, so you can for example skew the top half of the vectorscope pattern to the left with the (B-R)_N control without skewing the bottom half to the right at the same time.
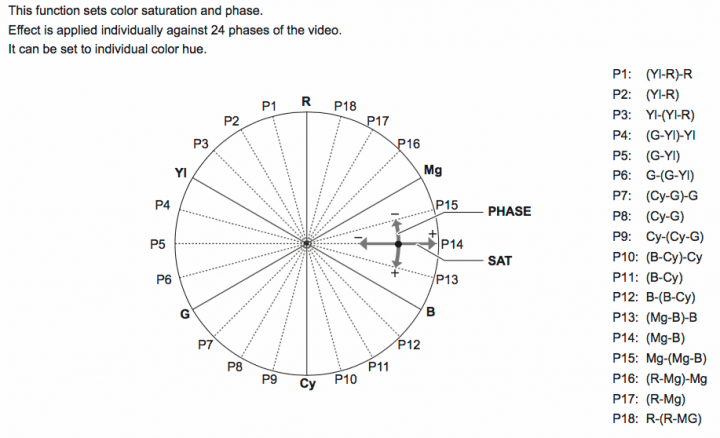
Color Corrector settings, from the Operating Guide
The color corrector’s 24 separate vectors give you more in-camera control over individual colors than I’ve ever seen before.
With these two controls I was able to line up the VariCam LT on a DSC Labs ChromaDuMonde chart pretty much perfectly in only a couple of minutes. I’ve never used a camera that was faster or easier to line up.
Raw Output
The camera can output full-frame raw data in either 10-bit or 12-bit formats. 10-bit can be sent out on a single SDI link, allowing frame rates of up to 30fps, or on dual SDI links at up to 60fps. 12-bit requires a dual-link feed and is limited to the native frame rate of the current system frequency. Raw recording is currently supported on Odyssey 7Q and 7Q+ recorders, and is scheduled for support on the Atomos Shogun Inferno In December 2016. The raw files are decodable today in Resolve 12.5, and either now or coming soon in a variety of other apps as detailed in this press release.
I used a Convergent Design Odyssey 7Q+ with the raw-recording license to capture the feed.

Odyssey 7Q+ mounted on rear 15mm rod

A small articulating arm made it easy to reposition the recorder
The 7Q+ records the signal as DNG (digital negative) files, one file per frame, using one or both SSD slots depending on bit depth and frame rate; it also captures embedded audio to a .WAV file, one file per clip (each clip has its own subdirectory in which all associated files are recorded). The 7Q+ can be triggered by the camera so that recording commences in sync with internal recordings.
Convergent Design has an exceedingly useful document, VariCam LT and Odyssey Setup: Quick Notes, that covers the quirks and peculiarities of the raw interface between the LT and the 7Q+, particularly the distinction between single- and dual-link SDI and how that affects both recording options and onscreen status display. It is required reading before shooting raw with this combo—it’s not that there’s anything too odd about the setup, but you need to understand how the pieces fit together so you won’t be puzzled by them.
Raw files aren’t small: a 10-bit frame consumes 10.4 MB while a 12-bit frame is 12.5 MB. A 256 GB SSD holds about 10 minutes of 10-bit raw or 8 minutes of 12-bit.
Operation
The camera takes 16–17 seconds to fully start up and respond to controls, though it starts making pictures within 5 seconds so you can at least start aiming, framing, and focusing. When you turn power off, the camera waits 3 seconds before shutting down—yes, you have some time to change your mind, and turn it back on again with no interruption in operations.
Unfortunately, changing MAIN CODEC, MAIN PIXEL, or SDI RAW (or system frequency) forces you to reboot the camera. If you want to switch the main codec from one of the normal AVC-Intra settings to AVC-Intra LT for high frame rates, you’ll need to reboot. If you switch from full-sensor 1080p to crop-mode 1080p, you’ll need to reboot. Each reboot takes 20 seconds: 3 to turn off, 17 to turn on. It’s not as bad as a RED ONE (90 second boot time), but even so, it gets a bit tedious (tip: stay in the menus and change as many things as you need before rebooting; it saves time).
The EVF has an eye sensor that turns the EVF off whenever your eye isn’t pressed to it; if this annoys you, you can set it to turn off after 1 or 5 minutes, instead. The eyepiece is large, has a considerable range of diopter adjustment (with a pushbutton lock so it won’t change by itself), and its optical zoom lets you zoom out to see the entire image at a glance or zoom in for a more close-up, large-screen viewfinding experience.
The camera’s sensor has lookaround capability (Panasonic calls it “surround view”) so you can see outside the edges of the active picture and keep watch for nearly-in-frame intrusions, just like a film camera… almost. By default, the lookaround shows you space above and to the sides, but not below the frame. You can switch the active picture area to use the upper part of the sensor instead, giving you below-frame lookaround, but Panasonic rightly warns that zooms will not track properly.
The EVF feed can be routed to SDI 2 (if you’re not outputting raw, that is), and both SDI 1 and SDI 2 can be individually set to show camera data, markers, etc. or to be clean feeds. The EVF feed is already an HD signal on SDI, so it’s trivial to plug it into any other SDI display for remote monitoring. I often fed the EVF signal to a PIX-E5 during tripod work while recording raw on an Odyssey 7Q+.
A 1.33x anamorphic adapter on the VariCam LT
Anamorphic desqueeze is available in the EVF and on the SDI outputs, in either 1.33x or 2.0x squeeze ratios, though 1.5x is not supported (in all fairness, not many folks in the LT’s target market will be using 1.5x anamorphic adapters). The desqueezed image can be displayed full-width, or cropped to 2.39:1 (since the camera uses the full 17×9 image area for anamorphic, even a 1.33x desqueeze needs slight edge cropping for a 2.39:1 output).
For the most part, camera operation and configuration are logical and straightforward, once you understand the primacy of MAIN CODEC, MAIN PIXEL, and SDI RAW settings. Once you’ve set those up the camera offers few surprises, though some secondary settings, like lookaround and anamorphic desqueeze, are mutually exclusive.
Audio control, however, is a bit of a hack. While the camera records four channels of audio and has a full complement of audio configuration and adjustment settings in the menu system, it has no dedicated physical controls for audio. In the initial firmware the only way to tweak levels was through the menus; the camera was clearly designed with the idea that a sound recordist would be feeding pre-leveled audio to the LT, It’s perfectly fine in that workflow, but for a single-person crew it’s far from ideal.
The current firmware lets you assign DIRECT VOL CTL to a user button; pressing it toggles the body and grip dials to adjust audio level instead of iris. When in volume control mode, a multisegment 2-channel level meter appears in the viewfinder. However, if you enable full-time display of the level meters (they’re off by default), there’s no visual indication of which mode the dial is in: you simply have to turn it and see what changes. More than once I considered slinging a sound bag ‘round my neck just so I’d have the responsive realtime control my Sound Devices 302 mixer affords, and not worry about what mode my control dials were set to.
The camera starts recording instantly when REC is pressed, but when you press REC again, the camera keeps rolling for about a second before it actually stops. I have lots of handheld clips that end with a sudden rolling downward tilt, as I pulled the camera off my shoulder immediately after pressing REC to stop recording.
 The camera balances very nicely on the shoulder; its mass keeps it well planted, and I never felt the handgrip was too far to the side, unlike my experience with the much lighter Sony FS7.
The EVF is small enough that it’s easy to look around and maintain situational awareness.
 One benefit of the active EF mount is that EF lenses with optical image stabilization work in stabilized mode. I quite enjoyed running ’round with the 70-200mm handheld.
I only encountered one annoyance in handheld work—this’ll show you what a petty, sniveling whiner I am—and that’s the sculpted side of the camera, with its slightly protruding media door.
That upper corner had a tendency to dig into my ear, or hook the eyepiece of my glasses, when I was positioning the camera on my shoulder. I am such a delicate flower, aren’t I? Pathetic, I know.
Performance
Resolution and Aliasing
A confession: I shot most of my tests at ISO 5000, just because I could. But that makes sample stills look noisier than normal, so I re-shot one resolution test at ISO 800, so you can compare them.
All images were shot in V-Log, bypassing the camera’s sharpening. Resolve was used to decode the raw DNG files, and aside from setting the raw decoder to use camera metadata for color space and gamma, no changes were made to the default settings. When a codec could be used in both 4K and UHD, or in 2K and HD, I saw no difference in resolution or quality between the “cinematic” width and the “television” width. Unlike certain other Panasonics, the LT doesn’t use a bewildering variety of rescalings and resamplings; 4K and UHD are pixel-for-pixel captures from the sensor; 2K / HD full-frame are 2x downsamples, and 2K / HD crop-mode images are again pixel-for-pixel captures.
2160p (4K and UHD)

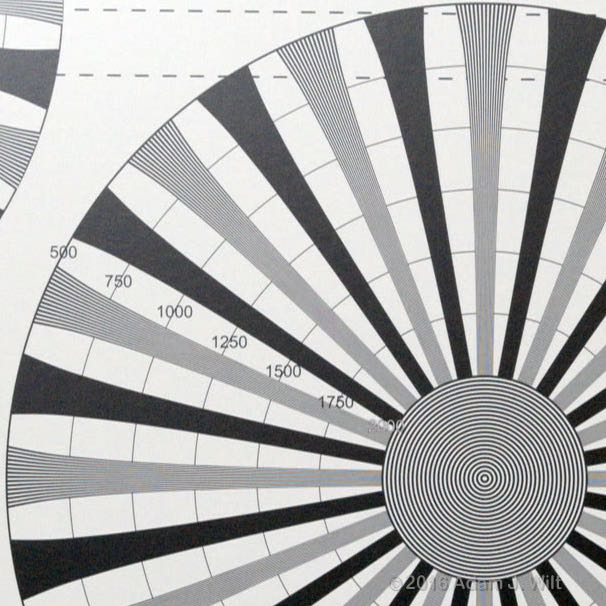
2160p, AVC-Intra, ISO 800

2160p, AVC-Intra, ISO 5000

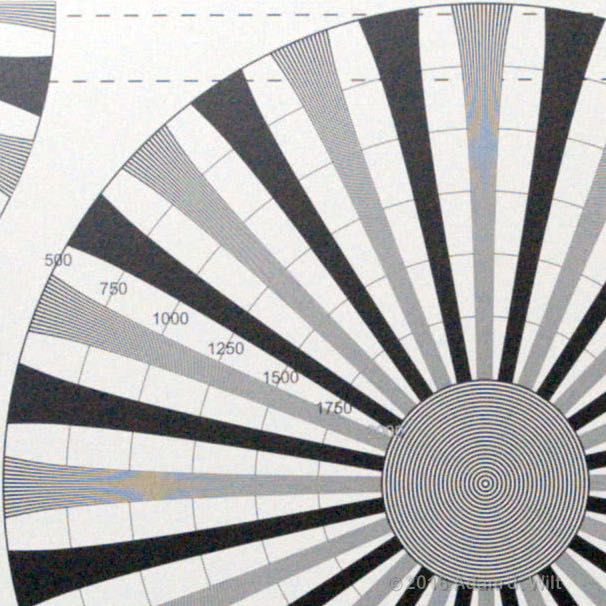
2160p, AVC-Intra LT, ISO 5000 (high frame rates only)

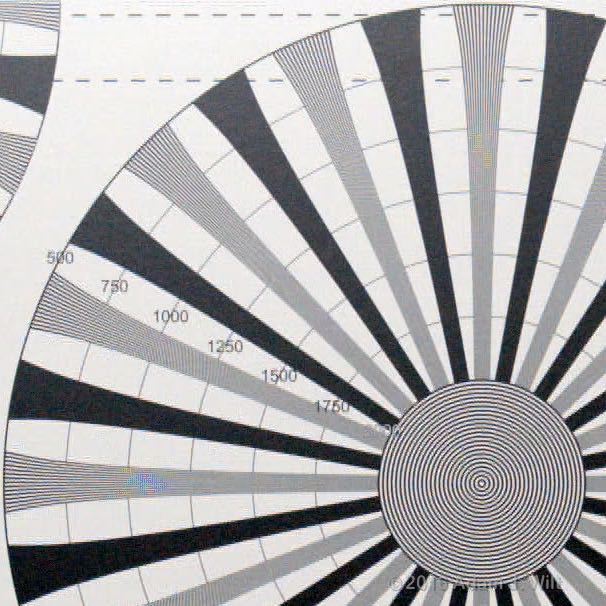
2160p, raw, ISO 5000
There are three variants of 4K/UHD capture: normal AVC-Intra 422 recording, high-speed AVC-Intra LT recording, and raw recording using an Odyssey 7Q+. The AVC-Intra files were played back in both FCPX or Resolve 12.5 with essentially identical results; the raw files were processed in Resolve.
The rule of thumb is that a Bayer-pattern sensor can yield clean pix to perhaps 80% of the pixel-count value, or around 1728 TVl/ph for a 2160p image. The AVC-Intra 422 files resolve around that much, with diminishing detail thereafter subject to aliasing. There’s also a fair amount of chroma aliasing, perhaps twice as much as I’m used to seeing on comparable clips from other 2160p single-sensor cameras.
AVC-Intra LT is vertically coarser, almost stair-stepped on diagonals. High-speed codecs and high-speed recording often sacrifice image-rendering finesse in their rush to capture a firehose feed of data, and that seems to be case here.
Interestingly, LT clips show less chroma aliasing.
Raw clips are much crisper, showing detail (aliased or otherwise) right out to the 2000 TVl/ph limit of the chart, with very low chroma aliasing.
Why is AVC-Intra 422 somewhat softer? It may be that Panasonic is pre-filtering the data upstream of the codec to suppress compression artifacts generated by overly-sharp edges. Certainly the AVC-Intra footage is very clean; it took heroic measures enlarging AVC-I images and boosting contrast on them before I saw any noticeable blocking, edge noise, or other compression artifacts on them (AVC-Intra LT, with its reduced bit budget, does show a fair bit of mosquito noise ‘round sharp edges).
In the real world, here’s a pixel-for-pixel, side-by-side comparison of an AVC-Intra clip and its raw equivalent. This is the most dramatic example I could find; neither the softness nor the chroma aliasing are noticeable in most real-world images and it requires a side-by-side test to see them:

AVC-Intra vs. raw (DNG), pixel-for-pixel extract
The raw footage is crisper, if not substantially so. If you look closely, some of the single-pixel-wide branches on the AVC-Intra side show some green/magenta aliasing depending on which row or scanline of the image they fall on. Yes, there’s a pixel-peeping difference, but it’s not a practical showstopper.
I tried to superimpose one image on top of the other to difference them and encountered an interesting alignment issue. It seem that the pictures decoded from the DNGs are offset half a pixel both vertically and horizontally compared to internal recordings. Keep this in mind if you send out internal clips as VFX proxies and then intend to marry the VFX footage precisely with raw footage.
There was no difference in performance between 4K (4096-wide) and UHD (3840-wide) clips. I also saw no difference between 10-bit and 12-bit raw recordings as far as resolution was concerned. Raw output quality was also the same regardless of whether the internal codec was set to AVC-Intra 422 or AVC-Intra LT.
1080p, 2K or HD, full-frame
1080p, AVC-Intra, ISO 5000
As you might expect, full-frame downscaled to 2K or HD resolves out to about 1080 TVl/ph and shows minor aliasing beyond that. 2K/HD full-frame is recordable at all supported frame rates without resorting to the LT codec variant: the limit is in getting 8 Megapixels of 4K data off the sensor, not in recording the 2K version of it to P2.
1080P, 2K or HD, crop mode
1080p, crop-mode, AVC-Intra, ISO 5000
1080p, crop mode, AVC-Intra LT (high frame rates), ISO 5000
As crop mode is 1080-line native, we’d expect good data out to around 860 TVl/ph and complete detail extinction at 1080 TVl/ph, and that’s pretty much what we see. Again, the LT codec has a coarser rendering and more compression artifacts.
Rolling Shutter
I measured rolling shutter at around 1/61 to 1/69 second in all full-frame modes, be they 4K, UHD, 2K, or HD recording.
In crop mode, when using the AVC-Intra 422 codec, rolling shutter is around 1/128 to 1/134 sec. This is pretty much what one would expect; the time it takes to read out the sensor is normally proportional to the number of columns being read.
But when I shot crop-mode AVC-Intra LT, rolling shutter dropped by another factor of two, to 1/254 – 1/270 sec. Clearly, Panasonic is doing something unusual to read out the sensor in crop-mode LT so as to get that additional speed.
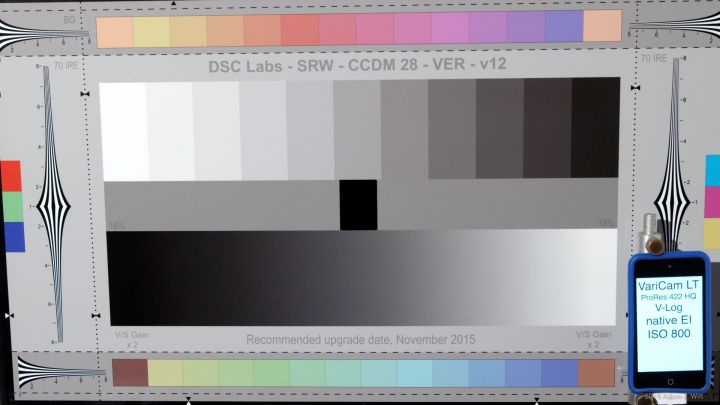
Sensitivity and Noise
The VariCam’s sensor has a dual-ISO design, nicely described in this Panasonic PDF. It’s claimed that “the noise performance of the camera at ISO5000 is very similar to that of ISO800. (Measured SN/R differences are only about 1dB).”
For best results, download the following images (1 Mbyte zipfile) to pixel-peep them; DVInfo’s CMS won’t let you display embedded pix any wider than 720 pixels, while these frame grabs are 1920×1080, and the downsizing makes all the images look equally clean. (There’s also a sample XML file in that zipfile, captured during internal recording, so you can see what information the camera records.)
Here’s a chart shot at native (or base) ISO 800.
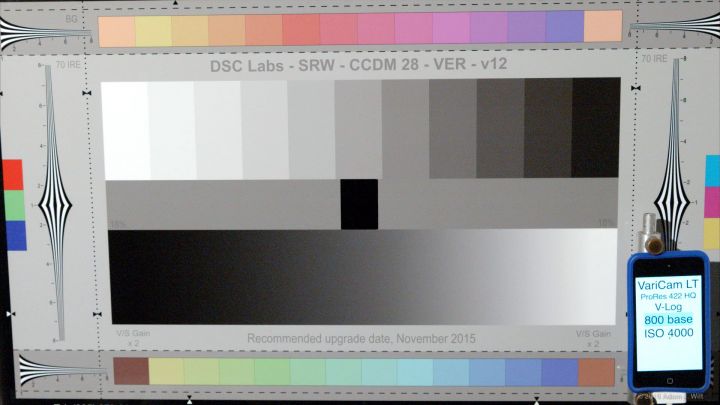
Here’s the same chart captured at base ISO 5000:

To my eyes, ISO 5000 is noticeably noisier than ISO 800 (You’ll. Perhaps a more interesting test is to shoot the chart at the same ISO, but using the two different base settings and varying electronic gain on top of that:

ISO 4000 from a base of ISO 5000 is definitely a stop or two cleaner than ISO 4000 from a base of ISO 800.
Want some real fun? The maximum sensitivity is ISO 12800:
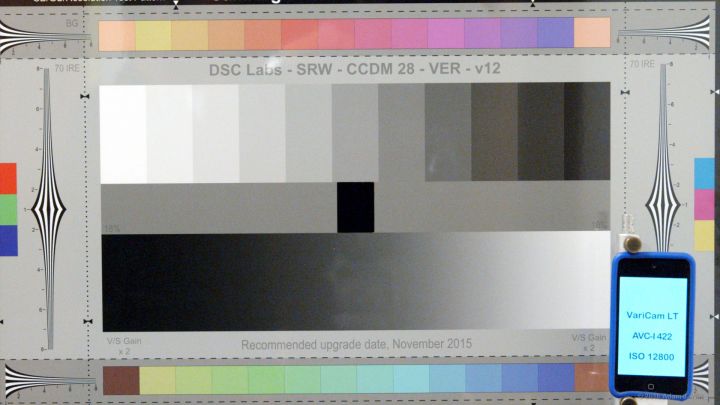
(The chart wasn’t flagged off properly for this shot, so you’ll see some reflections on the chart. Just look at the noise levels, and color quality.)
Generally speaking, I see slightly more noise at the “base ISO” of 800 with the VariCam than I’m used to from comparable Sony or Canon cameras. This is not unexpected; Panasonics are often a tad noisier than the competition. But the ISO 5000 base readout offers a nice reduction in noise at higher gains, and even ramping the sensitivity up to unreasonable levels yields an image with excellent color, detail, and tonal-scale rendering, virtually identical to those found at more sensible ISOs.
Many lesser cameras offer similar high-gain sensitivities, but few keep a consistent color and tonal rendering when they do so. This consistency makes the VariCam LT much more usable at high gains than you might otherwise expect.
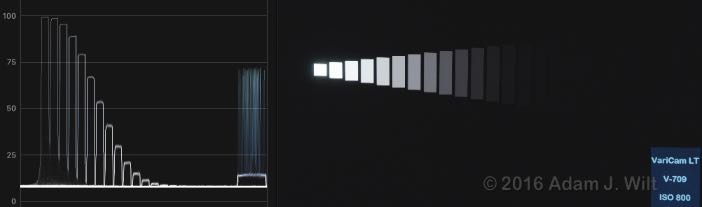
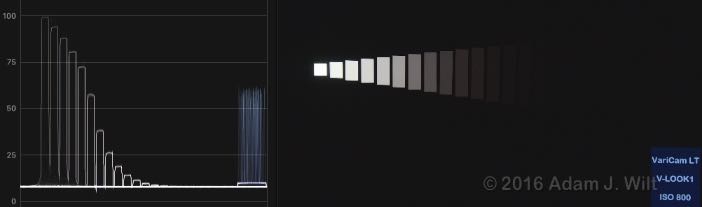
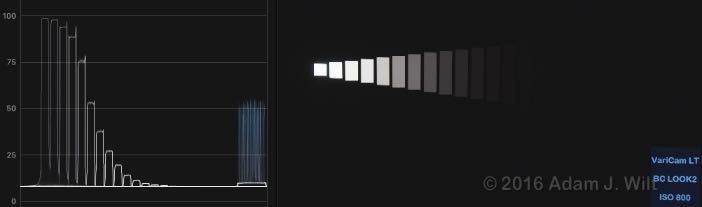
Dynamic Range
The short answer: yup, 14+ stops in V-Log. V-709 keeps that entire range in a more viewer-friendly contrast; the V-Look and BC Look gammas hold onto at least 13 stops, even without pushing stuff ‘round in post (not that you’ll be able to pull detail out of their highlights and shadows nearly as easily as if you captured in log, of course).
For comparison purposes, I shot the DSC Labs Xyla 21 chart, a transmissive target where each bar is half the brightness of its leftmost neighbor, and exposed so the first bar just hit clipping: the bars are one stop apart in brightness. I normalized each clip in post so that the black level was at around 7% and peak white was at 100%. Then, just for fun, I took a GH4 in V-Log L and clipped three bars (since V-Log L is supposed to have 12 stops of range to V-Log’s 14, losing the top two stops), and scaled it to match the LT in V-Log.
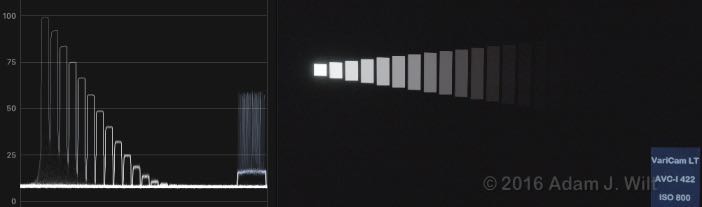
VariCam LT, V-Log

GH4, V-Log L
VariCam LT, V-709
VariCam LT, V-Look1

VariCam LT, V-Look2

VariCam LT, BC Look1
VariCam LT, BC Look2
Color and Tone
The VariCam, as previously mentioned, uses an improved color filter array that purports to offer color discrimination comparable to the filters used in 3-chip cameras, thus yielding more natural, better separated colors with more subtle color differences discernible. And Panasonics, in general, render naturalistic, neutral colors.
Here’s what I got shooting a Cine ChromaDuMonde chart, lit with tungsten, for each of the camera’s default built-in looks (V-Log processed using the V-709 LUT looks just like V-709, not surprisingly):
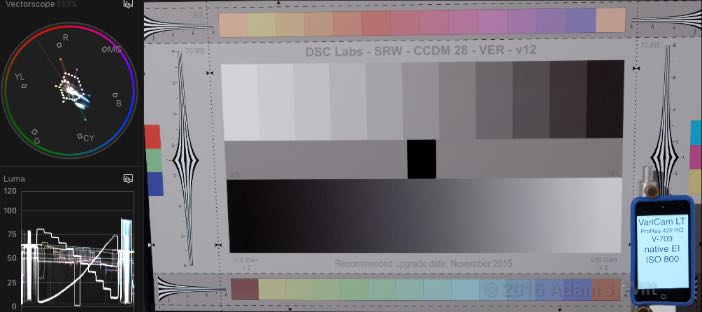
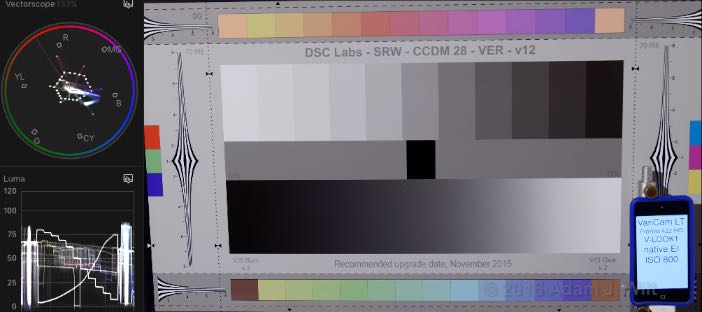
Any of these could be pulled into perfect alignment on the vectorscope with a few minutes of work with the matrix and color correction settings:
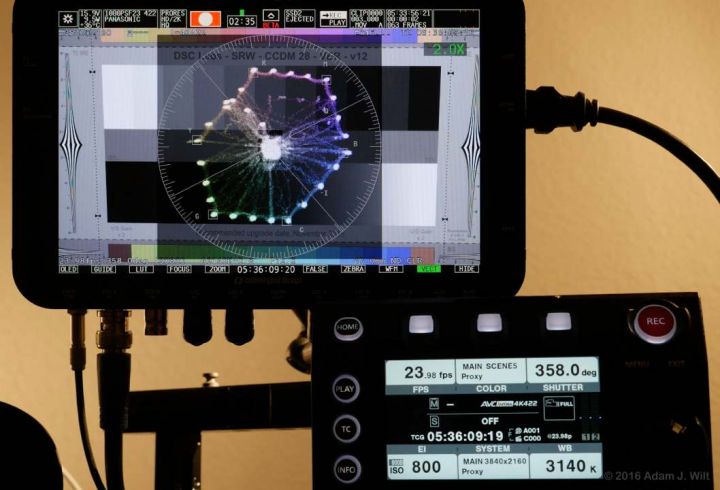
VariCam LT hitting the boxes after only a couple minutes of tweaking. A minute more and it would have been dead-on perfect
Here’s a real-world capture:

What’s the big deal, you say? When I saw this played back, I thought, “that’s exactly what those leaves look like. It’s not a good picture of the leaves, it’s what the leaves look like.” Just for grins, I went out and shot the same leaves the next day with my GH4. I got a very nice picture of the leaves for my trouble, but it’s not as subtle and accurate an image as the VariCam made.
I’ve only had that happen once before. I was shooting some tests with Art Adams at Chater Camera. We had an Arri Alexa shooting a ChromaDuMonde chart and displaying its output on a brand-new Sony OLED monitor. The chart on the monitor looked exactly like the chart on the stand: not a good picture of the chart, but what the chart looked like.
The VariCam, like the Alexa, reproduces what it sees in a neutral and naturalistic and accurate way, without surprises. (I’m not claiming that Panasonic’s color is the same as Arri’s color, just that they seem darned similar in their rendering. I haven’t put the two cameras side-by-side to compare ‘em so I can’t properly say quite how similar they are.)
But don’t take my word for it. Sit down with a nicely calibrated monitor and use your favorite search engine to find VariCam LT videos online. See what you think.
(I should point out that I’m not throwing shade on Canon or Sony colorimetry here. Different cameras offer different “palettes”; if you prefer the way Panasonic renders images, you’ll like the LT rather a lot. If your preference is for Canon or Sony color, the LT may leave you cold. Choices are good, eh?)
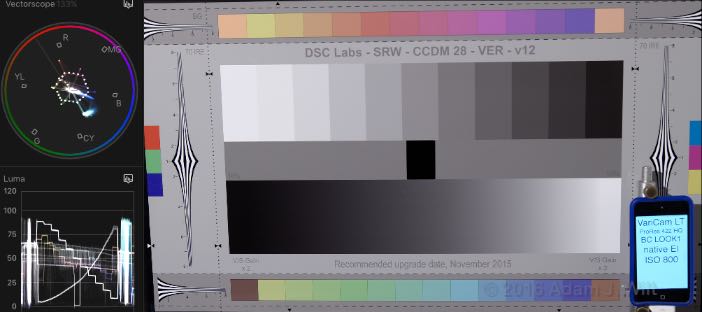
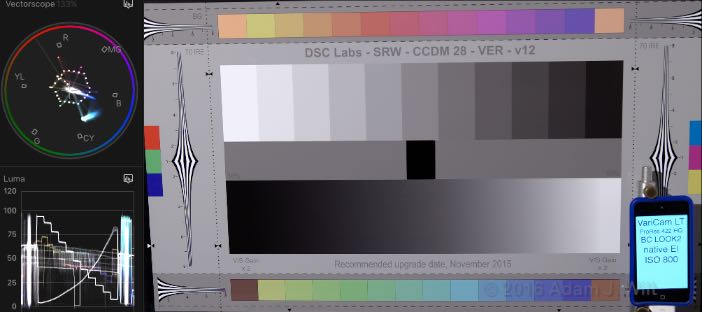
Highlight handling—specifically, the appearance of hue shifts or other color errors as the brightness level heads towards clipping— is superb in V-709 and very nice indeed in V-Looks, which gradually taper or S-curve highlights. The broadcast looks use traditional knees, and show a more typical, video-like shift towards secondary colors as levels head towards clipping, before blowing out to white.
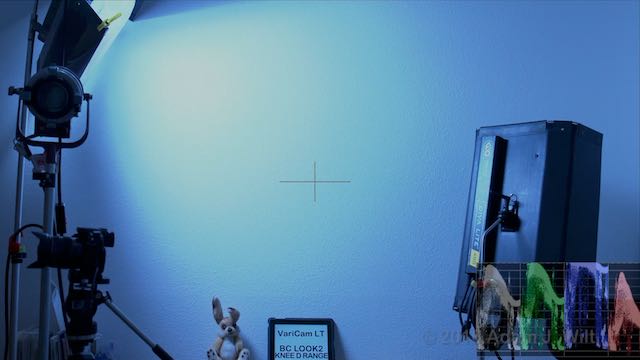
In the following pix (which, depending on your preferences, are either highlight-color-shift test images, or contenders in a gratuitously-ugly-scene contest), the white balance is set to 3200 K, while the Diva-Lite is using 5500 K tubes, so all the light in the scene is blueish. These are crops from the EVF feed recorded externally, then graded so that the peak brightness in each shot is below 100%, so there won’t any added clipping in the JPEG output and onscreen display. See what happens to color in the hotspot as the pool of light on the wall changes…
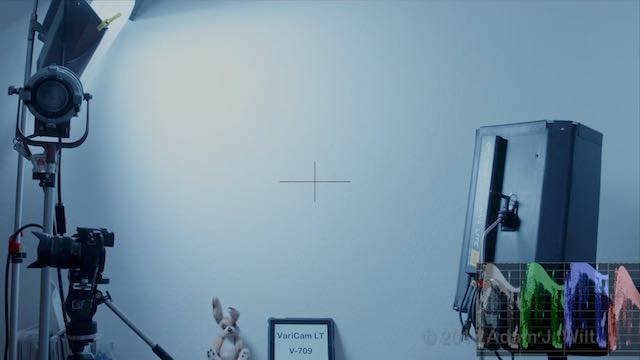
V-709
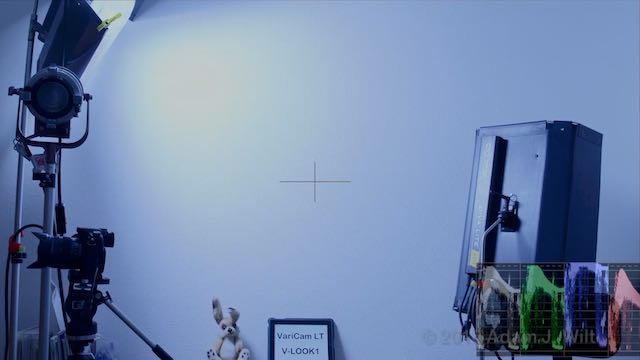
V-Look1
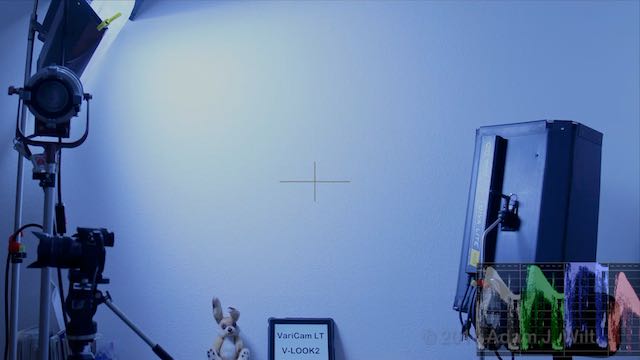
V-Look2
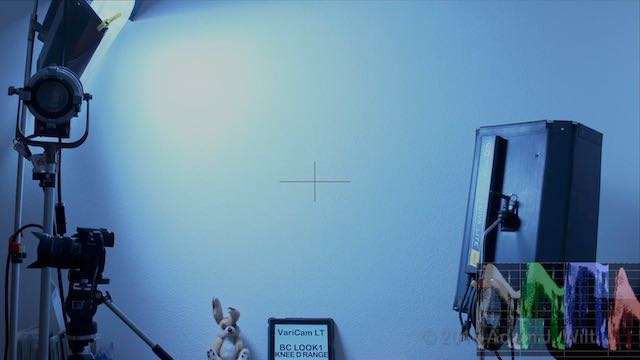
BC Look1
BC Look2
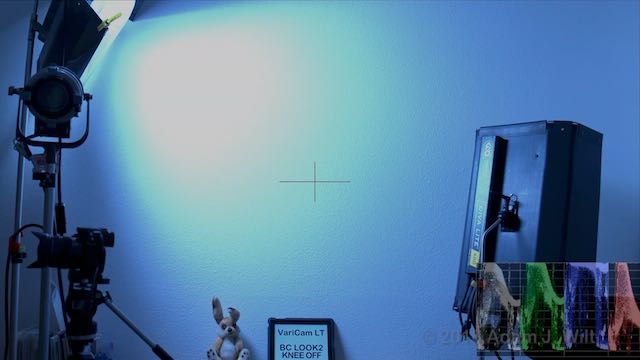
BC Look2, with knee disabled. Harsh!
Conclusion
The VariCam LT offers a subtle, sophisticated color palette, 14+ stops of dynamic range, and excellent low-light capability in a variable-frame-rate 4K camera at a midrange price. It comes standard with a positive locking EF mount with full electronic control and has an optional, user-changeable PL mount with both LDS and /i data pins. It has a cine-style control panel on a 3-foot cable, so you can configure and operate the camera from either side or even a short distance away. It captures 10-bit AVC-Intra internally and outputs raw 10- or 12-bit 4K/UHD frames at up to 60fps for external recording. 12-bit, 4:4:4 codecs are available for internal HD recordings, too. It can be had with an excellent zoomable EVF, and a shoulder mount with articulated handgrip—or use any other shoulder mount and/or SDI-capable EVF of your choice.
It’s not perfect: live audio control is limited, and the 20-second reboot cycle gets tiresome.
Internal recordings show somewhat higher color aliasing on fine details, and slightly softer images, than a comparable Sony or Canon (probably as a result of prefiltering to reduce compression artifacts), though both characteristics can be avoided by recording raw externally.
Is there a place for the LT in the crowded market for Super35mm cine-style cameras? I’d suggest that if you like the way an Alexa renders a scene, but need 4K and/or can’t handle the cost of an Alexa, the LT is definitely worth a look.
Pros
- Super35mm 4K/UHD sensor with 14+ stops dynamic range.
- Naturalistic, predictable color with excellent hue discrimination.
- VFR: 1–60fps with full-frame images, 1–240fps in crop mode.
- One-shot and interval recording; pre-record.
- Positive-locking EF mount with PL mount option.
- Great low-light performance.
- 10-bit 4:2:2 internal recording with 12-bit 4:4:4 options in HD.
- 10- and 12-bit raw output.
- Onboard cine-style LUTs and editable CDLs—no LUT box needed for on-set grading.
- V-709 and V-Look cine-like looks, plus broadcast looks.
- Video-style scene files with full matrix and 24-pole color correction.
- Six-button cine-style control panel.
- Multiple exposure and focusing aids.
- EVF lookaround.
- Anamorphic desqueeze.
- Very flexible and usable handheld rig.
- Crisp, compact EVF with nearly 2x optical zoom.
- EVF feed is SDI, so you can use any third-party EVF.
Cons
- On-board sensor deBayering shows chroma aliasing on fine detail.
- Internal recordings are slightly soft.
- Poor realtime audio level control.
Cautions
- Rebooting takes about 20 seconds.
- There aren’t many accessory mounting points on the body.
- No 4K monitoring output (aside from the raw feed).
Recommended Accessory
- Raw recorder: Convergent Design Odyssey7Q or 7Q+ monitor/recorder with raw option (if you prefer Atomos, raw support in the Shogun Inferno is scheduled for December 2016).
Takeaway
Color and tone reminiscent of an Arri Alexa, for around half the purchase or rental price. Plus, it’ll shoot 4K.
Disclosure: Panasonic sent me a complete VariCam LT package for review, including an Anton-Bauer battery and charger and a Canon 24-70mm EF zoom. Unfortunately, they wanted it all back, so I had to return it (actually, I sent it on to the next reviewer). I have the Odyssey7Q+ on loan from Convergent Design, and I helped beta-test its VariCam raw recording update. I own the other lenses I used during testing. I purchased some of the DSC Labs charts; others were sent to me for testing and review; the Xyla is on loan from DSC. Nobody influenced me to write a favorable review nor was any compensation or other consideration provided. I am a beta-tester for Convergent Design and a sometime consultant to DSC Labs; beyond that there is no material connection between me and any of the manufacturers mentioned.