
Codex Onboard S Plus
The $10,500 Onboard S Plus is Codex’s latest standalone uncompressed recorder. It’s a bit bigger than the Gemini, being a 140 x 188 x 83mm (5.5 x 7.4 x 3.3 inches) oblong box weighing 1.1 kg or 2.4 pounds. A Codex capture drive slots into the top of the unit beneath a flip-up door (which also serves as mount/dismount switch, so you’re unlikely to be able to yank the drive out in the middle of a write operation before the recorder has a chance to unmount it first).
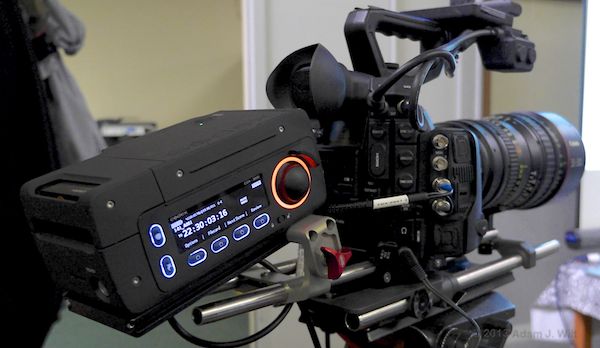
Codex Onboard S on a C500 at Videofax SF
Codex Onboard S on a C500 at Videofax SF
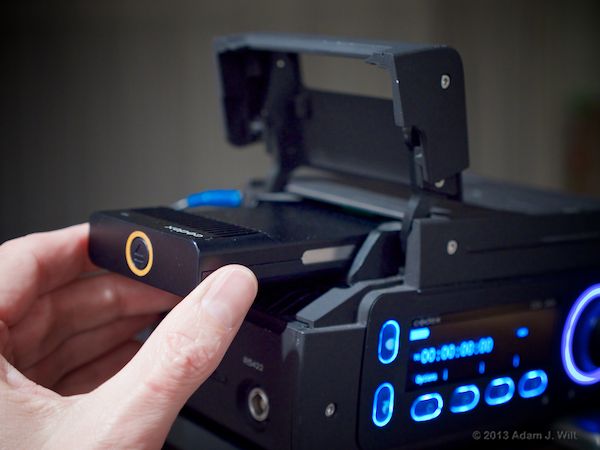
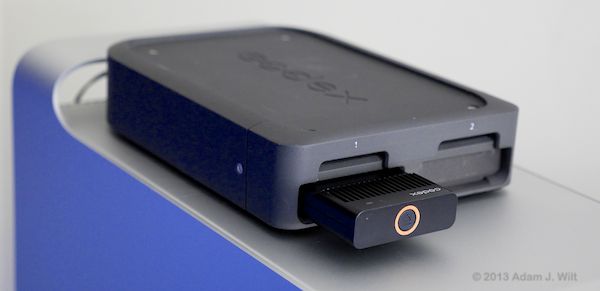
Removing the Capture Drive.
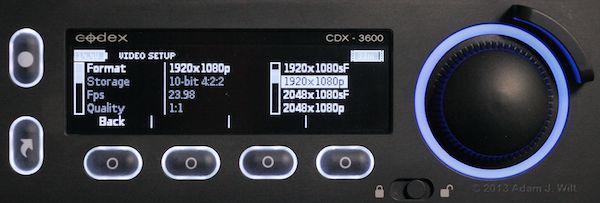
One side is filled by a configuration display, several backlit softkeys, and Codex’s trademark multicolor status ring surrounding a jog dial.
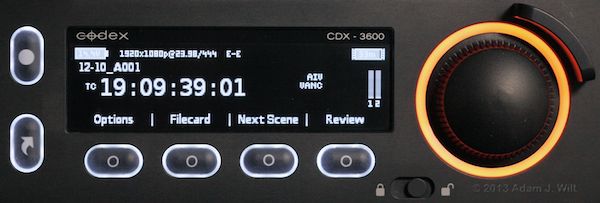
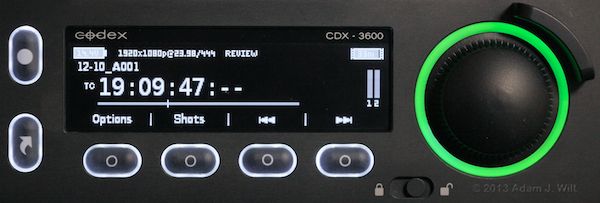
The upper left button is a record-start trigger (you’re never more than a single button press away from being in record mode). Below that, the arrow button opens menus, while the four buttons under the display are softkeys, with their functions appearing as needed in the display window above them. A lock switch locks out the side panel to prevent unwanted inputs. The jogwheel scrolls through menus and settings; you press it in to select a setting. The ring around it glows orange when the recorder is ready, red during recording, green during playback, and blue in the menus.

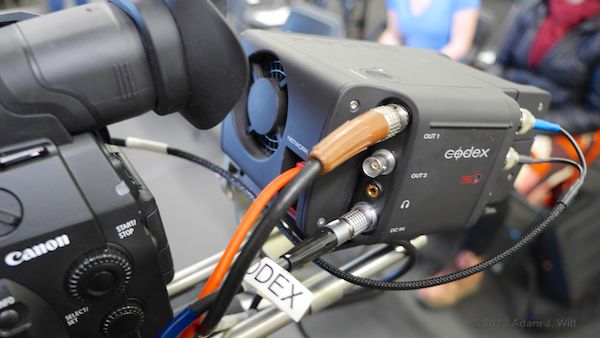
The opposite side of the recorder has dual 3G-SDI input BNCs as well as dual SDI monitoring outputs. There’s a large-diameter fan at one end of the unit; it’s so quiet that I never heard it running. That end also has a quick-release lever to pop the Onboard S off its mounting plate, and, in the notch behind the lever, a Gigabit Ethernet port.
The Codex’s body has a grippy rubberized coating, making it easy to hang onto. The recorder came with a Vocas quick-release adapter for 15mm rods: the recorder pops on and off the adapter with the press of a lever on the Onboard S, while the adapter releases from the rails with its own flip-down lock. Quick and simple, yet secure.
The Onboard S lacks a built-in picture display and any provisions for onboard power. If you don’t have an offboard monitor, you can at least view thumbnails over Ethernet (more on this later). As far as power goes, the Codex draws about 30 watts, at anything from 12 to 34 volts, and it has programmable warning and shutdown levels, automatic startup when power is applied, and multicolor voltage-level LED monitoring.
The Codex takes about 30 seconds to boot up and 20 seconds to power down. Capture drives mount and unmount in two seconds or less. Clearing the drive of existing clips is fast: simply delete the “roll” the clips are stored on, and create a new one; the entire process takes under ten seconds.
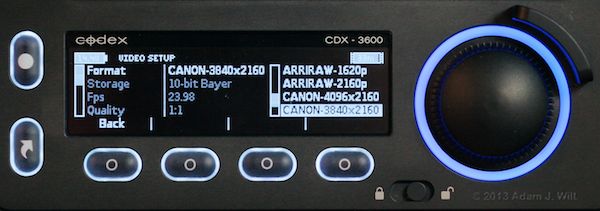
The Codex handles every possible permutation of data the C500 can throw at it, including varispeed, though the Codex demands that you dial in all the specifics on the recorder as well as the camera. If you don’t get it all in sync—bit depth, frame size, frame rate, whether or not you’re in varispeed mode—the display will flash “Input wrong type” at you until you set things right.
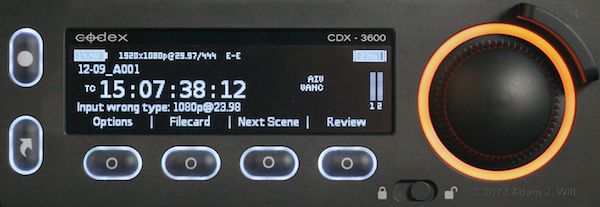
In this example, it’s easy to see what’s wrong: the recorder is set for 1920x1080p@29.97fps, but the input is at 23.98fps. However, if the only difference is bit depth (10 vs. 12 bits), the current format and the “wrong type” format are shown as being the same; this had me scratching my head for a few minutes at one point.
As with the Gemini, 3G-SDI is all that connects Codex to cameras: video, audio, metadata, and control flow across the same cables (single-link is used up through 30fps; above that dual-link is used). As with the Gemini, capturing to the Onboard S is a drama-free experience: press the camera’s trigger, and the S’s status ring changes from standby orange to recording red.
The Codex can be configured and driven through its softkeys, jog dial, and menu display, or via wired Ethernet. Codex’s User Interface software runs on Mac and Windows, and provides a stylish control panel for the recorder. When you connect your computer to the Codex (by default, it’s at 10.82.95.101; set up your machine with a compatible static IP address and netmask and cable it straight into the recorder) it offers an SMB server so you can download the documentation and the control UI program directly from the recorder, in case you hadn’t already done so from the Codex website—very clever!
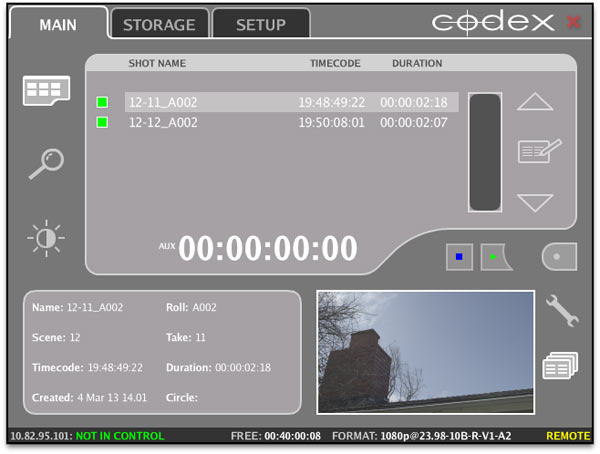
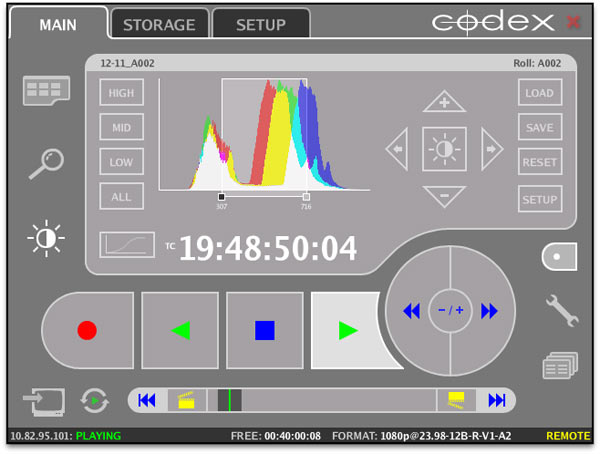
With the UI, you can take command of a recorder and control it completely. You can view clip thumbnails, and even apply viewing LUTs to the monitoring outputs: there’s a quick-and-dirty LUT utility built in so you can display clip highlights, midtones, and shadows in high contrast with the click of a button, as well as letting you fine-tune ranges and curves as you see fit.
The UI offers extensive metadata manipulation, clip renaming, and search capability.
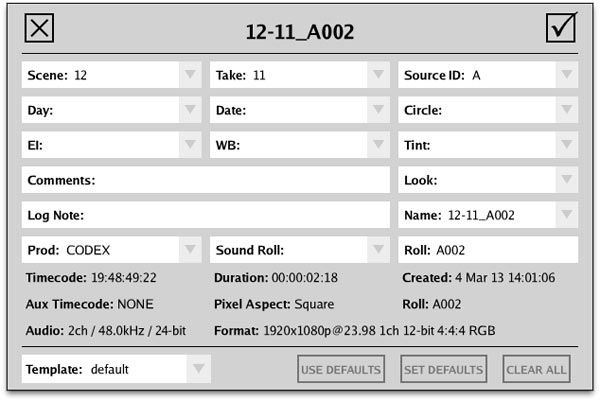
Filenames, both for internal recording and for the VFS (see below), are generated based on user-defined templates; Codex docs tell you how to define ‘em to match the Canon’s internal proxy names, or you can set them up for just about any other possible naming convention imaginable. There’s also the ability to interact with an on-set CDL (Color Decision List) server, so looks can be defined and associated with clips on the fly as production proceeds.
With laptop cabled to the deck, a data wrangler can recline at ease in video village, well out of the way of the camera crew, and he or she can do anything and everything necessary for data and metadata management at a comfortable remove from the front-line turmoil.
It’s worth spending some time with the Codex UI before your first gig with it (another reason to ask for a prep day, grin). The UI doesn’t follow common UI conventions; controls don’t change color or appearance when clicked (though some change when the panel or mode they trigger is active), and grayed-out items aren’t disabled, they’re just gray. The same UI program is used with the recorder and the transfer station, so all the options for both are present onscreen, yet the ones that don’t apply to the current hardware (or the current mode) simply don’t do anything when clicked; there’s no visual indication that they’re not available. However, don’t assume that lack of response means a control is disabled; clicking the “sun” icon on the left side calls up the LUT panel, but it takes several seconds for the panel to appear, during which time the only feedback I had on my MacBook Pro was a spinning-pizza-of-death cursor a second after the click.
In short, much of the interaction language that’s been standardized since, oh, 1984 or so, is simply absent from the Codex UI. Until you get familiar with it, you can spend a lot of time flailing away at its controls. Once you’ve learned to “speak Codex” the UI is rich and functional, and internally consistent, but it’s not exactly user-friendly for newbies. Thus you want that prep day (or at least half an hour during setup) if you haven’t worked with a Codex product previously, so you can learn its peculiarities prior to production pressures and panics.
Codex’s documentation (downloadable at www.codexdigital.com/support/recorders; there’s a bundle of docs, the “Canon Cinema RAW Document Set”, containing all you need to know for using an Onboard S with a C500) is thorough and elegant, but with its body copy set in a small, sans-serif, hairline-thin typeface, it’s not very e-Reader friendly. I had no problems on my 24” 1920×1200 monitor, but found it hard to read on my iPad 3 (Retina display) without a lot of zooming and panning, as the text is just too small and light to be legible. You’ll probably want to peruse it initially on a nice big screen or print it out; scanning through it on a small screen in a desperate search for on-set solutions can be trying.
[Yes, I’m banging on at considerable length about UI design and documentation formatting, because I’m assuming that most readers are going to be day players, not owner/operators. The Codex has a deep and sophisticated set of controls, both on the side panel and in the UI, and anyone using a Codex for the first time faces a bit of a learning curve. UI idiosyncrasies and documentation readability are critical usability factors for newcomers, if less so for experienced operators, so I’m putting a greater emphasis on them than I might otherwise. My message is simply this: the Codex needs some proper study and familiarization time before you ride it into battle, so please take that time up-front: an Onboard S will amply repay you with rich functionality and rock-solid reliability once you understand how to drive it. And, once you know it, you’re good to go on any Codex product, because they all use the same UI and design language.]
While documentation is freely available on Codex’s website, software downloads require you to register. Registration are processed “within 24 hours”, and mine was done in a mere 30 minutes, but even so, it’s not something to leave until you’re on a show and you suddenly need to get a new firmware version. If you don’t already have a Codex registration, sign up the day before your first Codex gig.
A $4000, 480 GB solid-state Capture Drive holds 30 minutes of 24fps 4K Canon raw material. Codex’s $7200 transfer station is a squat slab with two slots for capture drives; it connects to a Mac Pro tower via SAS and USB (an ATTO SAS card is required). You can cram three RAIDed hard drives into that same Mac and host a Codex Virtual File System, or transfer to an offboard SAS RAID.
(While the Codex documentation specifies a Mac Pro, enterprising folks like Abel Cine build mobile transfer stations using MacBook Pros with a Thunderbolt expansion chassis for the SAS card.)
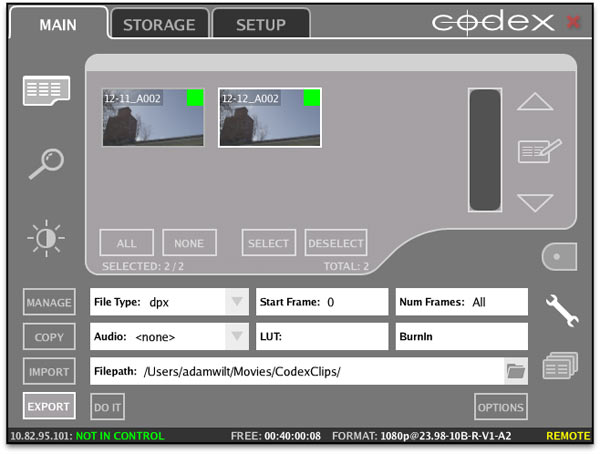
The control software is literally the same front-end program used for remote control of the Onboard S, only with more options enabled by the Transfer Station software: backing up the capture drives to local storage and/or LTO tape; creating virtual file systems to access captured data natively (DPX, ARRIRAW, or Canon raw as appropriate) and as on-the-fly transcodes to ProRes or DNxHD.
The virtual file system (VFS), along with the glowing status ring and the UI design, has long been a feature of Codex products. The VFS capability lets you view and transfer your recorded clips not only in their original formats, but resized, transcoded (e.g., to ProRes, DNxHD, or JPEG) rewrapped (as .AVI, .MOV, .MXF), and processed with LUTs, CDLs, and metadata burn-ins as desired. DPX files can be used as-is or converted to other bit depths (the Canon’s 12-bit DPXes turned out to be too exotic for my NLEs and grading tools, so I simply set up a VFS to present them as 16-bit DPXes, which worked in everything). Multiple VFSes can be set up for the same source clips: you could have one that presents Canon 4K raw files as-is, and another that offers up HD, ProRes422 LT .mov editing proxies at the same time.
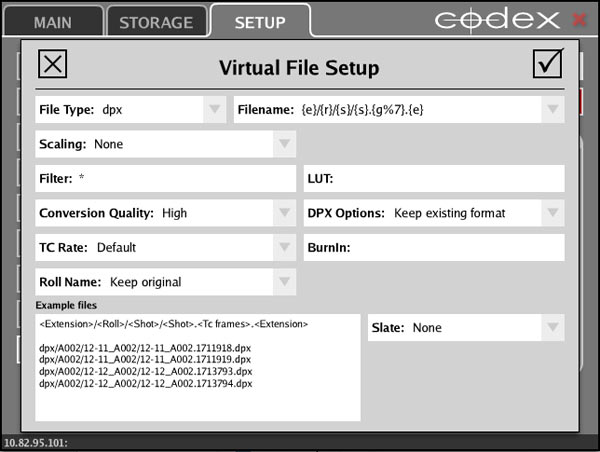
Setting up a VFS for DPX files.
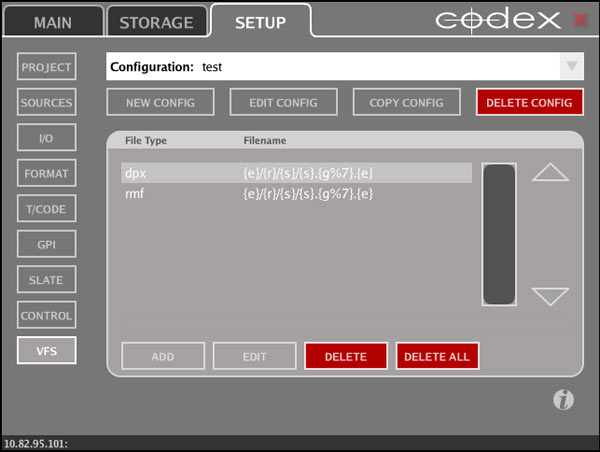
Virtual File Systems defined for DPXes and Canon .rmf files.
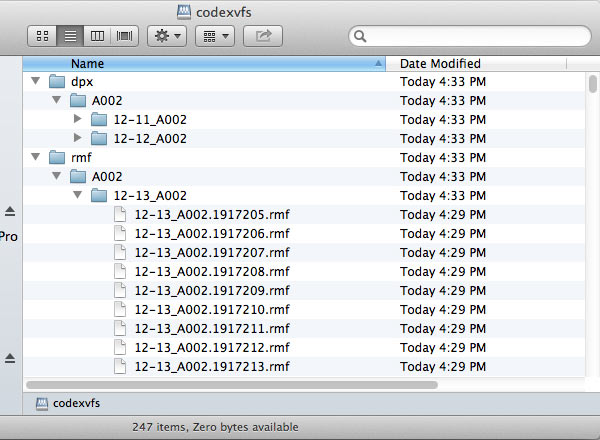
How they appear on the Mac. Note "zero bytes available" since the VFS is read-only.
Transcodes are done entirely on the CPU on an as-needed basis, so you won’t get blazing-fast transfers; Codex quotes 16-20 MB/sec for ProRes or DNxHD transcodes on a high-end Mac Pro. That may not sound speedy, but consider the raw files are being “developed” in the process; you’re saving a separate processing step and getting edit-ready files in one go. If you want to pull off the original DPX (2K) or .rmf (4K) files, they’ll transfer rather a bit quicker (at least in terms of bits per second, if not necessarily in terms of frames per second!). Codex says they’re working on GPU acceleration for faster future file flipping.
Indeed, file-system capability (though not transcoding, as far as I could tell) is present on the recorder itself: you can create a Canon raw VFS on your Ethernet-connected laptop and fetch over individual .rmf files for quick on-set grading. For that matter, you can retrieve entire clips over Ethernet, though at two minutes per Gigabyte (to my 15” MacBook Pro’s SSD, at least), or about thirty times slower than real time, that may not be the most expedient workflow!
Codex also makes a standalone, DC-powered, all-in-one data-wrangling system, the Vault (which runs around $10K – $40K depending on options). The Vault combines various combinations of computer, internal RAID, docking bays for Onboard S capture drives and Onboard M data packs, docking bays for CF cards and SxS cards and SSDs, external SAS connectors, and a couple of LTO drives, all packaged in a road-ready shipping case. Codex says that the Vault will clone Canon .rmf files about 3.9 times faster than real time.
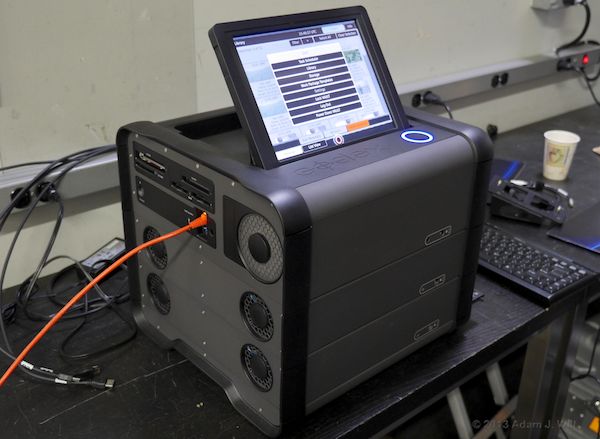
Codex Vault being demoed at Videofax: touchscreen on top; CF/SxS/SSD slots, network, and fans on back.
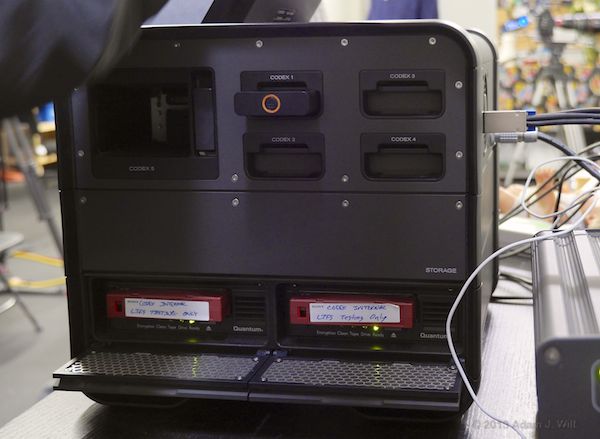
Codex Vault at Videofax: Onboard M and S docks at top, dual LTO drives at bottom, storage in between; SAS and power on the side.