The XL1 Watchdog
|
> top of page < |
Make a Simple Protective EVF Cap
an article by M.W. Herberth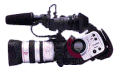
The Watchdog notes: I originally received this article during the summer of '98, when the dreaded EVF Sunburn was a problem. Canon has since resolved this issue by refitting user-returned EVF's with a filter modification. That fix has now been implemented into new XL1 EVF's right on the production line. However, there may be a number of XL1 owners who have the older sunburn-prone EVF's who may find this little project most useful. Indeed, even for those who have had their EVF's repaired with the new filter, Canon reccomends not exposing the LCD screen to sunlight at all. If you have an all-day outdoors shoot and don't feel like having to constantly tip the viewfinder down, then you'll want to build this easy, inexpensive project and save yourself the worry of damaging an expensive LCD display (besides, Canon will fix your EVF for free only once). Read on.
Yeah, the EVF on the XL1 used to burn if exposed to direct sun. An associate fried his while in the middle of back-country China. I have found no caps, covers, etc. that will fit the opening on the EVF, however...
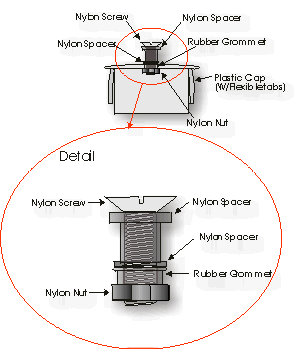
Go to the Hardware store (ACE is the place, in this case). Most have a section of organized bins that contain every fastener, fitting, and doodad imaginable. In this section, you will find: plastic and nylon caps with "expansion clamps", nylon nuts, screws, spacers, etc. Here is what you need:
- 1 - cap with a 1" OD
- 1 - 1/2" nylon screw
- 1 - nylon nut to fit screw
- 2 - nylon spacers (1 to fit through cap, 1 for attachment to cable/string/whatever - the type I used have a flange on one end, which simplifies attaching the retaining cable)
- 1 - rubber grommet (to seal the spacer where it goes through the cap)
Now - carefully drill a hole through the center of the cap. You want this to be just large enough to accept the rubber grommet. Tighter is better in this case. Next, place the grommet in the hole, then place one of the spacers through the grommet, with the flange on the outside of the cap (on top of the grommet). Then, place the other spacer on the screw, with the flange placed next to the head of the screw, place the screw into the cap assembly, and place the nut on the inside of the cap to secure the assembly together.
Finally, attach the cap to your XL1. You can use string and a rubber band, etc., but for a more professional (and durable) mount, visit your friendly neighborhood fireams dealer, and secure the cap and strap arrangement used to mount and retain caps on telescopic sights used with rifles. Vandalize this strap, removing the existing cap, and attach to the cap you just made for the XL1. The other end of this strap will be attached to the EVF housing.
If you did this correctly, you will have a cap that will protect your EVF, and will not get lost or misplaced, nor interfere with your lens while you are shooting.
If you're interested in this, the total cost is minimal; especially when compared to the cost of replacing/repairing the EVF! And, if you do not feel inclined to make this yourself, you can contact me at my email address, and we can probably work something out.
M. W. Herberth
MH InterAsia, Ltd.
P.O. Box 454
Kailua-Kona, Hawaii 96745
Back to the XL1 Articles Menu
Thrown together by Chris Hurd
Please direct questions to the DV Info Net Community Forums.
Where to Buy: These dealers are authorized DV Info Net sponsors... | |||
|
|
|
|
|
|
|
|
Please support this site by making your purchases through them. Thanks! | |||
©1998-2008 DV Info Net
The Digital Video Information Network
San Marcos, Texas
You are as young as you feel.