GL2 Watchdog
|
|
> top of page < |


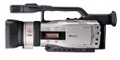
Hands-on Canon GL2 Report, Part Two
by Robin Liss, August 2002This article originally appears at camcorderinfo.com and is reprinted here with their gracious permission.
Manual Control
Where the Canon GL2 excels is in offering the user ultimate control over the picture they are recording. The best evidence of the respect that Canon has for the consumer regarding manual control is with the zoom. The GL2 has a very nice 20x optical zoom with a 100x digital zoom. The 20x optical zoom on the GL2 really beats out the 10x optical on the TRV950. Every camcorder has manual zoom. Of course the GL2 has manual zoom, but you are presented with a multitude of options. There are two zoom controls, one located on the grip and one located on the top handle. I do feel that the grip control is a little small and there isnt much movement making slow variable speed zooms a little hard. However, within the menu you have the option of setting the speed of the zoom, variable, slow, medium or fast. As I mentioned earlier, you can even set the speeds of the top handle and the right side grip zooms independently! So if you really wanted precision, you could set one to really fast or really slow and the other to variable zoom. I think this would make shooting in live situations, where you almost always want to use a zoom, or shooting on fast on the go situations where you want to pop in and out very helpful.Manual focus is controlled by a ring around the lens. The focus ring gives a fair about of tension making accurate focusing really easy. If you hold the camcorder like I prefer to when I dont have a tripod by putting my right hand in the grip and cradling the lens with my left hand, your left hand falls right on the focus ring, with your thumb conveniently falling right on the automatic / manual focus toggle button. I am able to move my left hand thumb to the exposure dial to adjust the aperture, shutter speed and white balance.
Where the GL2 really excels in manual control is with the aperture control and shutter speed control. When you are in automatic shooting mode, you can use the exposure wheel to manually compensate the overall exposure (a combination of aperture and shutter speed) by setting the exposure lock. You can set the exposure lock from -11 to +5 with 15 steps in between.
To get full control over the shutter speed and aperture you switch the camcorder over to full manual control. You press in the exposure wheel to toggle through shutter speed, aperture and manual gain. The on-screen display shows the values of the four picture elements. The first in the list is shutter speed. The Canon can go from as low 1/8th of a second to 1/15,000 of a second with 29 steps of shutter speed control. The slower 1/8th of a second, 1/15th of a second and 1/30th of a second shutter speeds are new to the GL2.
Canon also added a really great new shutter speed control named clear scan. After you get to the 1/15,000 of a second shutter speed value, the next option is the clear scan shutter speed control. This shutter speed option is designed for adjusting the shutter speed based on the scan frequency of a television or a computer monitor. If youve ever filmed a computer monitor you might have noticed black lines scrolling horizontally on the screen. This is because the shutter speed of the camcorder is out of sync with that of the monitor. You adjust the clear scan screen shutter speed by going into the menu and selecting camera setup. The clear scan shutter speed is set based on Hertz (Hz) from 60.5 Hz to 201.5 Hz with an amazing 120 steps in-between. This is a really great feature. I think its a broader example of Canon including features that really add to the camcorder but dont cost them anything to put in there, it really shows a respect for the consumer.
Pressing the exposure dial in once more switched control down to the aperture. You can set the aperture, or depth of field from F1.6 to F8 with 19 steps. The camcorder tells you the exact number of F stops on the on screen display. The inclusion of the numerical values is very helpful for the professional videographer. Although Sony gives you control over the manual exposure on the DCR-TRV950, they do not display the number of F Stops.
Pressing the exposure dial in one more time toggles the camcorder to manual gain adjustment. You can set the manual gain at 0 dB, +6 dB, +12dB or +18dB. Again you move through the options using the exposure wheel. I really like the added +18dB which helps in low light situations.
With white balance you have three standard options. Indoor, outdoor or complete manual. Two buttons control the white balance, The select button toggles between the three options. When you are in the full manual options, a button to the right of the select button sets the actual white balance.
You also have the ability to turn the neutral density filter on and off. No such feature is provided on the Sony DCR-TRV950. The ND filter is great for shooting bright scenes. Overall manual control is one of the areas where the GL2 really excels.
A feature I really love on the GL2 is the custom preset. Using this feature you can adjust the overall color gain, color phase, color sharpness and color setup level (brightness). Using the custom preset button on the side of the camcorder you can toggle the adjustments on or off. The custom preset options are really great for tweaking your video image even more, above the basic manual controls that the camcorder offers. Its a really helpful feature.
Frame Movie Mode
The GL2 has frame movie mode which allows it to shoot 30 frames per second, like progressive scan video. The video is nice to get that movie look, but if you're really looking for a high quality movie look, get Panasonic's new 24 frame progressive MiniDV camcorder.Optical Image Stabilization
The GL2 includes an optical image stabilizer. When electronic image stabilizers came out, I always choose camcorders with optical image stabilizers over digital because digital image stabilizers often degrade picture quality. However, now the CCDs have higher resolutions than the actual camcorders output quality, the amount an electronic image stabilizer degrades the video picture is negligible. So is the optical image stabilizer better? I hesitantly say yes. It is very hard to evaluate image stabilization because the differences are so subtle, however I do feel that the optical image stabilization is much smoother. It seems you dont get picture stalls (where you move the camcorder and the picture doesnt move with you for a half or quarter second) with the optical image stabilization. Whether or not the video quality is better? In theory it is, however I cant tell a noticeable difference in the degradation between electronic and optical image stabilization.Shooting Modes
The GL2 has a multitude of shooting modes. The first mode which I really like is Easy Recording. In this mode, the camcorder takes control of everything. The camcorders has Tv mode, where you have control over most features other than gain and aperture, Av mode where instead of control over shutter speed you have control over aperture. Of course, my favorite mode is full manual, where you have total control over everything, except you cant set the exposure lock. Of course, in this mode you can set the shutter speed and aperture so not being able to control the exposure lock doesnt matter. The last two modes are Sand and Snow and Spotlight. The first is self explanatory, but the Spotlight feature is great for shooting areas where there is strong contrast in light, specifically in an auditorium on a stage.Handling
The one major thing that I feel is better with the Sony DCR-TRV950 over the Canon GL2 is general handling and control. The GL2 is certainly heavier and larger than the TRV950, which I really like. The extra mass is not too much that youll get tired holding it with two hands, but it has enough weight so that you can shoot in a stable manner. Button location is pretty good on the GL2. I felt that I could adjust the picture settings in full manual and record to tape at the same time while maintaining a steady shot.Still Performance
The major upgrade of the GL2 over the GL1 is the addition of an SD slot of saving digital stills to. The Gl2 utilizes pixel shifting to achieve 1.7 Mega Pixel 1488 x 1128 resolution stills with the three 410K pixel CCDs. The GL2 only has satisfactory still performance. The stills are okay looking but I do believe that for overall quality, the TRV950 produces better pictures. The camcorder does not include a pop-up flash like the DCR-TRV950, although one is available as an addition accessory. Something I thought was quite annoying was that the GL2 can not save digital stills to the SD card while you are in the tape recording mode. In order to save digital stills you must switch from tape mode to card mode. It seems that when you are in card mode it takes the camcorder an extremely long time to save the digital stills to the SD card, this possibly could be explained by the fact that the Canon GL2 has to use pixel shifting, and therefore do more processing to the images before they are saved to SD cards. The GL2 includes a USB port and includes a USB cable and software to hook your camcorder up to your computer.Low Light
I would rate the GL2s low light performance as excellent. When you throw the camcorder in to full manual, open up the iris, bring the shutter speed to 1/60th and turn the gain up to +18 dB you can get a satisfactory picture in a fairly low light setting, one that certainly beats the TRV950. The better still performance is most likely explained by the slightly larger CCDs on the GL2 which are able to bring in more light per pixel than the TRV950. I really didnt notice any grain until I kicked the gain up to +18 dB, and then it was only minor, certainly at an acceptable level. At +18 dB the grain on the GL2 is greater than what it is at +12 dB on the TRV950, but I feel that when they are both at the same dB level, the GL2 has less grain. Where the GL2 really jumps ahead of the competition in low light performance is with the aide of the custom preset. By maxing out the color gain and just slightly increasing the brightness, you can get a really visible low light picture. Now the GL2 doesnt beat out the VX2000 in low light, but it does beat out the TRV950 in my opinion.Back to Part One of Robin's review.
Read Part Three of Robin's review.
Back to the Canon GL2 User Reports Menu.
This review orginally appears at
camcorderinfo.com/content/canon_gl2_camcorder_review.htm.
Written by Robin Liss.
Thrown together by Chris Hurd.
Please direct questions to the DV Info Net Community Forums.
Where to Buy: These dealers are authorized DV Info Net sponsors... | |||
|
|
|
|
|
|
|
|
Please support this site by making your purchases through them. Thanks! | |||
©1998-2008 DV Info Net
The Digital Video Information Network
San Marcos, Texas
If you can't say something nice, don't say anything at all.