
|
|
|
|
|
|
|||||||||
|
|
Thread Tools | Search this Thread |
|
|
#1 |
|
Regular Crew
Join Date: Apr 2009
Location: OK
Posts: 62
|
HM100 with Redrock Micro M2e 35mm Adapter
I couple days ago I got the Redrock Micro M2e or M2 Encore 35mm adapter for the HM100. This was always my plan for the HM100 and because of the small size and high quality image I was pretty sure it would be a great camera for such a set up.
I have spent a few days with it trying out different lenses and really love the images that come out of it. The small size of the camera and the ability to turn off the focus controls so you can't bump it out of focus work out really well. The screen and viewfinder both work well to focus the lens and the focus assist does work. For trickier shots I will zoom the HM100 in a little and focus and then back my zoom out to the maximum just like if I didn't have an adapter on the camera. Light loss is low and the aperture and shutter speed setting were similar to what they would be without the adapter, maybe the same. Only having 1 pretty mild ND setting is limitation but that is what the matte box is for. In the bright sunlight today with the ND filter on, the camera at 0 dB, 1/100 and f4.5 it was almost too bright while having the lens at 1.4. I will have my first real shoot this weekend but here is a test HM100 M2e Video test that I shot while setting it up. You can see the huge difference in the lens quality and depth of field. The first half is me focusing on my face and the second half is a circular pan of the trees above me. The closest leaves are about 10 inches from the lens and the farthest away is around 30 feet. My face is around 1 foot away from the lens. Both these shots were done with a Voigtlander 58mm f1.4 lens. The video was 1080/24p, standard gamma -2, cinema subdued color. In Final Cut I brought down the highlights a little bit and increased the saturation. Here are a couple images 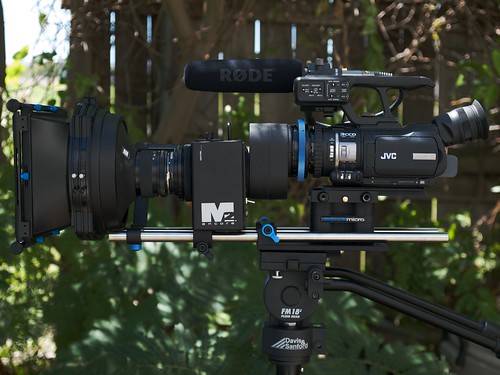 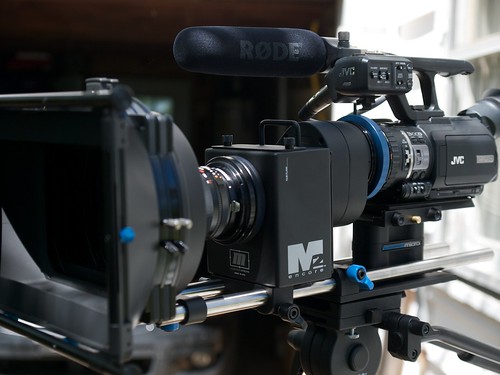 from front to back Redrock Micro microMattebox Voightlander 58mm f1.4 Lens Redrock Micro M2 Encore 35mm Adapter Redrock Micro microX Encore (flips the image right side up) JVC HM100 There are a few more images here. You can also see the images larger. HM100 with Redrock M2e and microMattebox - a set on Flickr After I do a few shoots I will be sure and write up a full review with some more video. Last edited by Elvis Ripley; August 22nd, 2009 at 12:08 PM. |
|
|
|
|
|
#2 |
|
Regular Crew
Join Date: Apr 2009
Location: OK
Posts: 62
|
place holder in case I want to write more
|
|
|
|
|
|
#3 |
|
Regular Crew
Join Date: Jul 2009
Location: France (Normandy)
Posts: 42
|
Pretty nice Elvis
Hurry to see some videos now !!! ;-) |
|
|
|
|
|
#4 |
|
Regular Crew
Join Date: Apr 2009
Location: OK
Posts: 62
|
There is that one test video in the post but I will see what I can do about hurrying up with some real stuff.
|
|
|
|
|
|
#5 |
|
Inner Circle
Join Date: Dec 2003
Location: PERTH. W.A. AUSTRALIA.
Posts: 4,477
|
Elvis.
The way you have that set up on the rods there are going to be some bending loadings on the camera casework and rear of the adaptor I would not much care to leave uncorrected for long if it was mine. The camera appears to be about 4mm too high relative to the adaptor and about 2mm too far forward to compensate or the adaptor is about 2mm too far rearwards which may be introducing an upwards bending load. The weight of the mattbox on front may have caused this if it was unsupported during assembly in which case the support under the mattebox needs to be adjusted upwards about 3mm - 5mm if there is a vertical adjustment available. There is a distinct bend in flip unit/adaptor junction and likley a loading at the camcorder/flip unit junction as well. If the bend has been introduced by the bottom of the adaptor being too far rearwards, then loosening the rod clamps under the M2 box and front support and sliding them forward about 2mm may allow the front of the camera to lower a little which will be evident if a bending load has been imposed during the assembly. When setting up vertical adjustments if these are available, the sliding camera baseplate should be locked down, not free as locking down afterwards will introduce a downwards loading on the camcorder body as the wedgeplate tightens down. You may also find with more detailed testing the top edge of your image and bottom edge of your camera image of the groundglass may not be in con-incident focus. The mattebox should be the last thing you fit up when aligning. After initial assembly of any adaptor camcorder combination on rods/rails where there are fine vertical adjustments available, it is helpful to mount up to a heavy tripod and tilt the the assembly close to vertical between about 10 to 30 degrees short or about 10 degrees over so that gravity is working more directly along the optical axis during your fine adjustments rather than across it. It is helpful to have an assistant holding things when trimming the assembly. (On the other hand, my imagination may be running rampart or the jpg posted itself may be distorted but I suggest you check. An hour or so outdoors in hot sun and distortions to the camera casework may become permanent.). Last edited by Bob Hart; August 23rd, 2009 at 12:41 AM. Reason: error |
|
|
|
|
|
#6 |
|
Major Player
Join Date: Jan 2005
Location: Hollywood, CA
Posts: 293
|
Hi Elvis
Nice info and setup. I also noticed a slight misalignment, though the rods are straight. Our setup chart recommends a 1/4" shim beneath the rod clamp which looks like your setup is missing that? http://www.redrockmicro.com/start/re...amerachart.pdf Cheers Brian
__________________
========================== Brian Valente Redrock Microsystems |
|
|
|
|
|
#7 |
|
Regular Crew
Join Date: Apr 2009
Location: OK
Posts: 62
|
I appreciate the feedback and I do know that something is out of alignment but it isn't clear where it is happening. It seems more like the camera is sloping up, maybe it is the tripod plate on the bottom or the filters are causing it to slope up a little bit.
|
|
|
|
|
|
#8 |
|
Major Player
Join Date: Jan 2005
Location: Hollywood, CA
Posts: 293
|
Elvis - you definitely want the corrects shims which will probably resolve everything. Try that first.
Cheers Brian
__________________
========================== Brian Valente Redrock Microsystems |
|
|
|
|
|
#9 |
|
Inner Circle
Join Date: Dec 2003
Location: PERTH. W.A. AUSTRALIA.
Posts: 4,477
|
Second Brian's recommendations and please ignore my ramblings as he knows his own product best and I do do not.
I was assuming that there were sliding adjustments in all planes as in other products. Tailor-made fitments to individidual camera types are good because nearly all the variables in setting up are eliminated - as long as you have all the parts. I am imagining that the shim goes in between the bottom of the M2 box and the rod clamp which will raise the M2 box up into alignment with the camcorder optical axis. I can't see in you image what vertical adjustment there is for the mattebox but I assume there will be one, either by a sliding pice secured by setscrew(s) or a shimming method. Brian may enlighten you furthur. If you closely study your images before and after adding the missing part and re-aligning, you will observe the difference. Enjoy. Last edited by Bob Hart; August 24th, 2009 at 01:19 AM. Reason: error |
|
|
|
| ||||||
|
||||||
|
|