Sony DV Companion
|
|
hosted by polycot.com
> top of page < |


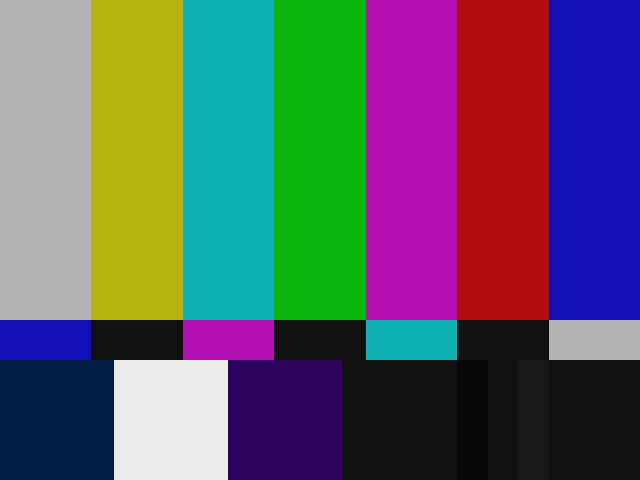
Color Bars for Memory Sticks
an article by Bob Stevers
First, I must thank Brian L. and John Jackman for their support with this project. At first there were a lot of misconceptions of what I was trying to do. These colorbars are simply offered to help you properly setup your field monitor to match the black level of your camera. Using colorbars at the head of your finished tape is an entirely different matter I do not have the time or energy to get into.
From what I have learned, it makes sense to use the 0 IRE colorbars if you are shooting with most DV cameras. These include both US and Japanese models that use 0 IRE as the black level of the camera, instead of the North American standard of 7.5 IRE. I am offering both colorbar files, since some cameras (like my Sony PD150) allow the user to set their IRE to either setting. Simply choose the one that matches your camera's IRE setting. Again, most likely it will be 0 IRE if you are shooting with most consumer DV cameras. With that said, there is an extra step to using the 0 IRE colorbar file. Here is the short version from John Jackman's great website, GreatDV.com:
"Adjust the monitor using the standard procedure described in the BASIC section, and note the amount of difference apparent between the BLACK and GRAY chips. Continue adjusting the brightness control up until a similar difference is visible between the SUPERBLACK and BLACK chips, but the SUPERBLACK has not lightened at all. Again, not as accurate as the proper calibration procedure, but much closer than guessing!"
The entire note plus how to use these "free" colorbars to setup your monitor can be read on Jackman's site.
What is the big deal about colorbars? Well, if you do not know the answer, I suggest doing some homework! If your monitor is not set up correctly, then you can not be certain how your final video is going to look. More importantly, from my perspective, is that the "brightness" level can be accurately set up using these JPEG colorbars output from the Memory Stick right from your camera to your monitor. Why? Well, I use my small field monitor more as a light meter to check for proper exposure. I don't like to trust the camera's small built-in LCD monitor for critical exposure settings. Sure, most of the time you can get away with it, using the camera's auto exposure settings, but hey, some of us call ourselves professionals and actually charge people for good video! I include the small JVC 550U, 5" Color Field Monitor in my package, and make an effort to set it up and use it as often as possible.
Most everyone knows by now that the colorbars included in most DV cameras are not "true" colorbars. This is true with the old Sony VX1000, the Canon XL1, and most other "prosumer/consumer" type camcorders. Some say they were designed for internal company use, you know the tech support folks you are seldom allowed to talk to. I have compared the colorbars put out by the Sony PD150 and they match up with the colorbars on my NewTec Calibar (a $350.00 portable colorbar generator). The problem is these PD150 colorbars are not the Full SMPTE Colorbars with the Pluge field on the lower right. These additional bars are needed for proper monitor setup, most especially your brightness level.
I thought it would be neat to have a copy of the Full SMPTE Colorbars on the Sony Memory Stick. This would come in handy if and when my Calibar batteries die on location, and also nice to share with everyone that does not have a Calibar, but does own a PD150, VX2000, or other Memory Stick compatible camera. Now after completing this project I have learned that my Calibar puts out 7.5 IRE colorbars only, and that I should have been using 0 IRE colorbars with all my previous DV camcorders. The Calibar does not even offer 0 IRE colorbars. I have to thank the first person that responded to my post online for help with completing this project. I started out by inputting the Colorbars from my Calibar unit, to the PD150 and then simply shooting a still photo.
That file was close, but not perfect. Brian L. wrote me directly after downloading and testing my first attempt. He came up with a GIF file made in Adobe Photoshop using the correct values found on John Jackman's website, for all the colorbars, and then made a JPEG version for me. I did my share by enabling this file so that the EXIF digital photo information could be read by the camera. I may have started this project, but without Brian's input and help, it would still be a half finished experiment. Thanks Brian!
DOWNLOADING COLORBAR JPEG FILES - INSTRUCTIONS:
- I use Internet Explorer 5.0, if you click and hold your mouse over the Small ColorBar images and their corresponding file names at the top of this page for either "Colorbar File", a menu opens with several options.
- Choose "Download LINK to Disk", this will download the actual file.
- For Netscape 4.08 users, like above, when you click and hold your mouse, choose "SAVE THIS LINK AS", in the "Save Dialog Box" that opens you should see the actual numbered JPEG name I used (see below). In the "FORMAT" box, choose "SOURCE".
- Note: In either browser if you make a mistake and choose to download "image", all you will end up with is just the small icon file representing the link to the actual files!
- File size is small at approximately 30k. I named these JPEG photos using the file conventions of the Sony PD-150 DVCam Memory Stick. The first is called "DSC00101.JPG", and is the "0 IRE" Colorbar file. This file has a small "0 IRE" title that can be seen in your camera. The second is called "DSC00100.JPG", and is the "7.5 IRE" Colorbar file, and has NO title.
I changed the last three numbers, for example: to 101, and 100, in case you have some photos already on your memory stick. I use a 64mb stick, if you use the 8mb stick you may need to lower the number. Keep the same amount of digits, e.g. change the 100 to 025. The reason for this is that you have to copy this exact file from your computer to the memory stick so you can use this file for setting up your field monitor.
Now, using the USB Memory Stick reader (or any other hardware device that allows your computer to read your Memory Sticks), open the folder that contains your still photos, and copy the two colorbar files to the stick. I have discovered that if you format the Memory Stick in the camera, you must first take a photo of something, so the camera can create the two internal folders on the Memory Stick. When you open the stick on your computer you will then see the folders, and make sure you navigate to the final folder that actually holds the photo files.
If the JPEG file has the exact same number as a photo you have already taken, it could possibly overwrite it, therefore you have been warned! I tried locking the photo file before uploading it to my site. When I downloaded the file to test, it is no longer locked. I strongly suggest you lock this file on your computers desktop or from within the camera's Memory Stick menu. This will keep you from accidently overwriting it or deleting it from within the camera.
Other then changing the file numbers in the label/name field, DO NOT ALTER the files you just downloaded, or your camera will not read them! Since this is free, and seems to work for me and most others, I do not have the resources to support it. If you mess with it, that is why is does not work! This is pretty simple stuff... download, copy to memory stick, playback, I can only wish you all the best. Another words, I will have to ignore any e-mails concerning colorbars. That about wraps up the disclaimer.
The Companion notes: this article originally appears at bobstevers.com/Articles/colorbar.html
Back to the VX2000 & PD150 Articles Menu
Written by Bob Stevers
Thrown together by Chris Hurd

Please direct questions to the DV Info Net Community Forums.
Where to Buy: These dealers are authorized DV Info Net sponsors... | |||
|
|
|
|
|
|
|
|
Please support this site by making your purchases through them. Thanks! | |||
©1998-2008 DV Info Net
The Digital Video Information Network
San Marcos, Texas
The only thing worse than quitting is being afraid to start.