
Features and Functions
Speeds and Feeds: the 1D C offers three general classes of movie capture:
• Full-frame: 640×480 (4×3 standard-def) at 25 or 30fps; 1920×1080 at 24, 25, 30, 50, or 60 fps; and 1280×720 at 50 or 60fps.
• Super 35mm crop: 1920×1080 at 24, 25, or 30 fps.
• 4K crop: 4096×2160 at 24fps, with a firmware update due in April to add 25fps.
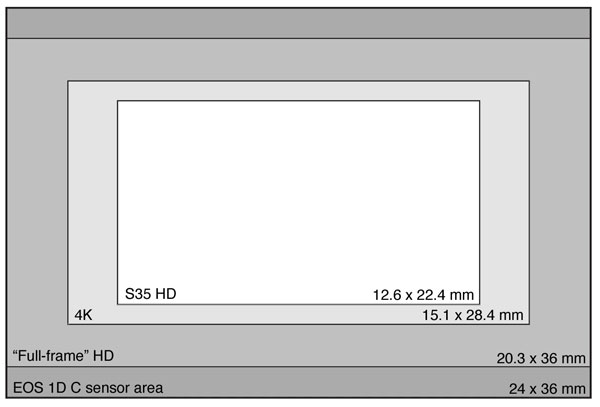
The 640×480 capture uses the full height of the sensor, for a capture area of 24 x 32mm. The other capture areas are shown here:
24, 30, and 60fps are really NTSC-compatible speeds: 23.98, 29.97, and 59.94fps. 25 and 50fps are PAL-compatible, integer values: 25.00 and 50.00fps.
The full-frame modes, simply called “1920” and “1280” in the camera’s menus, are similar to those in other Canon DSLRs; they read and downsample the entire sensor’s width and a proportional amount of its height. That’s about 5184 x 2916 photosites that have to be dealt with in one way or another, whether it’s pixel binning, line-skipping, or full scanning and downsizing.
The Super 35mm crop mode, S•35 in the menus, uses 3216 x 1809 photosites, and covers roughly the same area as a Super 35mm frame (3-perf 35mm).
4K mode uses a 1:1 crop of the sensor: 4096×2160 photosites.
All the full-frame and S•35 modes use 8-bit, 4:2:0 MPEG-4 / h.264 compression. Most offer the choice between long-GOP (“IPB”) and intraframe (“All-I”) compression; All-I makes for easier editing at the cost of roughly two to three the data rate of IPB modes. All-I is the only option for 1920×1080 at 50 or 60fps, while IPB is the only choice for 640×480. Data rates vary from 10 Mbit/sec for 480/30p IPB up through 182 Mbit/sec for 1080/60p All-I, with 1080/24p running about 91 Mbit/sec in All-I and 51 Mbit/sec in IPB. All of these can be recorded on 60MB/sec CF cards, which are widely available.
4K is recorded as 8-bit, 4:2:2 MJPEG at about 3.76 GB/minute or 500 Mbit/sec, a data rate demanding UDMA-7 (100 MB/sec) CF cards to avoid dropping frames. Such cards are hard to come by: even in high-tech Silicon Valley I couldn’t find any in bricks ‘n’ mortar retail stores. In my testing, I used my existing 60MB/sec Sandisk Extremes; about two-thirds of the time I was able to capture a 4K clip without issues, while the rest of the time recording stopped after a second or two as the card couldn’t keep up with the data.
Canon has a useful chart in the 1D C’s manual listing data rates and recording times for the various modes, frame rates, and compression types, which I reproduce here:
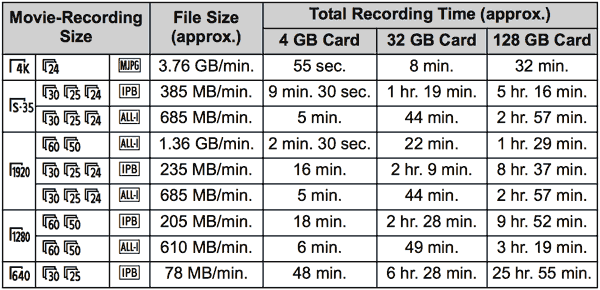
The camera captures clips lasting up to 12 hours, given enough space on the CF card: individual files are limited to 4 GB, but the 1D C transparently writes to multiple files while recording a long clip. Canon’s EOS Utility software lets you combine multiple files into single clips after the fact, or you can simply drag all the related files into your NLE’s timeline, where they play back-to-back without skips, pauses, or repeated frames.
Still frames can be grabbed while shooting any of the full-frame modes, except for 1920×1080 at 50 or 60fps. Shooting a still causes the moving image to freeze for about a second. You can disable still shooting during movie capture if you so desire.
Displays and Controls
To shoot movies, you’ll need to make sure that the Live View mode is set to Movies, not Stills or Disable.
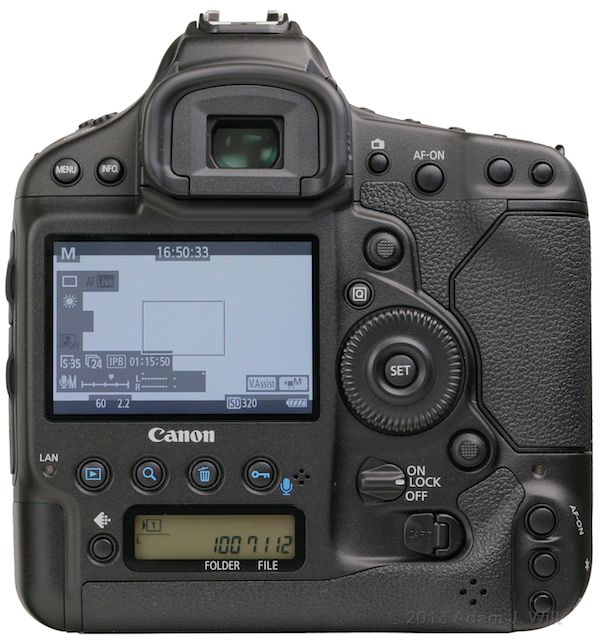
Pressing the live view button flips up the mirror and starts live monitoring. Pressing the INFO. button cycles onscreen displays though several densities of overlay:
- autofocus box (central white rectangle) only, or
- the same, plus shutter speed / aperture / exposure level / free space / ISO battery info across the bottom of the screen, or
- all of the above, plus additional settings info on the left of the screen (see graphic), or
- all of the above plus a histogram (see second photo below).

Live-mode displays with all options aside from the histogram shown, as lifted from the 1D C’s manual.
Not all items are visible at all times; for example, the magnification factor and magnifying position only appear when you zoom in to check focus.
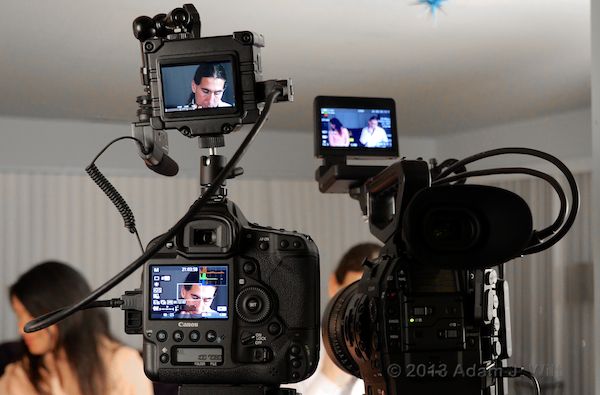
The 1D C and Canon C500 set up for a shoot with Jim Tierney of Digital Anarchy. The 1D C’s LCD has all its display overlays enabled. Simultaneously a clean HD feed is sent over HDMI to a Zacuto EVF, where I used 1:1 mode and focus assist to help ensure sharp images while rolling (the Zacuto was set up to display its own audio levels for a previous gig, but sadly the 1D C doesn’t send audio over HDMI except during playback).
You can also turn on a live-view grid overlay, with 3×3 divisions (rule of thirds), 3×3 with diagonals, or a 6×4 grid.
Pressing the magnify button below the LCD zooms in 5x, then 10x, then zooms out again. The zoomed area can be panned around the picture using the multi-function joystick. It’s a great way to get focus points nailed.
By default, you adjust shutter speed with the main dial (the one near the shutter release) and the aperture, on electrically-controllable lenses, with the quick-control dial (on the back panel). If you prefer, you can swap these assignments, in addition to reassigning about eight different buttons elsewhere on the camera!
Other parameters—anything displayed on the left side of the screen—can be adjusted without leaving Live View by tapping the Q button, using the multi-controller to select the desired parameter, and then turning the quick-control dial to cycle through the possible values. You can also press the SET button to pop up the parameter’s menu page, if you prefer.
If the ratcheting sound of the control dials annoys you (perhaps you’re using the camera’s built-in mike to record sound?), you can enable Silent Mode. In Silent Mode, you need merely touch the left or right side of the quick control dial—yes, it’s touch-sensitive—to bump the selected parameter up or down. It’s a great way to tweak audio levels or exposure controls without a telltale click-click-click appearing on the soundtrack.
Mind you, most of this overlay goodness vanishes once you start recording, as it does on other Canon DSLRs. You can still adjust shutter and iris with the dials, using the bottom-line readouts. In Silent Mode, you can tap the Q button to bring up the appropriate parameter list (exposure and audio controls) and adjust ‘em quietly. However your histogram goes away, and focus magnification is unavailable.
Fortunately the 1D C offers a clean, uncompressed HDMI feed completely devoid of overlaid data. I used it to feed a Zacuto EVF with 1:1 monitoring, peaking, and focus-in-red assist, which helped me maintain focus as my subject moved. The uncompressed HDMI also allows offboard recording; in 4K mode, recording the HDMI HD signal can serve as a proxy for the higher-resolution feed (the HDMI includes timecode, so frame-accurate matchbacks are possible).
The Zacuto also gave me a false-color mode for exposure monitoring; I could also have used any of a number of monitors with built-in waveform displays to help me keep control of exposure.
Movie recording is triggered with the M-Fn button next to the shutter release. You can also set the shutter release to work as a movie trigger, though you lose the ability to shoot a still while movie recording is in progress. Both controls are a vast improvement on using the 5D’s SET button as a start/stop trigger.
Image Rendering
The 1D C provides the same set of Picture Styles as other Canon DSLRs: Auto, Standard, Portrait, Landscape, Neutral, Faithful, and Monochrome. These can all be adjusted for sharpness and contrast, and the color styles let you tweak saturation and color tone (reddish vs. yellowish) while the monochrome style gives you color-filter simulation (as if you’d shot through a yellow, orange, red, or green filter) and toning effects (sepia, blue, purple, or green).
The 1D C also offers a Canon Log setting, rendering a flatter, more grading-friendly image, with sharpness, saturation, and hue controls. Canon Log lets you turn on View Assist, a viewing LUT applied to the LCD and (if you’re shooting 4k) the HDMI output.
Canon gives you three user-definable custom settings, which you can set to your favorite picture styles without having to modify the presets, or letting you have several variations on a theme.
The camera includes Auto Lighting Optimizer and Highlight Tone Priority functions. If I understand these correctly, ALO adjusts the tone curve to compensate for overly dark or low-contrast images, similar to the “shadows and highlights” adjustments in Photoshop or Aperture, with three levels of adjustment possible in addition to “off”. HTP essentially underexposes a stop (by halving the gain) and then applies a tone curve to retain the shadows and midtones while keeping the highlight detail.
Highlight Tone Priority doesn’t really add a stop of dynamic range; it brings exposure down to protect the highlights while pulling the midtones back up where they would otherwise be.
ALO and HTP are mutually exclusive, and neither one can be used when shooting in log gamma.
Audio
The camera has a 3.5mm stereo microphone input, with both manual and automatic gain modes. An onscreen bargraph meter with a tick-mark at the -12dB point helps you control levels. And, unlike many ostensibly more audio-focused cameras, the 1D C’s bargraph has a visible scale all the way out to 0 dBFS; you can see exactly how close to clipping your levels are getting before they hit the limit.
Audio is recorded at 48 kHz, 16-bit uncompressed.
There’s a 3.5mm stereo headphone jack with adjustable monitoring levels, and sufficient oomph in its amp to allow plenty of loudness.