
2K and 4K
Go into the camera’s menu, and change “System Priority” from MXF to 2K or 4K; the camera reboots. When it restarts, the fans in the processing module start spinning (though they’re really very quiet); if you haven’t removed the processing module’s cover, the camera tells you to do so. The two additional monitoring outputs on the module now supply HD video, and the two 3G-SDI BNCs feed 2K or 4K in a variety of formats, depending on how the camera is set up.
The most common 2K/4K recorders in the USA for the C500 are the Convergent Design Gemini 4:4:4 and the Codex Onboard S. I cover them in a separate article.
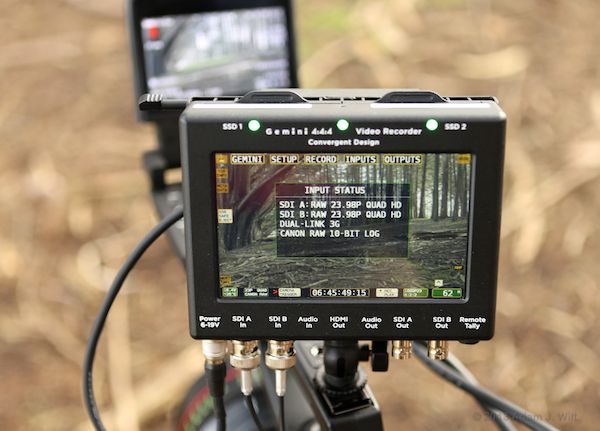
Convergent Design Gemini 4:4:4 shoe-mounted on the C500’s top handle.
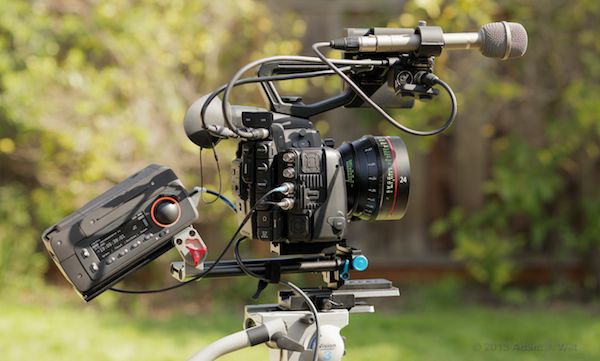
Codex Onboard S rail-mounted behind the C500.
Speeds and Feeds
In 2K mode, the C500 lets you choose either 1.77:1 (16×9), 1920×1080 images or the DCI-compliant “full 2K” 1.89:1 format of 2048×1080. In either 1920- or 2048-wide formats, you have three choices of output:
- 10-bit, 4:4:4 RGB, called ”RGB444 10-bit”
- 12-bit 4:4:4 RGB, called ”RGB444 12-bit”
- 10-bit 4:2:2 YCrCb, , called ”YCC422” (not available when the camera’s System Frequency is 24.00 Hz)
In all 2K modes, Canon stresses that there’s no deBayering going on: as in MXF recording, and as on the C100 and C300, each output pixel’s RGB value is created by reading a 2×2 photosite sample from the 4K sensor, two green photosites and one each of red and blue. The green values are averaged, and the red and blue values used directly; there’s no fancy math to “recreate” or “interpolate” colors, just a direct readout. This 2×2 downsampling from the raw sensor data allows true 4:4:4 color in a 2K image, with no chroma subsampling limits. Larry Thorpe gave a good presentation on the C300’s image processing at NAB last year, and the 2K outputs use that same scheme.
Capturing the uncompressed 10-bit output to .dpx files gives files that are 8.3MB/frame or 199.3 MB/sec at 24fps for 1920×1080 RGB frames; for 2048×1080 that jumps to 8.9 MB/frame or 212.5 MB/sec at 24fps.
12-bit 1920×1080 RGB DPX files run 9.3 MB/frame or 224.1MB/sec at 24 fps, but 12-bit DPXes aren’t well understood by most apps. If you capture the 12-bit data and output as 16-bit DPXes, which are well understood, that’s 12.4MB/frame or 298MB/sec at 24fps.
Uncompressed data storage isn’t for the faint of heart.
Unconstrained by the limits of the internal MXF encoder, the C500’s Slow and Fast Motion mode allows higher frame rates in 2K . You can shoot:
- 1-30 fps in 1 fps increments plus 32-60 fps in 2 fps increments using RGB444
- 1-60 fps in 1 fps increments plus 62-120 fps in 2 fps increments using YCC422.
That’s with a System Frequency of 24.00 or 59.94 Hz, of course; when in 50.00 Hz mode, the limits are 1-25 fps, 26-50 fps, 1-50 fps, and 52-100 fps respectively.
Depending on the speed and the format, either one or two of the 3G-SDI outputs will be required to carry the data. If both outputs are needed, the fps value is shown onscreen in [brackets], warning you to wire up the second spigot. In practice, I simply cabled both the outputs to the corresponding inputs on the offboard recorder and left ‘em connected at all times; doing so didn’t cause any problems, and meant one less configuration change to worry about when shooting.
When shooting 4K, the output of the camera is 10-bit Canon raw. It’s actually a four-component readout of sensor data: one red channel, one blue channel, and the two green channels, as described nicely by Abel Cine’s Andy Shipsides.
4K can be shot as QuadHD, 3840×2160, or “full 4K”, 4096×2160.
The raw output, captured directly as uncompressed .rmf frame files, is about 11MB per frame, or 16 GB/minute, or 1TB/hour for 24 fps recording.
Slow and Fast Motion in 4K is very similar to 2K . You can shoot:
- 1-30 fps in 1 fps increments plus 32-60 fps in 2 fps increments, in raw mode.
- 1-60 fps in 1 fps increments plus 62-120 fps in 2 fps increments, in half raw (not available when the camera’s System Frequency is 24.00 Hz)
HRAW is a half-vertical-resolution mode: 3840×1080 or 4096×1080. And again, a System Frequency of 50.00 Hz reduces all those rates by 20%.
There are a couple of readily-available choices for developing Canon raw.
Canon’s own Cinema RAW Development utility for OS X 10.7 and 10.8 provides batch transcoding to 10- or 16-bit RGB DPX files, or to ProRes4444. It also creates 480p or 1080p DPX or ProRes proxies. It has a clip preview window and lets you tweak white balance, exposure, and sharpness, but it lacks ‘scopes: no waveform, parade, or histogram display guides you in your tweaking.
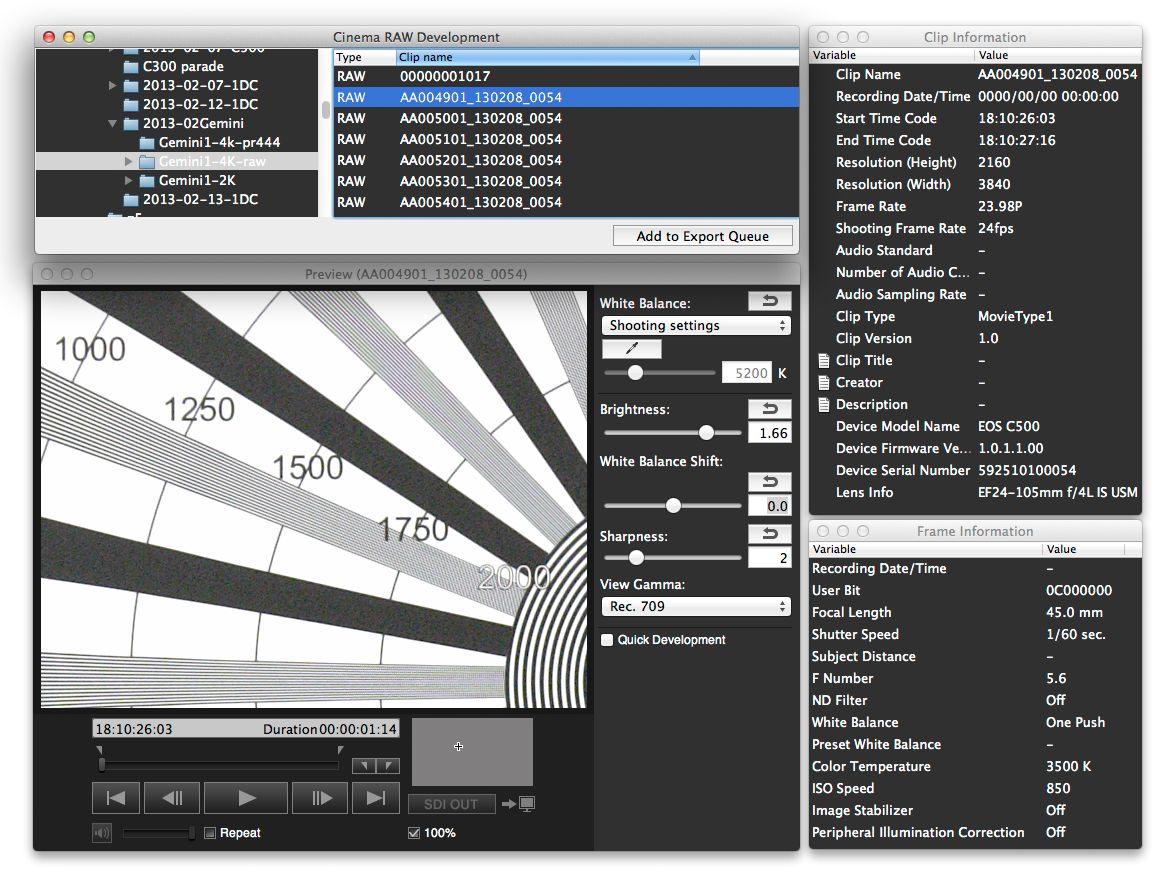
(Click to see full-size.)
If you have an AJA Kona 3G in your Mac, Cinema RAW Development will feed it a preview picture (as-is, or with one of two viewing LUTs applied).
The image seen in the preview window and on the Kona card can be viewed in log, Rec.709, or wide dynamic range gammas. Wide DR looks like Rec.709 in the shadows and midtones, with an S-curved highlight compression to preserve highlights lost in Rec.709:
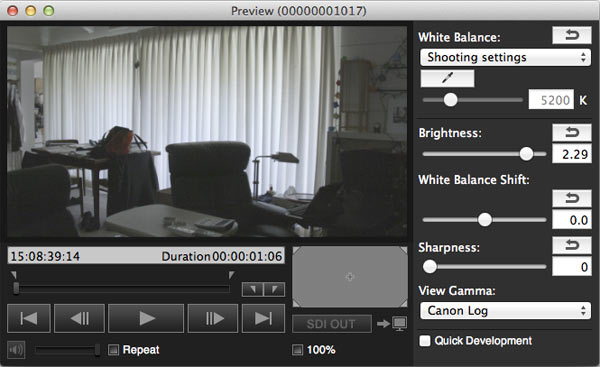


These viewing choices only affect the preview images; the rendered outputs always render in log.
Cinema RAW Development requires an Nvidia CUDA 2.0-compatible GPU to do anything useful; if you run it on an ATI-equipped Mac, the program simply doesn’t decode any clips (the documentation warns you of the need for an Nvidia card, but the program itself doesn’t complain if it doesn’t find one; it just won’t do anything when you point it at a folder of .rmf files).
Amusingly, my weedy little 2010 Mac mini with a 320M GPU ran Cinema RAW Development perfectly well—if not especially quickly—and I was able to transcode 4K clips to ProRes with ease… at about 0.4 seconds per frame.
DaVinci Resolve supports Canon raw files, even on my ATI-equipped MacBook Pro (this is the same Resolve that chokes on the same weedy little Mac mini that Canon Raw Development runs perfectly well on. It’s a funny old world).
Colorfront’s On-Set Dailies software reads Canon raw, too, or so I’m told; hiring a Colorfront system is well above my pay grade.
I’d be very surprised if this NAB doesn’t see multiple other software vendors offering Canon raw compatibility, too.
Proxies
Except in the Slow and Fast Motion modes, the C500 can record frame-accurate proxies during 2K or 4K output; all you have to do is load a CF card. The proxies are 50 Mbit/sec 4:2:2 MXF files, just like normal internal recordings. The 16×9 formats (1920×1080 and 3840×2160) record full-frame 16×9 proxies indistinguishable for normal, MXF-mode clips recorded in camera. The “full width”, 1.89:1 formats (2048×1080 and 4096×2160) are shrunk down a bit to fit in letterboxed 1.77:1 (16×9) proxies, with thin black bars on top and bottom.
Pixel-for-pixel extract from a 2K proxy clip, showing top letterbox bar and the line-skipping resampling.
The rescaling is somewhat inelegant, but these are only proxies, after all.
Color
All 2K and 4K outputs use the Canon Log gamma, even if the camera is set up for one of the normal gammas. That lets you shoot your proxies with and edit-ready look while preserving the maximum gradability in the external recording.
External Recorder Control
The C500 sends metadata, timecode, and control signals across the same 3G-SDI links that supply images to an external recorder. Once you connect camera to ‘corder and configure both for a common image format, and tell the recorder to watch the camera for a trigger, recording externally is exactly the same as recording internally: press any of the START/STOP buttons on the camera.
If you’ve set up the naming conventions properly on the recorder, the offboard clips even have the same names as the proxy clips recorded in the C500, so conforming your external clips to the proxies is trivially simple.
The only complication in this same-as-it-ever-was workflow is that the camera doesn’t know (or care) if the recorder is recording properly. Your job as the operator / 1st AC / DIT (depending on crew size) is to keep a weather eye on the recorder, making sure it’s “recording” lamps light up when they’re supposed to, and watching to make sure the offboard data packs don’t run out of room in the middle of a take.
Performance
Resolution and Aliasing
In the 2K modes, resolution is identical to that of the internal recording (no surprise, since they’re pixel-for-pixel matches in 1920×1080, and the 2048-wide recordings simply use a correspondingly wider chunk of the sensor). The camera is as sharp as the law allows, with a bit of aliasing out past the 1080 TVl/ph limit (as we might expect, since the sensor and optical low-pass filter are set up to allow 4K imaging).
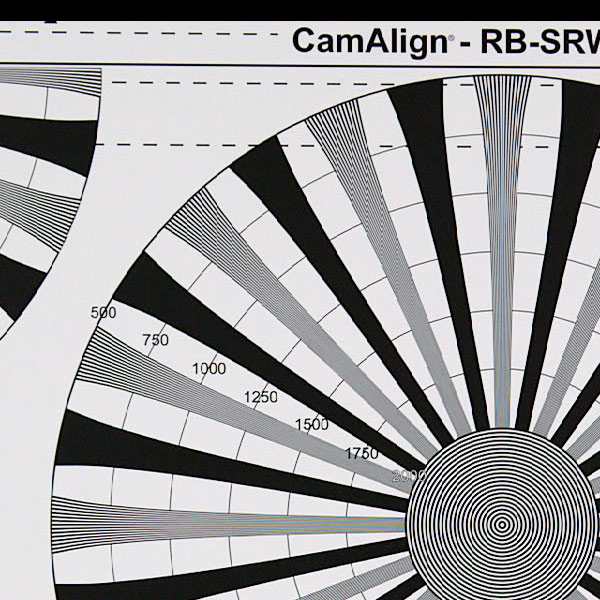
Pixel-for-pixel extract from a C500 1920x1080 image of a DSC Labs MegaTrumpet chart (externally recorded as 10-bit RGB).
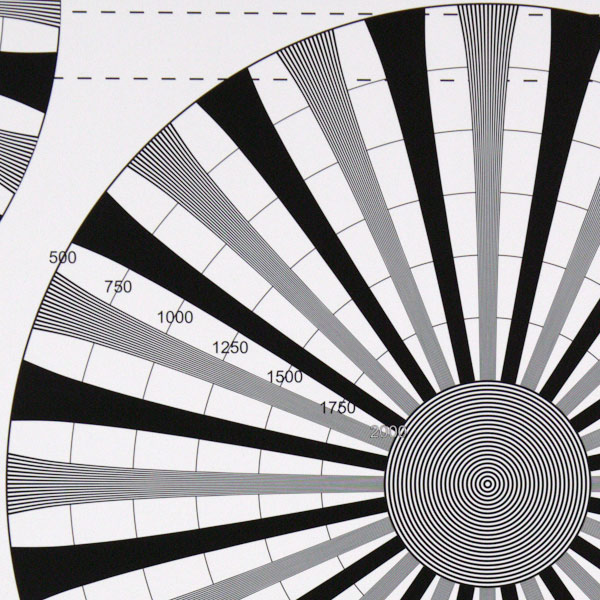
Pixel-for-pixel extract from a C500 2048x1080 image of a DSC Labs MegaTrumpet chart (externally recorded as 10-bit RGB).
In 4K, the raw data must be deBayered; Canon can’t use the 2×2 downsamplng that gives those nice, crisp 2K and HD images. The generally-accepted rule of thumb is that deBayering can, at best, yield an unaliased resolution (in TV lines per picture height) of about 80% of the photosite count; if a 4K Bayer image is 2160 lines tall, it should resolve up to about 1728 TVl/ph, depending on how the deBayering is done. Anything past that is gravy—or, more likely, a mix of overly-optimistic detail synthesis and early-onset aliasing.

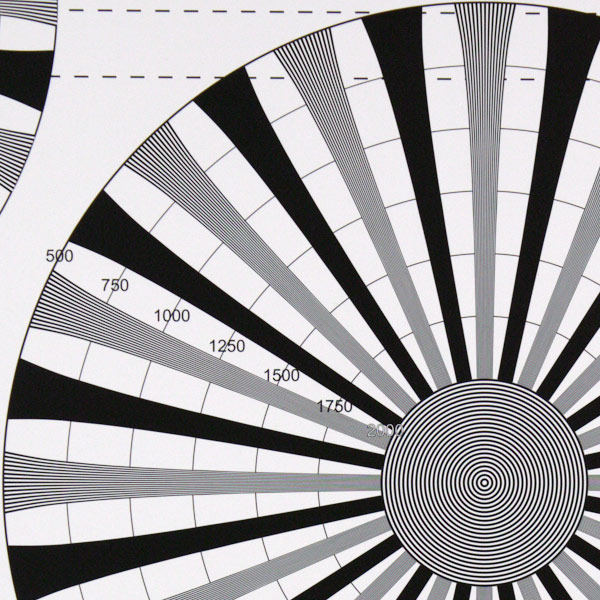
Pixel-for-pixel extract from a C500 3840x2160 (“quad HD”) image of a DSC Labs MegaTrumpet chart (externally recorded as 10-bit Canon raw).
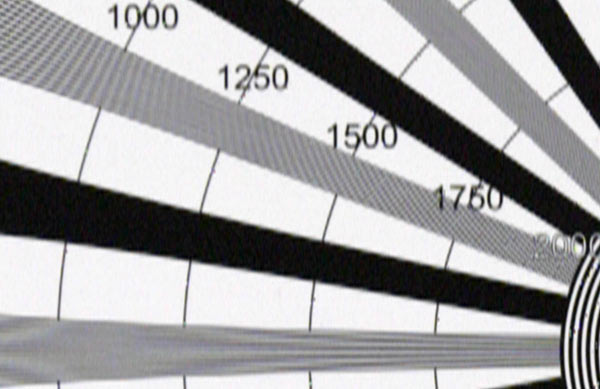
I’d say the C500 is getting there; to be sure, I pulled back so the chart was half-height (thus the resolution numbers shown are half the true numbers) and shot it again:
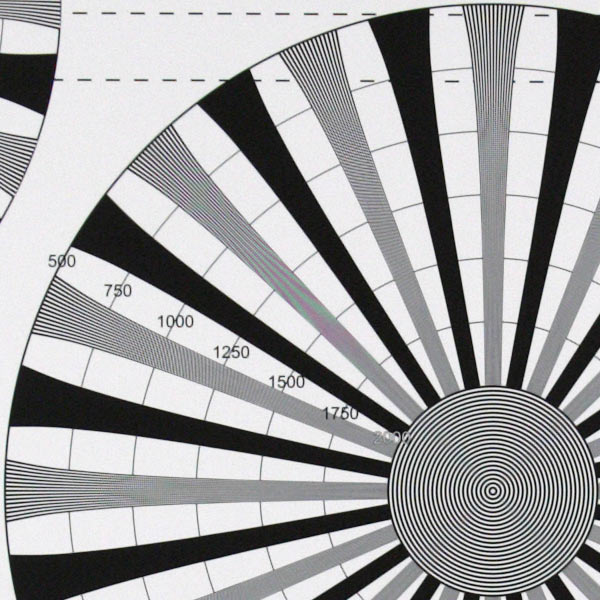
Pixel-for-pixel extract from a C500 3840x2160 (“quad HD”) image of a DSC Labs MegaTrumpet chart (externally recorded as 10-bit Canon raw), shot at half the image height. Resolution numbers should be doubled.
Indeed, if an indicated 860 TVl/ph is the expected practical limit, the C500 is pretty much giving it to us, plus a little bit beyond. In practical terms, the images are quite sharp, with minimal real-world aliasing ever visible.
So far, so good. I did see a puzzling thing, though: my 4096×2160 clips, and only those clips, show speckly noise on the trailing edges of brightness transitions:

Pixel-for-pixel extract from a C500 3840x2160 (“quad HD”) image of a DSC Labs MegaTrumpet chart (externally recorded as 10-bit Canon raw).
This was due to a problem with the 1.4.101 firmware on the Gemini recorder; had I recorded this with the newer 1.5.146 firmware (which became available the week after I shot my chart tests), it would have been just as clean as the other image sizes. The C500 and its raw format are very new, so some teething problems are to be expected.
The 4K half-raw mode, as expected, stomps on vertical resolution:
Pixel-for-pixel extract from a C500 3840x2160 (“quad HD”) half-raw image of a DSC Labs MegaTrumpet chart (externally recorded as 10-bit Canon raw).
It’s not really any softer horizontally, not by the numbers, even though the horizontal transitions aren’t as crisp-looking (it’s also possible I wasn’t quite as sharply focused in this test, though I’d expect that to decrease high-frequency aliasing dramatically). I’m reminded of the high-speed, reduced-resolution modes on the FS700, which have a similar look.
Rolling Shutter
Since every mode aside from 4K half raw and YCC422 can shoot at speeds up to 60 fps, we’d expect the rolling shutter time in those modes to be shorter than 1/60th second, and I measured it at around 1/64 sec +/- 5%.
4K half raw and YCC422 go up to 1/120 second. I measured rolling shutter in half raw at around 1/126 sec; I didn’t test YCC422.
Bit Depth and Color Resolution
8-bit, 4:2:2 50 Mbit/sec MPEG-2 not good enough for you? With both 10- and 12-bit 4:4:4 RGB available in 2K and HD, and 10-bit Canon raw in 4K and quad-HD, you should be covered both for extreme grading and delicate chroma-keying.
A note on 12-bit clips: both the external recorders I tested for capturing uncompressed HD and 2K use DPX files as their storage format. DPX allows bit depths of 10, 12, and 16 bits, but 12-bit DPXes are rarely used in the wider world. Indeed, none of my post tools—Apple Color, DaVinci Resolve, Adobe CS6 (including SpeedGrade), FCP 7, or FCP X—would read them. I found a “DPX Plus” plugin from fnordware for Adobe products, and it was able to open the 12-bit files, but it swapped the red and blue channels. Even after swapping ‘em back with some channel mixing, I wasn’t sure I was seeing any quality difference compared to the 10-bit files, but I wasn’t sure what the bit depth of my rendering pipelines in Premiere and After Effects were (I’ve been burned by 8-bit bottlenecks in certain effects in certain color spaces in certain NLEs before—I won’t mention FCP by name, but you can imagine what you will—so I’m unwilling to assume anything about the bit depth of any of my tools without very good proof!).
The Codex Onboard S recorder I used for this test let me export the 12-bit clips as 16-bit DPXes. Once I did this, the files were immediately openable in all my apps (well, all those that understood DPX in the first place).
Here’s one example: I shot a sky gradient, normally something that tends to show quantizing and compression defects quite handily (some may recall the brouhaha surrounding the Canon XL-1, a DV camcorder of such pictorial cleanliness that blue skies banded quite visibly in its 8-bit, 4:1:1 recordings. Many folks wound up shooting it at +12dB just to bring the noise up enough to add “dither” to the image, concealing the limits of 8-bit coding). I then threw it into DaVinci Resolve and severely messed with its tonal curve:
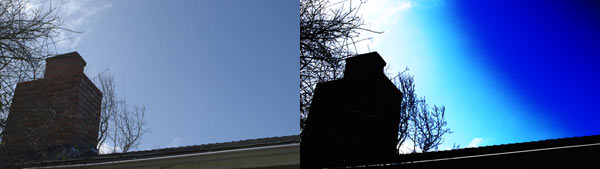
The unaltered image and what I wanted to do with it.
Here’s the highly sophisticated and extremely subtle color correction I’m using to get that result:
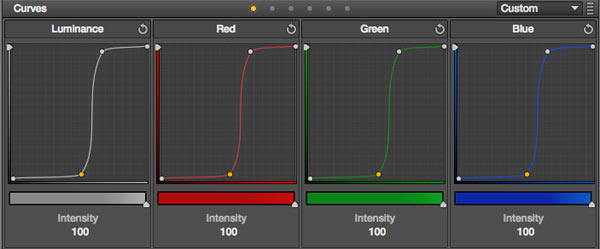
Oh, I’m a clever boy I am, a proper hotshot top-end colorist, me.
Here’s what it looks like with the same final look applied to the 8-bit MPEG-2 proxy as well as the 10- and 12-bit uncompressed clips.

Pixel-for-pixel extract from the 8-bit MXF proxy clip.

Pixel-for-pixel extract from the 10-bit DPX clip.

Pixel-for-pixel extract from the 12-bit DPX clip.
In the first instance, the posterization is due to the 8-bit nature of the clip, and its blockiness is due to the MPEG compression. Neither of those is an issue with the 10-bit and 12-bit, uncompressed 4:4:4 RGB DPX files. Clearly there’s value in keeping as much of the source image data as possible!
Now, I don’t see much difference between the 10-bit and 12-bit clips in this instance, nor did I in a couple of other tests. It may be that my post pipeline isn’t taking advantage of the extra two bits, or it may be that I just didn’t try the right sorts of things to reveal the difference.