
The US$26,000 Canon EOS C500 joins the $16,000 C300 and the $6,500 C100 as the Big Daddy of Canon’s Large Single Sensor cine cameras. All three cameras share the same Super35mm-sized 4096×2160 sensor, the same general body design, and the “Canon look,” but diverge in their recording formats and output capabilities.
The original C300 records 8-bit, 4:2:2 1080p using the Canon XF codec, and offers HD outputs on SDI and HDMI. It pioneered the “potato-cam” form factor, with a superb side handgrip and a removable, tilt-and-swivel monitor unit.
The C100 is a simplified AVCHD ‘corder with the same great handgrip, an integrated LCD in place of the monitor unit, and HDMI output only (no SDI).
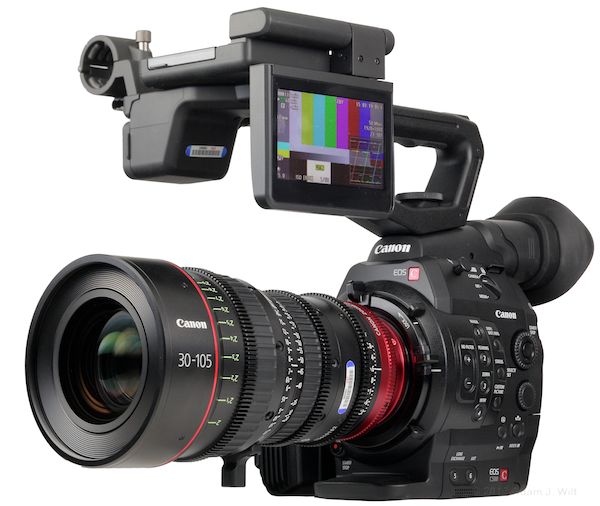
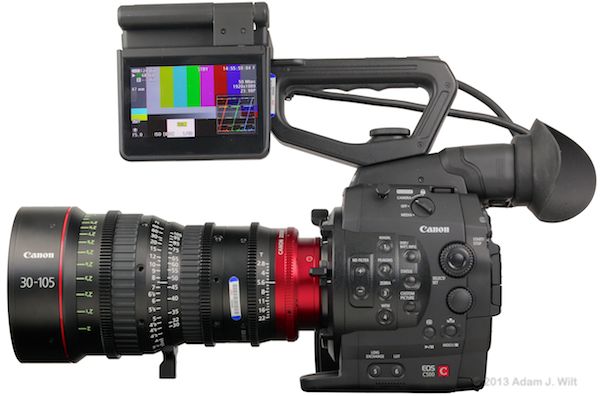
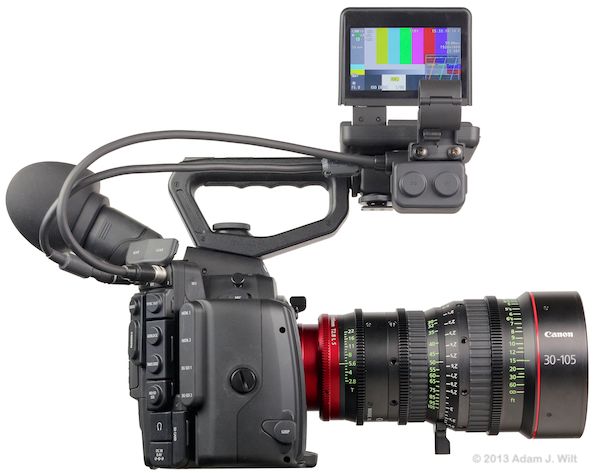
The C500 moves in the other direction. From the left side, it’s a C300 lookalike, with the same body shape, top handle, and monitor unit. The C300 is criticized by some for its 8-bit-only, compressed recording; the C500 addresses these concerns with 10- and 12-bit uncompressed HD and 2K outputs, plus 12-bit, Quad-HD and 4K raw, while still offering XF-format HD recording internally. Turn the camera ‘round to the right, and you’ll see that the handgrip has gone missing, replaced by a permanently affixed processing unit providing the dual 3G SDI outputs for the uncompressed and raw feeds–the missing handgrip is the price paid for keeping the overall camera as compact as it is.
Design
The C500 is a large-single-sensor, interchangeable-lens camcorder with a built-in, rear-mounted EVF. It comes with a removable top handle, and a “monitor unit” with a positionable LCD, a control panel, and dual XLR audio inputs. It records on dual CF cards, and provides several flavors of uncompressed output for monitoring and offboard recording. The C500 is available with either an EF or a PL mount; I tested the EF mount version.
The camera is taller than it is long, and longer than it is wide. A roughly cylindrical sensor block, finished in shiny black textured paint, is embedded in the vertically-oriented, matte gray body. Fit and finish are up to Canon’s usual standards (i.e., very good), with clearly-labeled controls and plenty of surface contouring to aid in tactile navigation.
The C500 camera body alone (no side or top handles, monitor unit, battery, or CF cards) weighs 4 pounds / 1820 g; that rises to 6.4 pounds / 2885 g with CF cards, battery, top handle, and monitor unit. Add 0.3 pound / 110 g to those figures if you have the C300 PL.
Of course, you’ll need to add the weight of a lens if you want to shoot anything. Lenses range from 4.6 ounces / 130 g for the EF 40mm f/2.8 pancake to nearly two pounds / 805 g for the EF 24-70mm f/2.8L II, or more.
PL lenses (and Canon’s own EF-mount cine lenses) typically weigh more; 3-6 pounds for primes and 10 pounds for a zoom aren’t uncommon.
Left Side
Looking at the left side of the camera reveals an S-shape, with a broad support foot at the front and the EVF at the rear:

Left side, with six assignable controls.
At the top, there’s a focus hook and a rotary power switch. That switch selects between camera and media (playback) modes; additionally, there’s a lock position in camera mode that locks out all controls aside from the start/stop trigger, so that you can’t inadvertently press other buttons and change settings.
The sensor block has +/- buttons to change the ND filter setting (and there’s an emergency screwdriver override in case the ND drive motor fails, too). There are four positions: ND off, and 2, 4, and 6 stops of attenuation. Four assignable buttons (with sensible defaults) follow, then three buttons: two display and status selectors, and the CUSTOM PICTURE button used to choose different looks.
Aft of the sensor block we find two wheels: a SELECT dial with a central pushbutton, normally used to traverse menus and settings in a manner eerily reminiscent of the rear-panel selector wheel on Canon DSLRs; and a control dial usable for iris control (on the EF version) or ISO/gain setting (on both EF and PL models). Below the wheels, two pushbuttons provide record-review and one-push white-balance in camera mode, and play/pause and index marking in playback mode.
At the bottom, two assignable buttons default to lens exchange (powers down the camera except for the timecode generator, so you don’t risk glitches when connecting an EOS lens) and LUT (to apply a lookup table to Canon Log material played out the MONitor port), and an air intake lets cooling breezes in to keep the sensor from overheating (hot air, driven by a very quiet fan, exits around the base of the pull-out EVF).
Rear
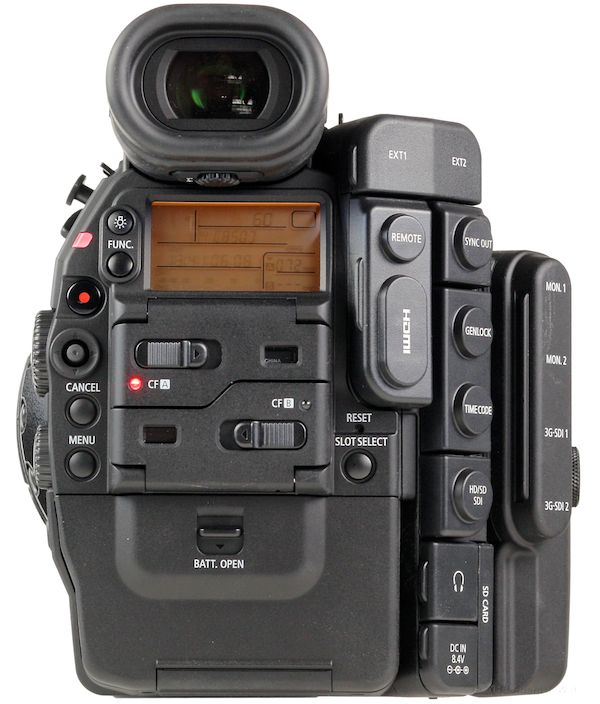
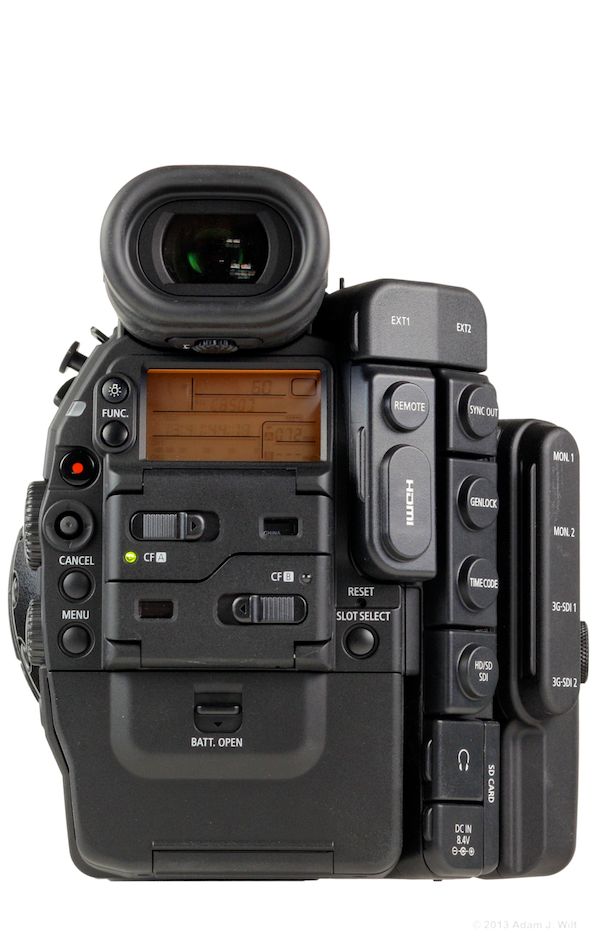
Rear panel with doors closed, recording on CF card A.
An LCD status panel sits immediately below the EVF; it shows shooting status such as white balance setting, ISO, shutter speed, iris, battery level, time remaining on both CF cards, and audio levels. A backlight button triggers amber illumination, like the backlighting for the status panel on a Canon 5D Mk II.
The FUNC. button is the direct-setting function selector; it cycles through shutter speed, ISO/gain setting, and white-balance selection, which you can then change with the side-mounted SELECT wheel or the four-way joysticks on the rear panel, monitor unit, or handgrip as you see fit: don’t let anyone ever say that Canon didn’t give you any choices.
Just to the left of the LCD panel there’s a wraparound tally LED, visible from the side as well as the rear. Below that there’s a shiny black START/STOP trigger, then a four-way joystick used for a variety of navigation operations, a menu-canceling button, and a menu-invoking button.
Dual CF card slot doors with card-loaded windows, bi-color status LEDs, and spring-loaded release levers occupy the center of the rear panel. Below them, a flip-down door covers the battery compartment.
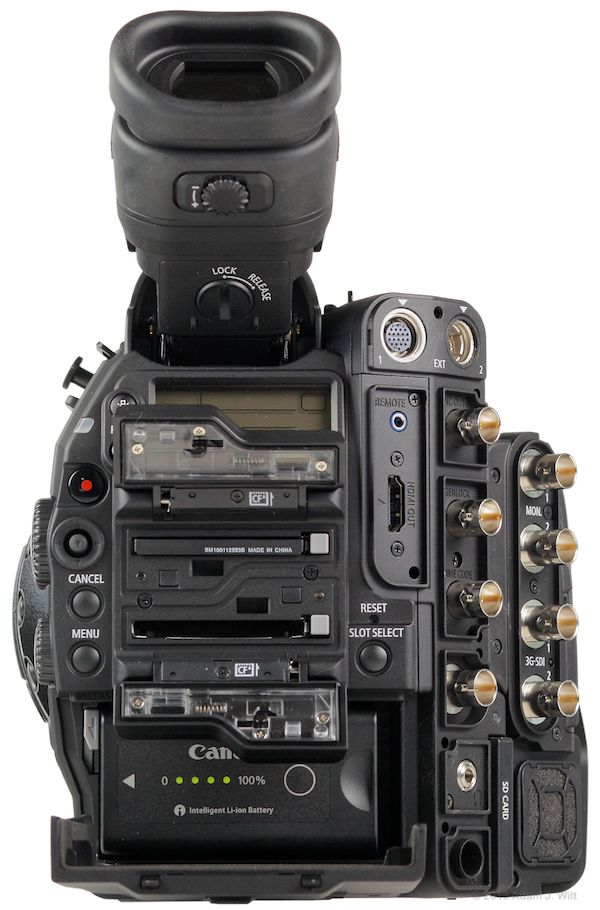
Rear panel, weather-sealed doors opened.
All the doors are weather-sealed with rubber gaskets. The battery door can be removed to allow installation of larger batteries, though doing so defeats the weather sealing.

A larger battery loaded with the door removed.
A small RESET hole allows you to insert an unbent paper clip to reboot the camera’s brain should it be necessary, and a SLOT SELECT button lets you switch which CF card is in use.
Right Side
The right rear of the camera is a connector panel, angled out at about 45 degrees so that cables don’t interfere with the face of the operator at the back of the camera, nor do they stick annoyingly out to the side. The bulk of the left side is the C500’s processor module for uncompressed HD, 2K, and 4K output, hidden behind a removable cover.
At the top of the camera body itself there’s another focus hook and a 3.5mm stereo MIC connector. At the bottom, behind the processing module, lurk two more air intakes.
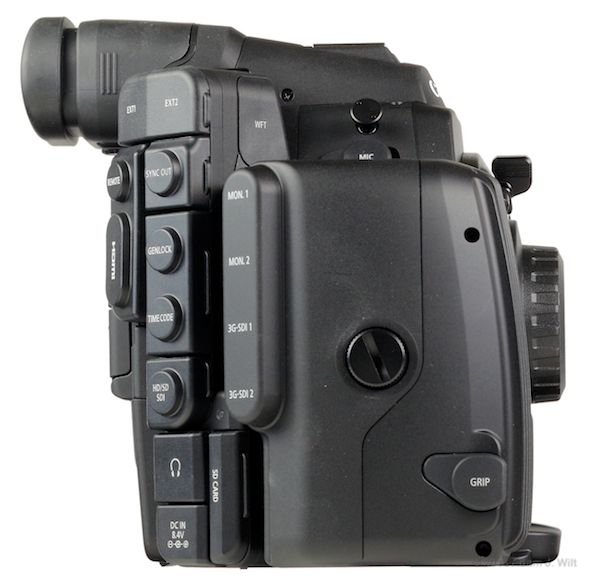
Right side, all covers in place.
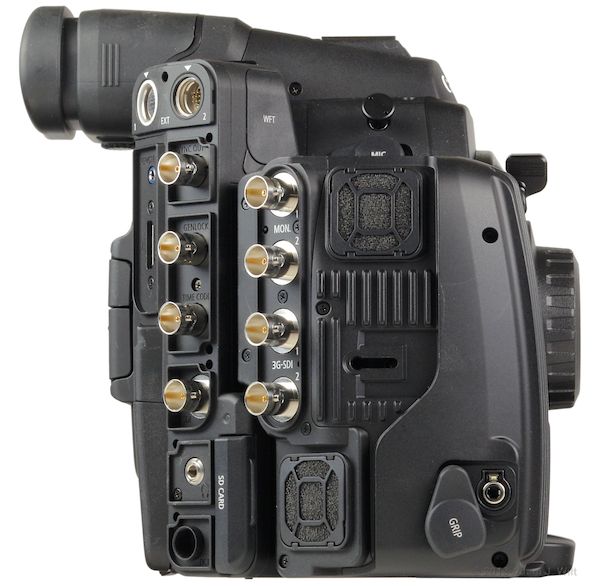
Right side, all covers removed aside except for the one on the SD slot and the WFT socket.
The two EXT connectors at the top are where the dual cables from the monitor unit plug in, carrying video and power to the LCD and XLRs and bringing control signals and balanced audio back. A REMOTE jack accepts a 2.5mm plug for “commercially available remotes”; I didn’t investigate this further.
On the front side a WFT port accepts a plug-in WiFi transmitter, letting you control the camera wirelessly through a web browser, complete with live viewing. I didn’t have the transmitter module to test, so I will say no more about this.
The camera body proper has three video outputs: HDMI supplies SD or HD video depending on what the connected monitor tells it; SYNC OUT can be set to supply SD composite video, an HD analog component Y (luma) signal, tri-level HD sync, or SD blackburst sync; HD/SD SDI outputs digital component. All three outputs are available simultaneously.
TIMECODE can either send or receive LTC timecode signals. GENLOCK accepts either an SD analog blackburst signal or an HD analog signal with tri-level sync; oddly enough these are two of the formats available from the SYNC OUT terminal.
A 3.5mm headphone jack, DC IN port, and an SD card slot finish off the right rear panel. The SD slot is used for storing video-resolution stills and for transporting camera setup files.
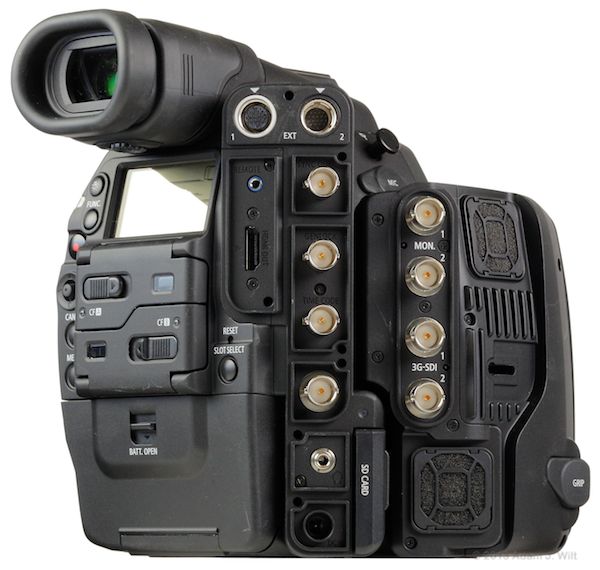
Right rear corner view.
The processing module adds four more BNCs: two more HD-SDI monitoring ports, and a pair of 3G-SDI outputs used, simgly or in combination, to feed uncompressed HD, uncompressed 2K (both as 10-bit, 4:2:2 YCrCb, 10-bit 4:4:4 RGB, or 12-bit 4:4:4 RGB), and 4K (12-bit Canon raw format) to external recorders. Two small (yet quiet) fans with foam dust covers keep the module cool, along with heatsink ribbing on the side and front.
A small socket towards the front lets you plug in the same handgrip used on the C300. There’s no place on the body to attach the grip—the C500‘s processing module mounts where the grip does on the C300—but folks like Zacuto make grip relocators so you can use the grip on support rods (the trick is finding the grip: Canon doesn’t offer it as a C500 accessory, so you need to order it as a C300 service part, instead).
Top
The C300’s body narrows towards the top, leaving just enough room for an accessory shoe and the pull-out EVF.
Robust accessory shoe with 1/4" socket; two focus hooks.
The EVF pops out a bit, allowing it to be angled upwards.
The processing module and its front heatsink give the camera a somewhat side-heavy look.
Bottom
The underside of the CA300 has a forward-mounted tripod socket, intended to be roughly at the camera’s center of gravity once you’ve hung a lens on the lens mount.
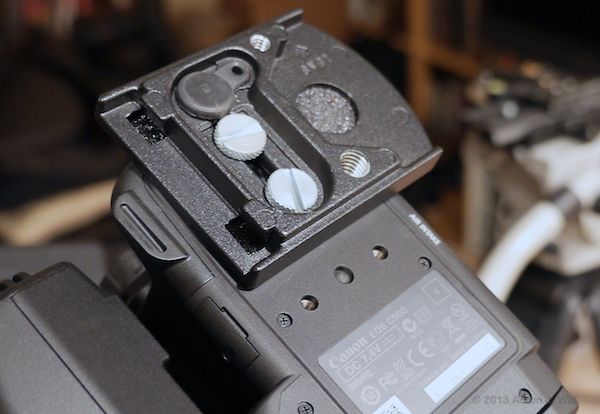
The C500's underside with a Manfrotto quick release plate attached using both 1/4” and 3/8” screws.
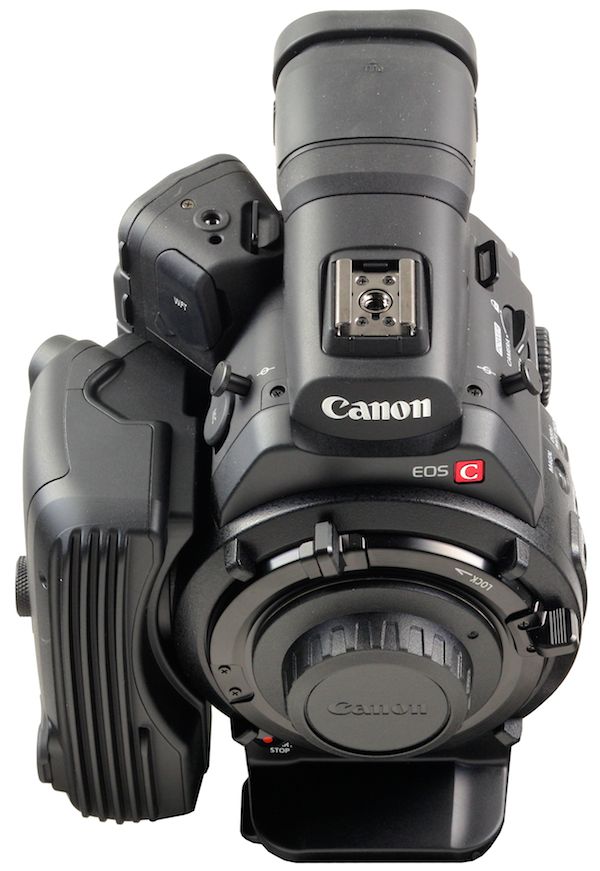
Front
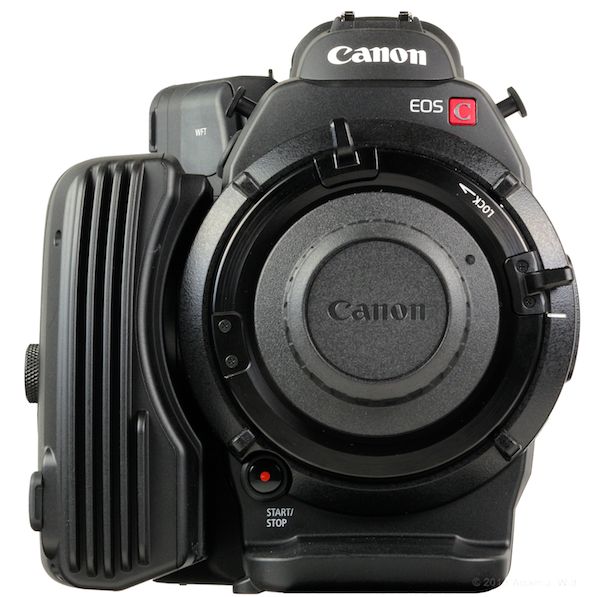
C500 EF business end, body cap in place.
There’s a START/STOP trigger at the 7:00 position; lens release levers at the 11:30 and 2:30 positions.
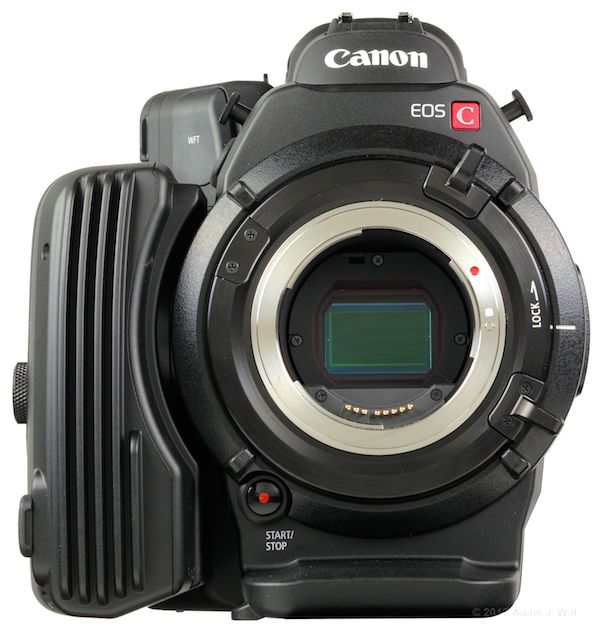
C500 EF business end, cap off, powered on to reveal its Super35mm-sized sensor.
Like the C300, the C500 automatically selects the 6-stop ND filter when it’s powered down, serving as a capping shutter to keep dirt off the sensor and cut down the light when there’s no lens attached. Turn it on, and the filter slides out of the way.
Note also that the lens locking levers are now at 2:00 and 4:00… on an EF-mount camera! The C500 EF uses a breech-lock mechanism instead of a twist-lock bayonet mount. Observe that the red dot for lens alignment is at the 2:00 position, not straight up at 12:00.
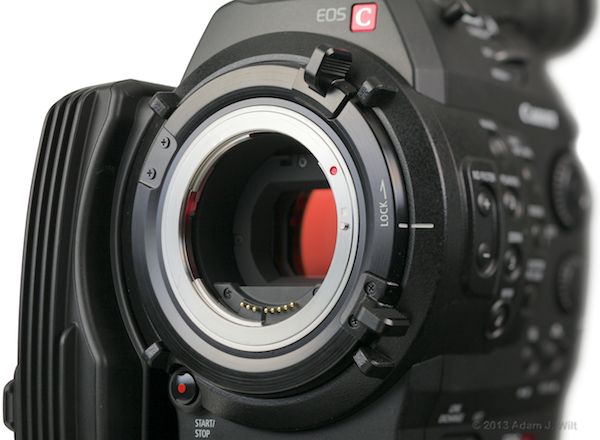
Breech lock open.
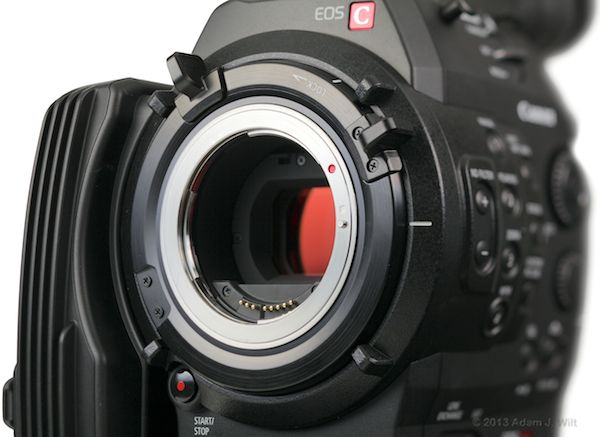
Breech lock closed.
A breech lock is much more rigid and secure than a bayonet mount. Bayonet mounts have a slight amount of play in them, letting you rotate the lens completely until a locking pin pops into place. The lens is held firmly in place by stiff leaf springs in the mount, but those springs have enough “give” to allow for manufacturing tolerances in the mounting flange as well as thermal expansion and contraction.

Looking inside the bayonet mount of a 5D Mk II. See the spring?
For a still camera, that’s fine: body and lens are tightly coupled by such a mechanism, because the body and lens don’t tend to have forces separating them—and even if the lens gets pulled slightly away from the body, the minor displacement will be compensated by refocusing just before the exposure is made. Furthermore, by the time stills lenses get big enough and heavy enough to pull away from the body, it’s the lens that gets tripod mounted, and the body simply hangs off the back of the lens.
On a more massive cine camera, with a big cine lens fitted, a spring-loaded mount is less suitable. Hanging a five- or ten-pound cine zoom off a body rigidly fixed to a tripod means it’s likely to sag against the springs; if you use a lens support, proper alignment means you’ll need to adjust the support preload perfectly.
On a breech lock, the lens’s mating flange is placed against the camera’s mount, and a rotating collar actively clamps the lens to the mount with a wedging action, just like screwing down a bottle cap. There are no springs involved. The mating surfaces of camera and lens are simply put in contact, with no sliding motion (and thus no abrasion and erosion) along the critical surfaces determining lens-to-body spacing, and the locking collar clamps the lens firmly and securely in place.
With a PL mount, the locking collar sits in front of the lens mount’s “ears” and presses the flange against the body mount as the collar rotates. EF lenses weren’t designed with a locking collar in mind, so a different approach was used: the three “ears” on the body’s mount rotate behind the fixed, non-rotating mounting surface, and essentially pull the lens against the body from behind. It’s a very clever solution, and one I wish I could retrofit to my 5D Mk II.
Top Handle
The top handle is a robust metal grip that slides into the camera’s accessory shoe and clamps down firmly with a thumbscrew. It mates solidly with the camera, with no residual wobbles or creaks.

Top handle, with monitor unit mounted on the front accessory shoe.
There are accessory shoes on the front and the top of the handle, designed for the monitor unit’s feet but also allowing any other accessory fitting a standard shoe. A 1/4″ socket at the top rear accepts fittings like mike mounts and articulating arms.
Monitor Unit
The monitor unit combines dual XLR inputs (with phantom power), a 4″ LCD monitor, and the sorts of audio and playback controls that we normally find on the top panels and top handles of other camcorders.
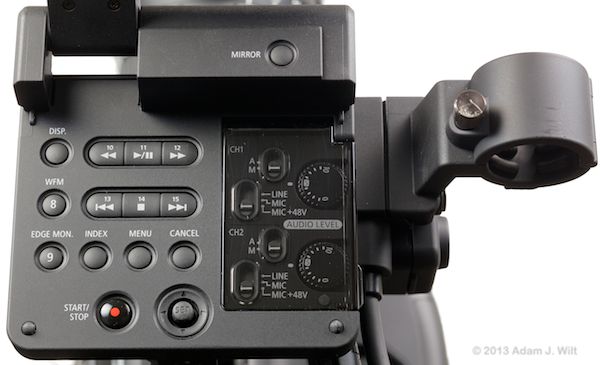
Controls on the monitor unit. Sorry, there are “only” 8 assignable buttons up here. Mike mount, dual XLRs on right side.
There’s a MIRROR button letting you flip the LCD image around as needed for whatever direction you’ve aimed the monitor; since the whole unit is detachable and re-orientable, the LCD can’t automatically flip its image based on its pivot angle.
Transport and display controls do double duty as assignable controls. There’s also yet another START/STOP trigger and another four way joystick, and a full suite of audio input controls beneath a flip-up safety cover.
The monitor unit has mounting feet on its bottom and its aft end, letting it attach to the front or top shoes on the top handle or the top shoe on the camera body itself, without the top handle. The entire monitor unit can spin 270 degrees on its mount; the LCD can then flip either up or down and then spin another 270 degrees, so you can aim the LCD in just about any direction imaginable.

Dual multipin cables run from the monitor unit to the EXT connectors on the camera body. They use self-locking polarized connectors, not unlike LEMOs, so they’re easy to connect and disconnect by feel. They can’t be plugged in to the wrong ports (one cable end is female and the other is male), and their locking collars ensure they won’t pull out by accident.
Displays
The C500, like the C300 before it, has a backlit status panel below its EVF, showing white-balance setting, ISO, shutter, aperture, audio levels, and time remaining on the CF cards. Unfortunately, just as on the C300, this display fades out if viewed from below the level of the panel itself, rendering it less than entirely suitable for jib or crane work where it would otherwise be most useful.

Status LCD is readable from above but blanks out if viewed on the level or from below.
In terms of display resolution, data overlays, focusing aids, scopes, and the like, the C500 is the C300’s twin… so much so that I’ll simply refer you to my C300 review, halfway down page 2, for details.
By the same token, I’ll refer you to page 3 of that review for the camera’s basic features and functions, and page 4 for HD performance and colorimetry; just ignore the stuff about the handgrip.
I do this for two reasons: (1) I’m lazy, and (2) in MXF mode, the two cameras are so close in functionality and performance that they are interchangeable. This is a great boon; once you know the C300, the C500 is instantly familiar, with only a few things changed and more capabilities added.
What changes?
- The C300’s headphone volume buttons become, by default, LENS EXCHANGE and LUT. LENS EXCHANGE powers down the entire camera aside from the timecode generator, so you can change lenses without worrying about power glitches on the EOS contacts and yet still keep your timecode from skipping a beat. LUT lets you apply either a Rec.709 or a “wide dynamic range” viewing LUT to the monitor outputs when shooting in Canon Log gamma,
- The C500 EF has the breech lock mount, while the C300 EF uses the same ol’ bayonet mount (the PL versions of both cameras are identical in this respect),
- The C500 has no side handgrip.
What gets added?
- There’s that processing module thing stuck on the side, and,
- There’s a “System Priority” item in the main menu that turns it all on.
It’s that added functionality I’ll look at next.