
Doin’ the HDMI-DownRes-ProRes Shuffle…
Convergent Design’s Odyssey 7Q+ firmware version 5.10.100 includes the ability to take in a 2160P (4K or UHD) HDMI feed and record it as 1080P (2K or HD) ProRes. I’ve been working with a beta version for a while; here are my thoughts and impressions.
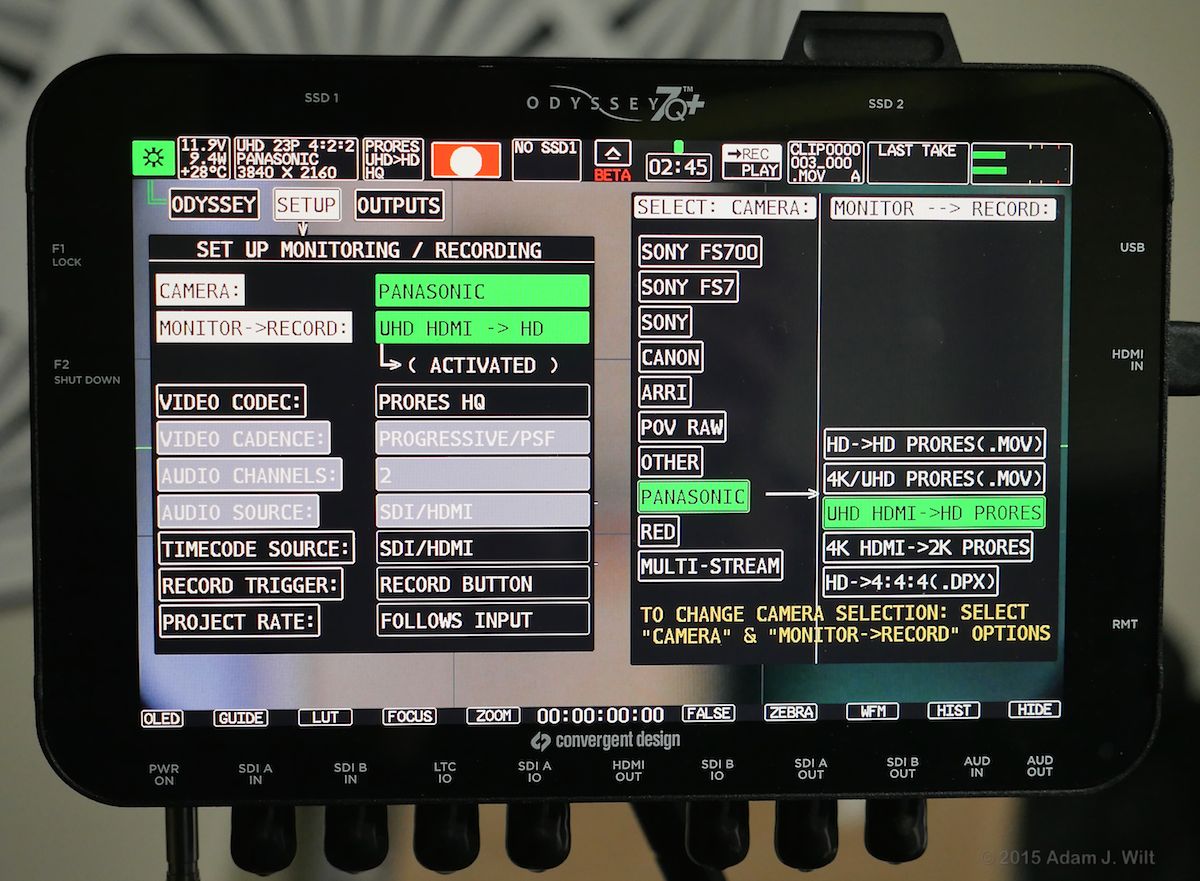
Selecting UHD-to-HD downsampling for the GH4 in the 7Q+’s beta-release menus. Click/tap for a larger image.
Odysseys have previously been able to accept 2160P raw feeds from the Sony FS700 and FS7 and downsize it 2:1 for recording. The new feature is accepting a 2160P video feed over HDMI and recording it at half-size. Now any camera with a 2160P-capable HDMI output can record 1080P ProRes externally, without the compromises many low-cost 4K/UHD cameras make in generating an HD image. This is great news for those using the Sony A7S, Panasonic GH4, and Samsung NX1, to name a few.
This configuration offers several advantages:
Supersampling: it is a truth universally acknowledged, that an image in possession of a high resolution will look better downsampled to a lower resolution than an image that starts off at that lower resolution. A clip generated at 4K and recorded at 2K looks sharper than the same scene shot at 2K to begin with. Even if all you need is HD, capturing at UHD and recording as HD – assuming the downsampling is properly executed – will look better than the same image captured as HD, all else being equal…
Some 4K cameras make lousy HD images: …but all else isn’t equal, at least with the current crop of mirrorless still cams; their 1080P images lack the quality of their 2160P images, sometimes by a lot. Take a look at the GH4’s images: in full HD (FHD) mode, the GH4 reads the full sensor (not the slightly-smaller, pixel-for-pixel 4K window) and mashes it down to 1080P, using binning or skipping. You’ll get a 700-line-ish image with plenty of aliasing – it’s passable fair video by DSLR and DSLM standards, but it’s not close to the quality a real HD camera can capture.
GH4 FHD (1920×1080) internal recording, 1:1 sample
(With the GH4, you can also use ETC mode – Extended TeleConversion – which crops down to a pixel-for-pixel area of the sensor; this gives you cleaner resolution, but at the expense of a much narrower angle of view and an increase in noise, and the GH4 is not noted for its excessive quietude to begin with.)
However, all these cameras do a passable fair job of making 2160P images, even if their native HD isn’t always up to snuff. So you can shoot 4K (true 4096×2160 4K, or 3840×2160 UHD as you see fit) and then downsample it in post:

GH4 QHD (3840×2160) internal recording, downsized to HD in FCPX.
I work this way with the GH4 as a matter of course; its UHD H.264 pix downsize to HD very cleanly and I get a noticeably superior HD image, which I’ve happily intercut with HD footage from cameras costing 20x more (I do, however, take a hit on NLE performance – pushing 4K frames around isn’t as swift and responsive as juggling HD images).
If you have an A7S, you can’t quite do this, as the A7S doesn’t have internal 4K recording. You can record 4K ProRes externally, with an Odyssey or a Shogun or such, but now you’ve got big, bulky 4K ProRes files to deal with; if all you need is HD, it’s storage-gobbling overkill.
With the downres-to-ProRes conversion in the 7Q+, you get the benefits of native 4K/UHD imaging and edit-ready 2K/HD ProRes in a single step.
Increased bit depth and color resolution: The act of downsampling an 8-bit 2160P image by a factor of two has the effect, under certain circumstances, of increasing the apparent bit depth by up to 2 bits, resulting in a 1080P image with up to 10 bits of brightness information. Consider various 2×2 pixel 8-bit blocks; they might have luma values like these:
128 128 128 128 128 128 128 129 129 129
128 128 128 129 129 129 129 129 129 129
Now downsize them: average them to single 8-bit pixels:
128 128.25 128.5 128.75 129
or, represented as 10-bit pixels (the 8-bit numbers times four):
512 513 514 515 516
(A moment’s careful contemplation of the gradients and conditions that result in this happy accident will show you that it’s not a perfect bit-boost; very flat gradients, in the absence of dither noise, won’t show as smooth a ramp as the same ramp originated at a true 10-bit depth, but it’ll still be a bit better [pun intended] than a pure 8-bit signal.)
Here’s a simulated example: both these images are 8-bit, but the first has a very coarsely posterized gradient, while the second is downsampled 2x using bilinear interpolation:

A simulated “2160P” image with coarse luma steps.

The same image downsampled 2x to “1080P”. Note the somewhat smoother gradient.
A comparable argument can be made that a 4:2:2 image downsized 2x might not have quite the color sharpness of a 4:4:4 image, but it’ll be better than 4:2:2, and a 4:2:0 image similarly shrunk will be between 4:2:0 and 4:4:4 in its smaller size.
So, in addition to the sharpness boost of supersampling, we can also boast of a potential boost in the bit depth and color crispness of a downsized clip.
In neither case are you getting something for nothing; you’re not creating more bits and color samples out of thin air. You’re simply taking the same picture information and trading off spatial resolution for tonal and chroma depth and detail; you wind up with only a quarter of the pixels, but each new pixel combines the information from four original pixels and benefits thereby.
ProRes quality: an externally-recorded ProRes file, in all its high (but manageable) bit rate, I-Frame-only goodness, is generally more robust, edit-friendly, and artifact-free than an internally-recorded H.264, H.265, or XAVC clip. Not that you need a 4K-to-2K downres for that, mind you; a regular HD output can be recorded in ProRes and reap the same advantages. What the 2x downres does do is trade off spatial resolution for increased pixel depth as described above. For cameras like the A7S that are limited to 8-bit outputs and 8-bit internal HD recording, this workflow gives you 10-bit(-ish) HD files that will tolerate more aggressive grading than their 8-bit counterparts. With the A7S’s log curve especially, this is a Good and Necessary Thing.
But does it work?
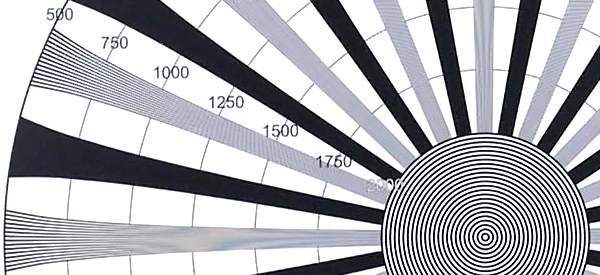
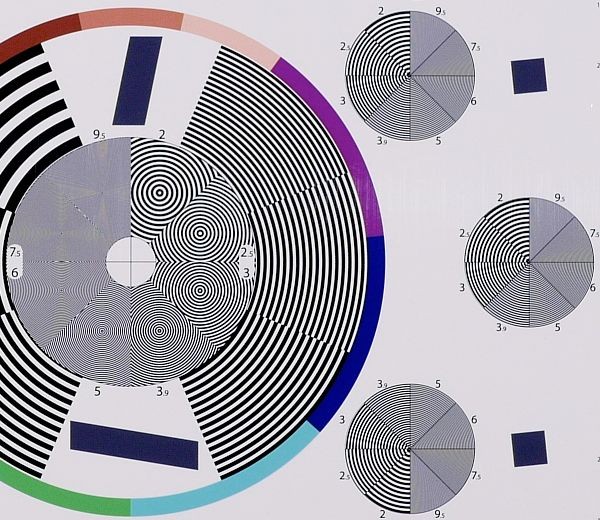
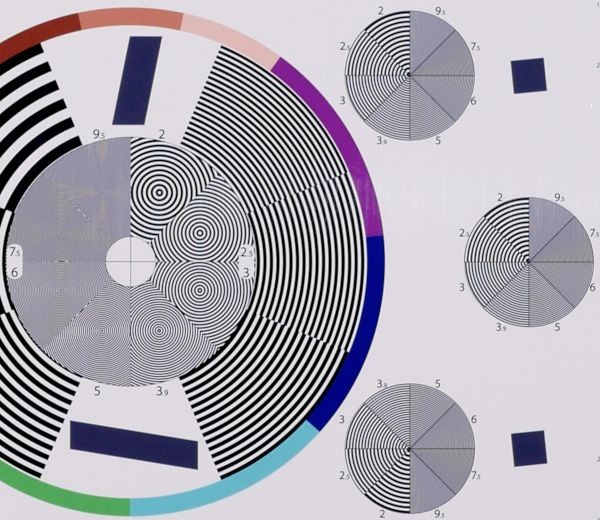
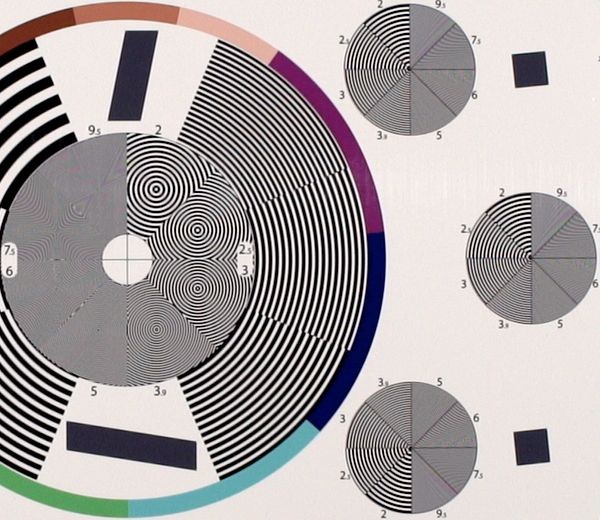
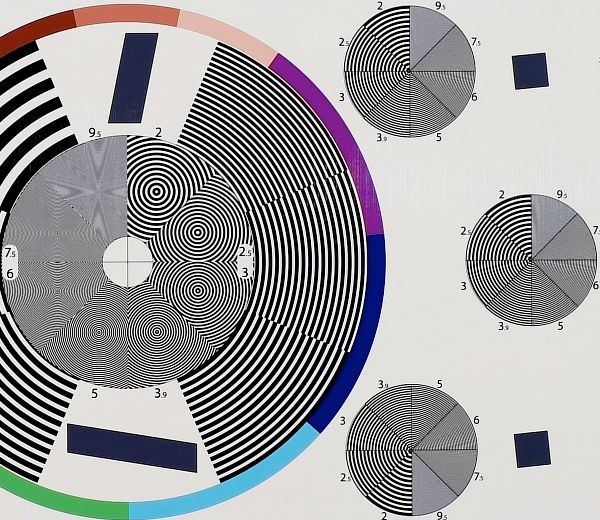
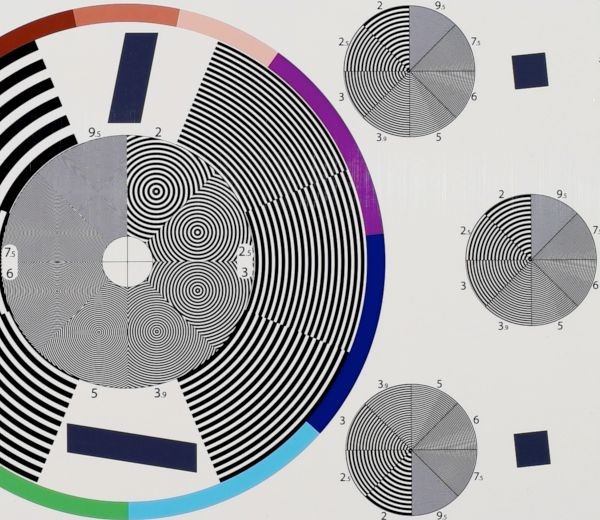
Convergent Design’s Mitch Gross sent me several sample clips, from which I made pixel-for-pixel extractions. Convergent Design’s clips were shot with three different cameras, using an Abel Cine Resolution Analysis chart:
On this chart, the numbers by each resolution wedge indicate hundreds of line pairs per picture height of the pattern, so “5” means 500 lp/ph, or 1000 TVl/ph.
Panasonic GH4
GH4 HD output recorded as ProRes on the 7Q+.
GH4 UHD downsampled to HD and recorded as ProRes on the 7Q+.
Just for grins, I took the sample UHD clip (because the 7Q+ can also record a UHD input to a UHD ProRes file) and did the same resizing in FCPX:
GH4 UHD recorded on 7Q+, downsized to HD in FCPX.
(Convergent Design sent GH4 UHD clips recorded both internally as H.264 and externally as ProRes on the 7Q+; both of them look very much the same after FCPX downsampling.)
The FCPX image looks a bit less edgy than the 7Q+’s image, but both are much better than the GH4’s own HD rendering.
There’s a bright vertical smudge in the magenta color patch above; it’s in all the footage from all the cameras, both internally recorded and externally recorded, though it moves around a bit depending on the camera used. I think it’s a stray reflection on the chart, not a defect of recording or of any of the cameras.
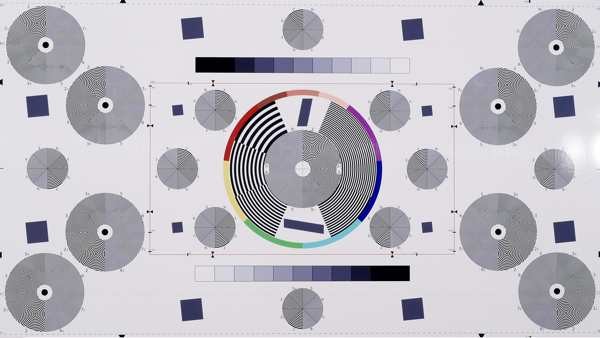
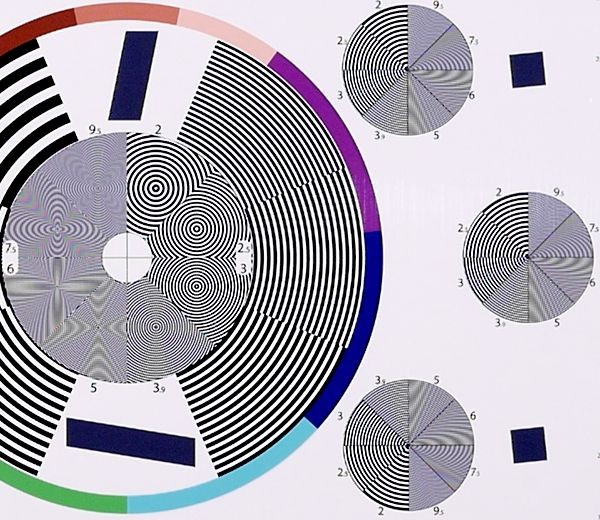
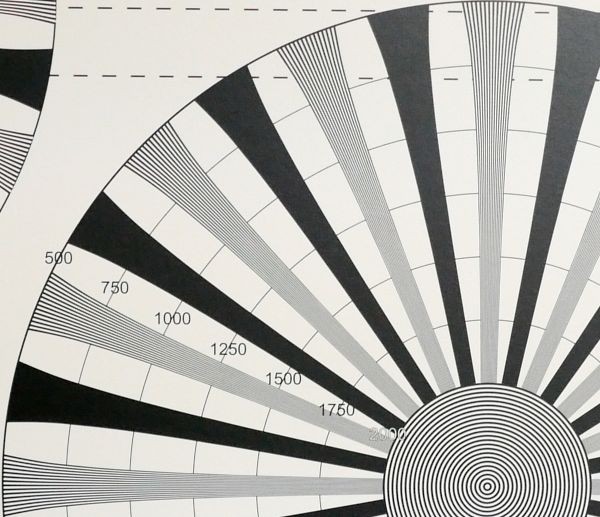
For good measure, I did a quick-and-dirty test with my own GH4 and the DSC Labs MegaTrumpet chart (the same one I used in my GH4 tests previously):
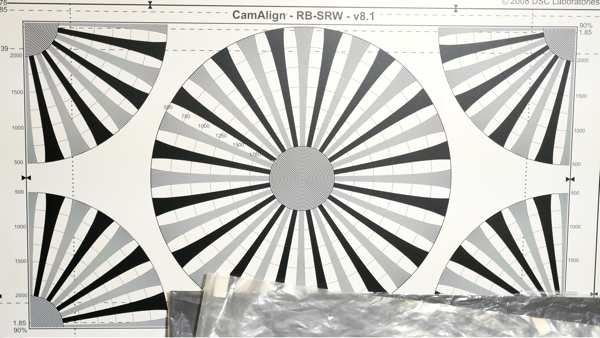
The MegaTrumpet chart as sloppily set up for this test.

GH4 Full HD, native output.

GH4 UHD downsized to HD by the 7Q+.
GH4 UHD downsized to HD in FCPX.
I’m not seeing the same difference in edginess between the 7Q+ and FCPX downsamples here. I shot these tests in “Natural” photo style with sharpness at -5; I’m not sure where Convergent Design had sharpness set in their GH4.
Both downsampled clips are clearly superior to the native HD clip.
Sony A7S
Sony A7S HD output recorded on 7Q+.
Sony A7S UHD output downscaled by 7Q+.
Sony A7S UHD output downscaled by FCPX.
The A7S does a very creditable job of outputting clean 1080P, but the downsampled UHD – whether recorded as HD by the 7Q+ or recorded as UHD and then downsized in FCPX – retains slightly more high-frequency detail. And, of course, the A7S’s output is 8-bit only; the downsized ProRes files have gained some 10-bit tonal smoothness due to the resampling (not that you’d see it in this chart, mind you!).
Samsung NX1
NX1 native HD output recorded on 7Q+.
NX1 UHD downsampled to HD by the 7Q+.
NX1 UHD recorded on 7Q+, downsampled in FCPX.
Yow! The NX1 appears to simply line-skip and pixel-skip in its own downsampling from UHD to HD. As with the other cameras, taking the UHD output and then downsampling it gives a much cleaner image.
Conclusion
Yes, it does work: you get much better looking HD pix from these cameras by using the 2160P-to-1080P downsampling modes, resulting in edit-ready 10-bit ProRes images with higher quality than internal (or external) native-HD capture, and without having to record a 2160P camera master and downres it later. It’s not a one-size-fits-all workflow, but if you need high-quality HD fast, with as few postproduction hassles as possible, this is a very nice capability to have in your toolkit.
Note that the first time you enable the 7Q+‘s HDMI downres, or the first time you reboot the 7Q+ after installing a firmware upgrade with this mode loaded, the 7Q+ wants three minutes to initialize the firmware (at least in the beta code I’ve been testing with). Thereafter, it’s a quick reboot to change modes, so it’s not a problem once you’ve done it the first time. Just don’t wait until you’re on a busy shoot to do that first load.
Also note that some cameras offer the choice of 4096×2160 (“4K”) or 3840×2160 (“UHD”) output. Make sure you select the corresponding downres mode on the 7Q+, or it will refuse to record, and complain about an unsupported input. This is an easy thing to overlook; I did so myself the first time I set it up, leading to considerable head-scratching. Yep, just another reminder to familiarize yourself with your gear before the pressure of a real production!
Disclosure: Convergent Design sent me an Odyssey7Q+ for beta-testing and feedback, and C-D’s Mitch Gross sent me their sample downres clips. It’s quite probable that C-D expected some positive press out of this; after all, I’m more likely to write about stuff if I have it to play with. Aside from that, they haven’t actually suggested that I write anything, or that their loan of the 7Q+ is conditional upon my giving it a good writeup, or in any way tried to influence my opinions. I’m also working on a contract for Sound Devices / Video Devices, which makes competing ProRes recorders, but they haven’t influenced me in any ways to say disparaging things about the Odysseys. Each company knows about my involvement with the other – and now you do, too.