
My explorations of the prototype PXW-FS7 “Vérité” continued this week with the receipt of two E-mount lenses and the XDCA-FS7 extension unit.
Getting a Grip
In Part 1 I whined about not being able to actuate all the controls on the SmartGrip, especially the zoom rocker. Sony’s Juan Martinez asked, “have you tried rotating the grip so your middle and index fingers fall on the rocker?” I hadn’t, so I did: I pressed the SmartGrip’s release button and rotated it “one finger forward” so that middle and index fingers worked the zoom rocker, leaving my ring and pinky fingers to grasp the grip.
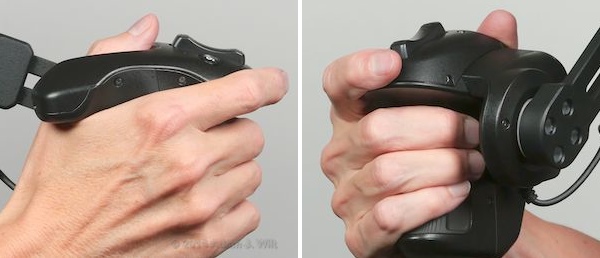
“Normal” three-finger grasp.
“Rotated” or “zoom” two-finger grasp.
This grasp has several tradeoffs with the “normal” three-finger grasp:
- Middle and index fingers easily control the zoom rocker.
- Front/side button is now under the pinky finger, not the ring finger; it’s equally easy to use in either case.
- Front dial is pretty much unusable (accessible by middle finger, only with slightly painful contortions).
- Top Button as accessible as before, using either index or middle finger.
- Rear control usability unaffected by the rotation.
- Somewhat less Mashed Knuckle Syndrome.
- Lowered grasping force: the middle finger, formerly used for grasping but now on the rocker, has about as much gripping force as the ring & pinky fingers put together (PDF).
I find that both grasps are useful, depending on whether I’m in need of the front dial or the zoom rocker. If I’m using the “zoom” grasp, I do wind up taking more weight on my left hand due to the reduced gripping force I can comfortably exert with my right hand. But then, if I’m using the zoom rocker instead of zooming the lens manually, my left hand can stay affixed to the focus ring most of the time, so it’s a fair tradeoff.
And while it would be nice to have all six SmartGrip controls equally accessible at all times, I’d need eight fingers to run them all simultaneously, with none left over to hold up the camera – amusing, but not entirely realistic.
In running around with the FS7 over the past week, I haven’t ever felt that I was lacking for controls on the SmartGrip, whichever grasp I used. In practice, I find that I’m only using one or two of the controls 95% of the time anyway.
What Sony has done is cram lots of controls you might want to use into the SmartGrip, but that doesn’t mean you have to use all of them all the time; you can pick and choose the ones that make sense for the way you like to work. Sony is building a one-size-fits-all grip, and they’re trying to cover all the bases. Caleb Crosby, creator of several control-studded grips, points out, “oh my lord is the devil in the details of exactly where the button resides relative to finger position and finger size. It’s very critical and at the same time totally unforgiving.” In that light, Sony’s done a superb job with the SmartGrip… though I wouldn’t mind seeing Mr. Crosby craft a black walnut version of the same thing, grin.
What’s telling is that when I’ve pulled the SmartGrip off the camera, I’ve really missed it, even when I’m sitting with the camera in my lap or operating it on a tripod. Having the grip’s assignable top button set up for focus mag and being able to zip through menus with the grip’s 4-way controller make the camera much faster to use than when I have to fall back on the small and fiddly Handycam-style buttons on the side of the FS7. Without the SmartGrip, the FS7 feels like the flatfish cousin of the FS700: the FS700’s controls have migrated to the FS7’s left side, but they’re the same things: small, black plastic buttons and thumbwheels scattered about on a flat surface, with insufficient tactile differentiation to allow successful eyeballs-elsewhere operation. The SmartGrip by its nature is a tactile control surface, and It Just Works.
Looking at Lenses
Sony sent me two new E-mount zooms to try on the FS7, the 16-35mm f/4 and the 28-135mm f/4. Like other E-mount lenses, they pull focus “normally”, like other cine / video lenses, but zoom “backwards”, like Nikon stills lenses. Both lenses have servo focus and iris mechanisms and Optical SteadyShot (OSS) stabilization.
The FS7 can drive these lenses in both manual and auto modes for iris, focus, and (for the 28-135) zoom. Focus or iris can even be assigned to the control dial on the grip, though the current firmware’s dial “gain” is too low to make that practical.
SEL1635Z 16-35mm f/4, a.k.a FE 4/16-35
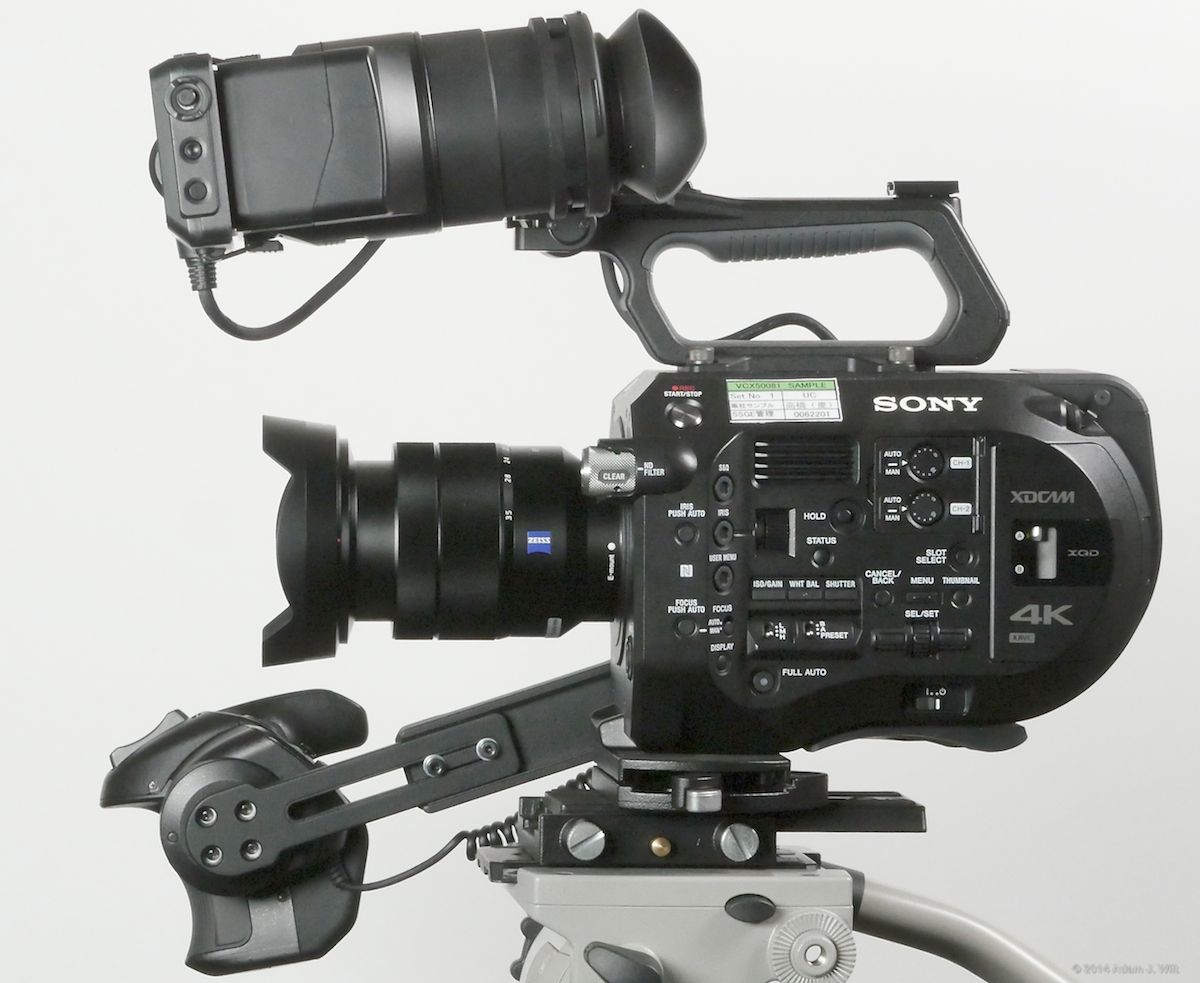
FS7 with 16-35mm zoom
The Zeiss-labeled16-35mm introduced at Photokina follows in the minimalist tradition of other E-mount stills lenses: it’s a stylish black metal cylinder with finely-ridged but otherwise unobtrusive focus and zoom rings.
The free-spinning focus ring has no markings and no repeatability. It has a buttery-smooth, lightly damped feel. The zoom is mechanically coupled and the front of the lens extends about 15mm at the 16mm focal length; the feel is smooth and firm. That’s it for controls: iris is adjusted using the camera the lens is attached to, as is OSS.
Zooming from 35mm to 16mm causes the front of the lens to extend about 15mm.

16-35mm at 35mm
16-35mm at 16mm
The lens weighs 18.3 ounces or just over half a kilogram. It’ll cost about $1350 when it ships in the next few months. It takes 72mm filters.
Performance looks very good: the lens is quite sharp wide-open, with only a very slight barrel distortion at the 16mm end and no lateral chromatic aberration to speak of at any focal length. Illumination is even, with no noticeable vignetting and at most a 1/6 stop difference between center and edge of picture.
You have to try pretty hard to provoke flare, which typically appears as single cyan ghost radially opposite your in-shot light source. Bokeh is round (the iris has 7 blades) and mostly undistinguished, but the outer edge shows as a bright ring, and the body of the bokeh shows the “onion ring” appearance characteristic of lenses with aspheric elements.
Despite the minimal texturing of the two control rings I found them easy to tell apart by touch. There’s a distinct groove between ‘em that serves to signal which one is which. Both rings have enough resistance that I didn’t inadvertently change one while groping for the other.
FE 4/PZ 28-135 G OSS
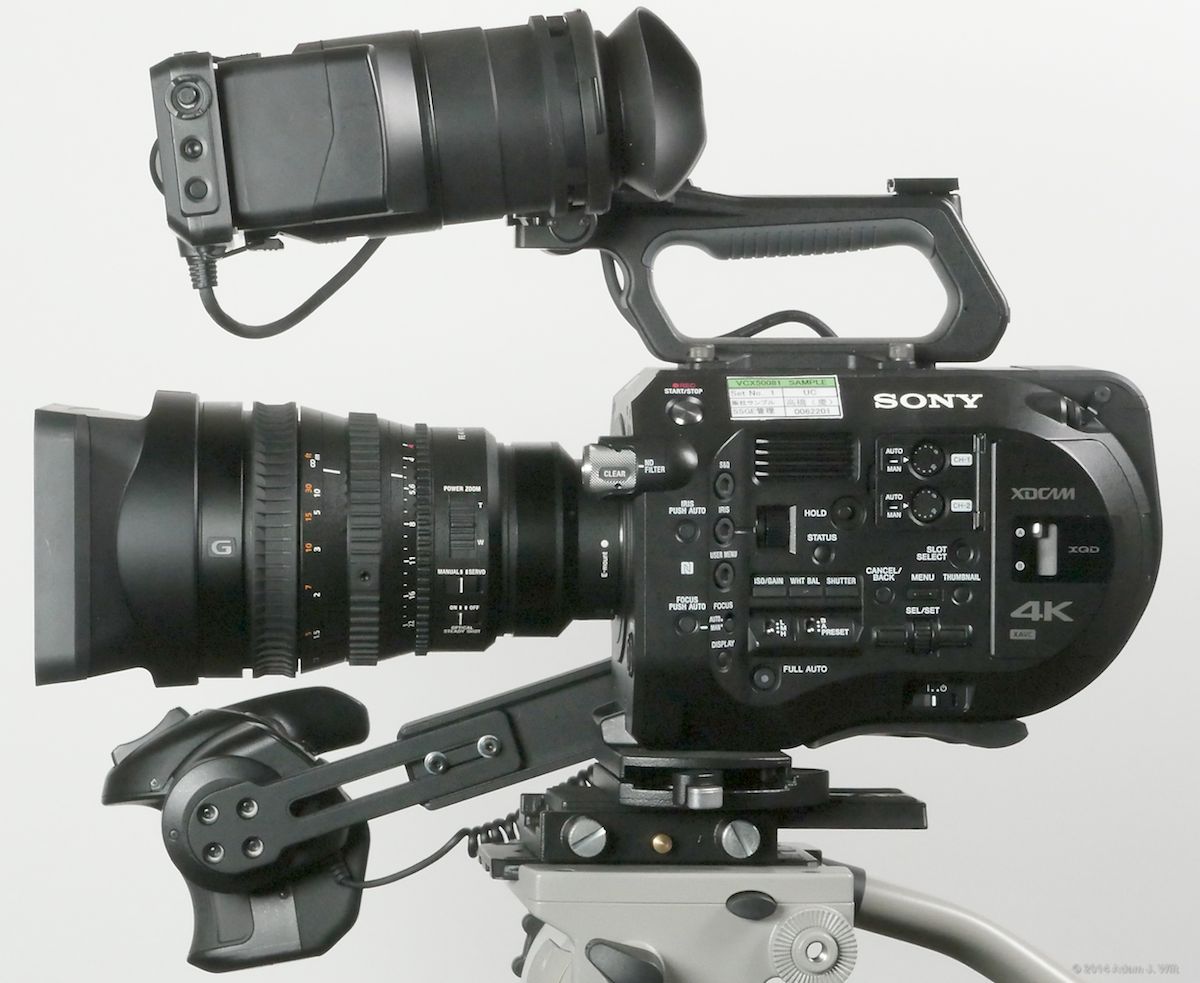
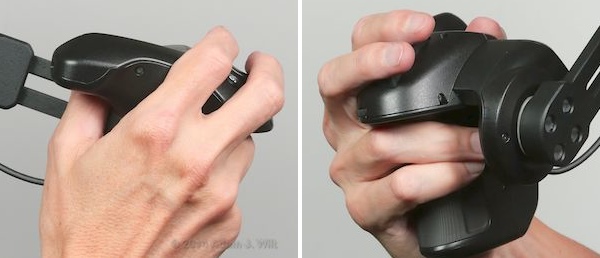
FS7 with 28-135mm zoom
The 28-135mm f/4, announced at IBC, is a video-oriented power zoom, not a stills lens (though it can be used as such). It has physical focus, zoom, and iris rings; clicked or clickless iris operation; power or manual zoom. It’s a nearly constant f/4 through its 4.8x zoom range. It takes 95mm filters. It weights about 2.7 pounds (1.2 kg).
According to Jon Fauer, it’ll be the kit lens for the FS7. Street price is around $2500, and sure enough, B&H lists an FS7 kit with this lens for $10,499.
The focus ring works like that on an EX1 or EX3: push it forward, and it’s a free-spinning servo-focus ring allowing both manual and autofocus depending on what the camera tells it to do; pull it back, and it locks into a marked and hard-stopped focus scale for precise, repeatable manual focus. In full-manual mode, it takes about 135º of rotation to go between infinity and the M.O.D of just over 3 feet (0.95m).
The zoom ring is also hard-stopped, with a 90º travel, but it lacks any markings at all (possibly because it’s intended to be reversible in software; see below). An auto/manual switch on the lens determines whether the zoom ring is used for manual zooming or ignored in favor of power zooming, which can be done with a slide rocker on the lens itself or driven from either of the zoom rockers on the camera.

28-135mm lens: zoom rocker at top, Manual/Servo switch in middle, OSS switch at bottom
The iris ring is marked in third-stop increments, and a slide switch on the right side of the lens enables or disables click-stops at those increments. The scale runs from f/4 to f/22 over a 90º rotation, and beyond f/4 there’s an “A” setting for auto-iris. Another slide switch locks the ring in either the manual or the “A” positions, so you won’t inadvertently move between ‘em – if you leave the switch in the unlocked position, it’s very easy to move from f/4 to A and back again. In the A position, auto/manual iris selection is done on the camera; you can set up the FS7 to use the IRIS dial, the SmartGrip dial, or both to select an aperture.
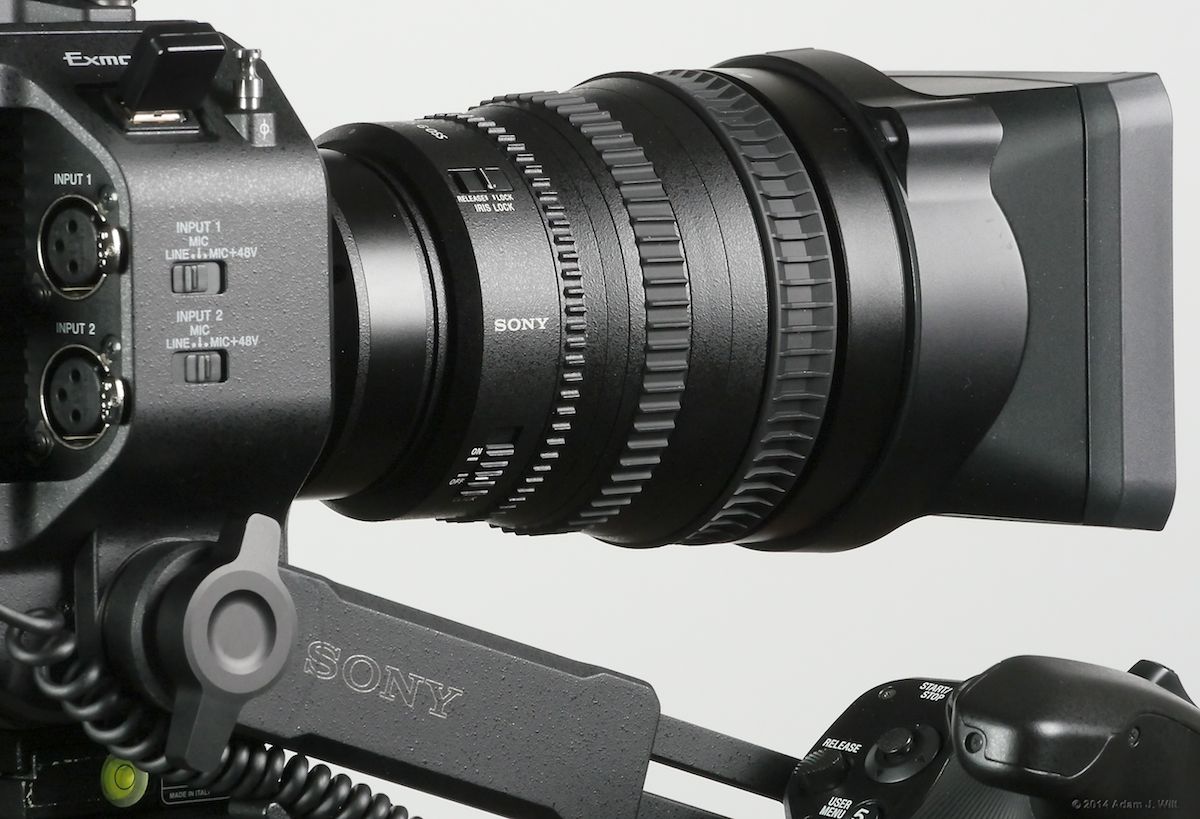
28-135mm lens: iris lock at top, click/clickless switch at bottom
Even with the various controls in manual mode, it’s still a servo-driven lens; there’s no direct coupling between a ring and the mechanical positioning it controls. If you snap the focus ring from the auto/manual position back to the full-manual position, the lens slews quickly to whatever focus setting the focus scale indicates (and since you can position the focus scale even when the focus ring is forward, you can preset a distance for an automated focus-pull). In the same manner, switching zoom from Servo to Manual causes the zoom to move to whatever position the zoom ring is set at, but as that ring is unmarked in any way, it’s much harder to predict beforehand what will happen.
The servo-driven nature of the lens also means you may see a bit of lag on fast moves. The lens I have is a prototype, and Sony’s Juan Martinez characterizes its firmware as “jellyware” – not firm at all! – so I can’t say if the performance I’m seeing is indicative of the shipping product, but this prototype takes about 1.5 seconds to zoom end-to-end, even if I spin the zoom ring faster.
Switching the zoom from Manual to Servo yields zoom control to the camera body (and to a slide control on the lens itself, which will come in handy for smooth zooms on a camera like the A7S). Using the rocker on the SmartGrip, I was able to zoom end-to-end in as few as 4 seconds or as slowly as 20 seconds.
In both Manual and Servo modes, the lens eases into and out of zooms; there’s no hard-start or sudden stop, unless you drive the lens at speed into its end limits.
The lens comes with a tripod-mounting collar like the ones common on 70-200mm stills zooms (among others). Why? It may not be of much use on an FS7, but if you’re using this lens on an a6000 or a7S or the like, it’s the best way to tripod-mount the combo. The collar’s foot is tapped for both 1/4” and 3/8” screws. The rotation locking knob is a cam mechanism with a half-turn between free and locked. Even better: pull the knob out in its free position, and the top half of the mount flips open so you can lift the lens out for handheld work – fast and simple.
Performance is pleasing for a 4.8x zoom: sharp wide open, no visible lateral chromatic aberration, perfectly even illumination across the frame with no vignetting or “port-holing”. The lens loses about 1/6 stop zooming from full wide to full telephoto: visible on the waveform monitor but not in the picture. There’s some barrel distortion wide (visible but not distracting) and a tiny bit of pincushioning zoomed in.
The 28-135 is no flare monster; I pretty much had to aim it straight at the sun to see anything untoward bouncing around in the optics. If you want to channel your inner J. J. Abrams, this isn’t the lens for you: it’s far too clean.
Bokeh is round (a 9-blade iris is used) and evenly illuminated, with a bit of the “onion ring” look to it (more aspherics); it’s not distressing, but if you’re a creamy-bokeh freak this ain’t the lens for you either (if you’re a creamy-bokeh freak the lens for you is a medium-long spherical prime anyway, so why are we fussing about the bokeh on these zooms so much?).
Distortion Correction and Zoom Ring Direction
If you find even a small amount of distortion displeasing, the FS7 has a trick up its sleeve: go to Menu > System > Lens > Distortion Comp., and set it to AUTO. The FS7 straightens vertical lines pretty much perfectly, though it doesn’t seem to affect horizontal lines, at least on this pre-release camera. Distortion Compensation is not available in Picture Cache (pre-record) operation according to the preliminary manual.
Also in the Lens menu: Zoom Ring Direction, which has the options Left(W)/Right(T) and Right(W)/ Left(T), about which the ops manual warns, “Enabled only when using an E-mount lens that supports zoom ring direction switching.” Obviously the setting has no effect on the mechanically-zoomed 16-35mm, but it also didn’t affect the 28-135mm. Sony says that “many things are not working yet” in these prototypes; I hope that the shipping FS7 and 28-135 will support this setting [update: it works in the shipping version of the firmware], since it’ll allow the zoom ring to be used in the video / cine-friendly direction instead of the default “backwards” direction. That the zoom ring on the 28-135 lacks any markings makes me optimistic that this will occur.
Better Balancing
Roughly speaking, there are two primary ways to set up a shoulder-mounted camera: balanced, and three-point support.
Balanced shooting is epitomized by Aaton’s “cat on the shoulder” designs, cameras that hug the shoulder in perfect balance. There’s as much mass aft of the support point as ahead of it, and a close-mounted handgrip allows the camera to be aimed and steadied with minimal force. Old-school ENG cameras are balanced designs, with VTRs and batteries in back counterbalancing B4 zooms in front. The typical 35mm shoulder rig hangs a coax film mag off the back to match a prime lens in front; 16mm rigs do the same with (typically) a small and light 16mm zoom lens in front, or a prime.
Balanced setups are harder to achieve when the bulk of the camera shrinks (an XQD card drive is a fraction of the size and weight of a Betacam deck or a film mag), yet big, heavy lenses are needed to cover a Super35mm-sized sensor, especially when the working environment favors the flexibility of zooms.
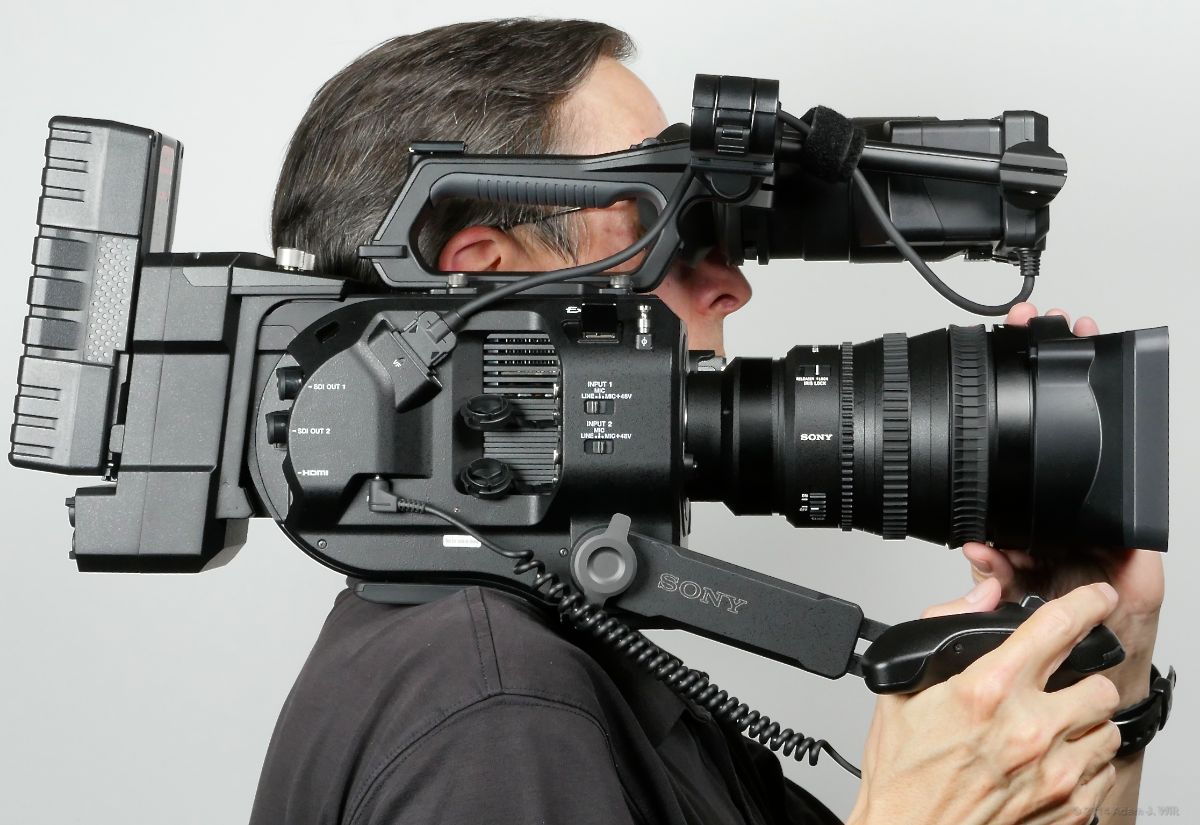
Thus three-point support: shoulder, right hand, and side of head (or shoulder, right hand, left hand). The weight of the camera is carried on both the shoulder and the supporting right hand, and stabilized (and partially supported) by the side of the head or the left hand. This is the style of operation the FS7 is designed for and it works quite well, but with a bit of work a balanced approach can be taken as well.
I found the stock 6” EVF rod on the FS7 prototype wasn’t quite as long as I wanted, though if I moved the EVF out to its farthest extent, so the rod was only halfway inserted into the clamps at either end, it was adequate for a three-point supported setup. I also tried a 10” rod; it let me push the camera about 3”-3.5” farther back on my shoulder, so that my shoulder was under the tripod socket instead of the shoulder mount (however the prototype’s VF cable length limited the forward extent of the VF’s travel to about 3”). In such a position, the camera is very close to neutrally balanced, even with the 28-135mm zoom. It took a load off my right hand, too, though – ever the complainer – I now wanted another 3” of extension on the SmartGrip’s arm. I also found that the flat plate of the tripod-mounting socket was rather less comfortable on my bony shoulder than the contoured, rubberized shoulder mount; if I chose to operate with this setup I’d want some additional padding.
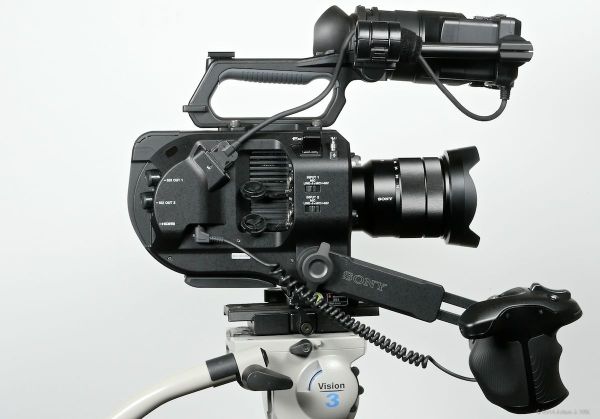
Compact FS7 rig…
..and bulked out with extension unit, V-mount battery, 4.8x zoom
Alternately, I tried fitting the XDCA-FS7 extension unit (about which more will be said below), and adding a RED Brick battery. With these installed, the camera balances quite nicely with a lightweight prime or the 16-35mm zoom, perched with my shoulder under the shoulder mount. With the 28-135mm zoom, the rig is slightly front-heavy.
In any case, the assemblage is starting to get heavy enough that I’d want a bit more padding between me and the camera if I were to wear it for an extended period of time (the whole kit with the 28-135mm weighs 13 pounds or 5.9 kg, whereas with a light lens and internal battery the camera runs around 7-8 pounds). Now, you may be made of sterner stuff than I am, and your mighty frame may shrug off the weight of the built-up FS7 as it would a gnat… I’m just reporting what I’d like were I operating it for a long time.
I should note that Sony’s FS7 System Chart shows a padded shoulder mount with 15mm LWS support rods, similar to the shoulder mount for the F55, so even bony shoulders like mine may have OEM relief. There’s also an ENG-style quick-release plate, the VCT-U14.
The upshot of all this is that whether you prefer balanced or three-point setups, the FS7 is adaptable to either mode of operation.

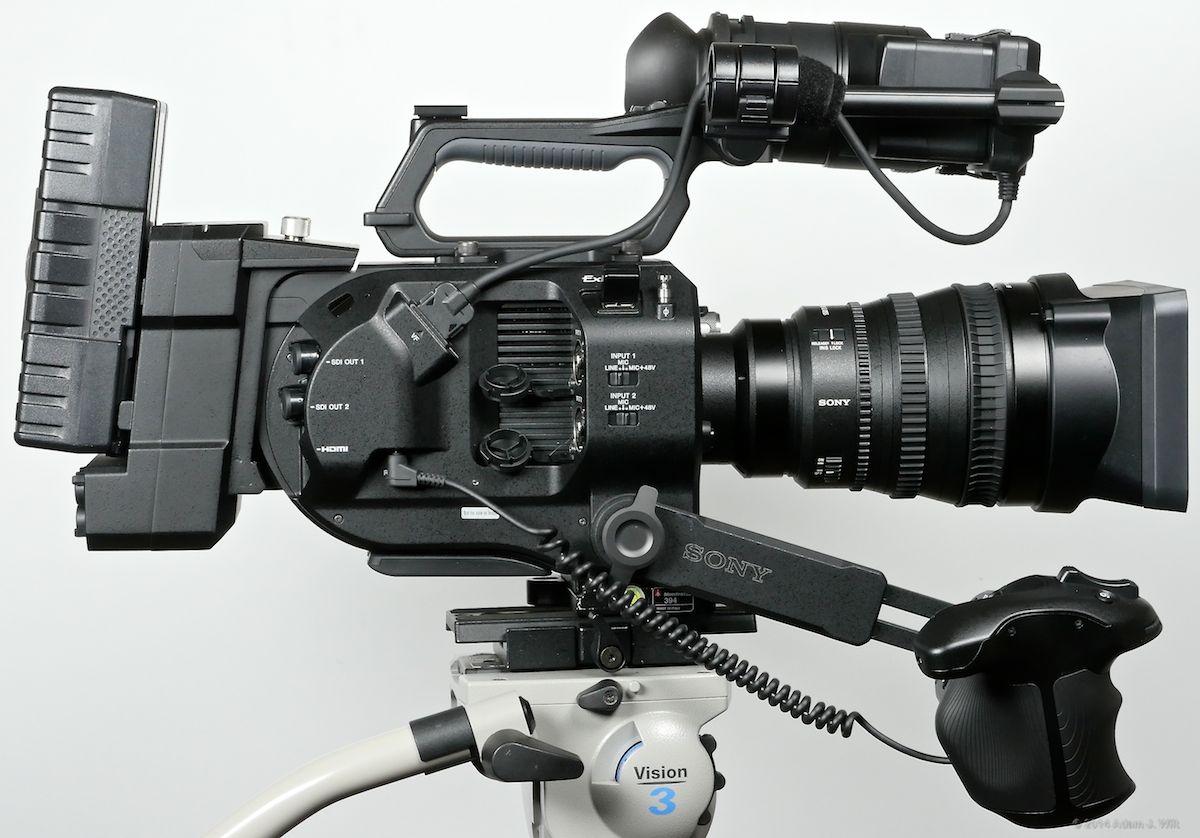
3-point support with a front-heavy setup
More balanced rig with extension unit and RED Brick battery
And More…
Extension Unit
The XDCA-FS7 extension unit, a $2000 option, adds several ports to the back of the FS7:
- 4-pin Cannon XLR DC IN
- 4-pin accessory DC OUT (a small Hirose connector, I think)
- GENLOCK IN BNC
- REF OUT BNC
- TC IN/OUT BNC, with a selector switch for direction
- RAW OUT BNC
It’s set up to carry a V-mount battery. The extension unit plugs into the top of the FS7 once a pop-off plastic cover is removed, but it also has a bulgy bit that slots into the FS7’s battery well, so that the oversized BP-U60T battery I was supplied with has to be removed first. A smaller battery, like the stock BP-U30, might still fit, but you’d have to remove the expansion unit to change the battery out, and I don’t know if the internal battery can power the FS7 with the extension unit installed. I suspect it’ll be disabled, but that’s just a guess.
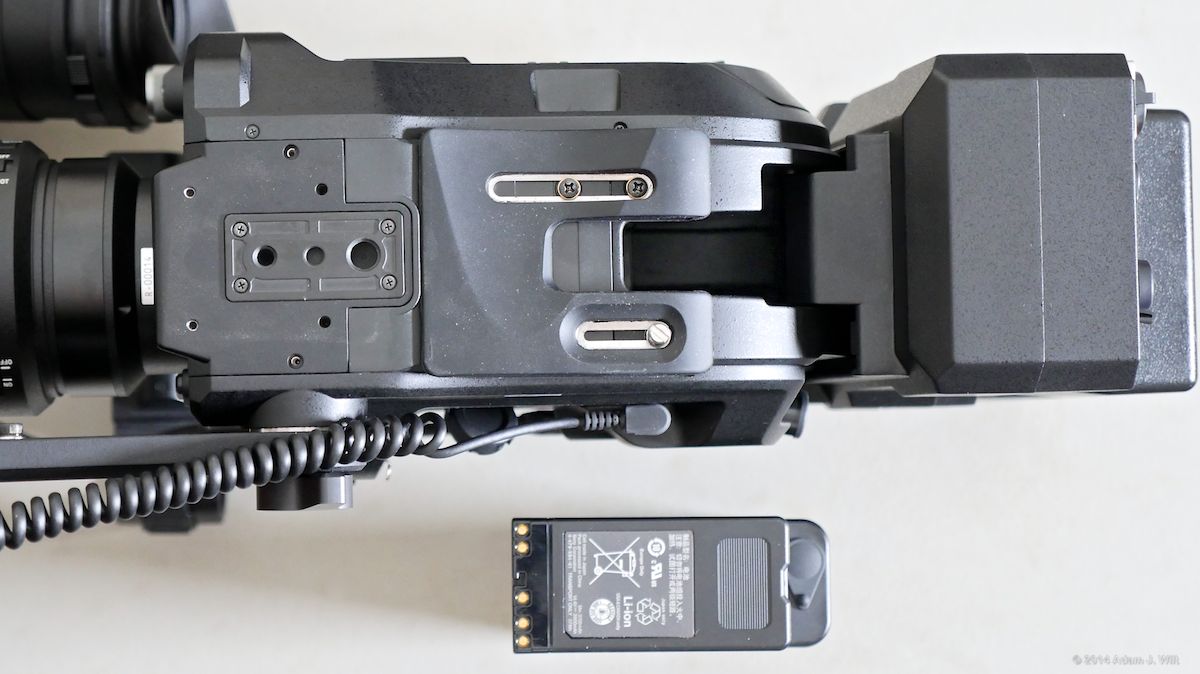
Underside of FS7 with extension unit installed. BP-U60T battery alongside
The TC IN/OUT, REF OUT, and GENLOCK ports let the FS7 play nicely with other cameras in a multicamera shoot.
4K Raw
The RAW OUT port supplies FS700-formatted (lightly compressed) “raw” video to a compatible recorder (“raw” in quotes because it’s log-encoded using Sony’s S-Log3 curve). The HXR-IFR5/AXS-R5 combo that Art Adams and I used for FS700 raw work can certainly be used, but I plugged in a Convergent Design Odyssey7Q recorder just to see what would happen:
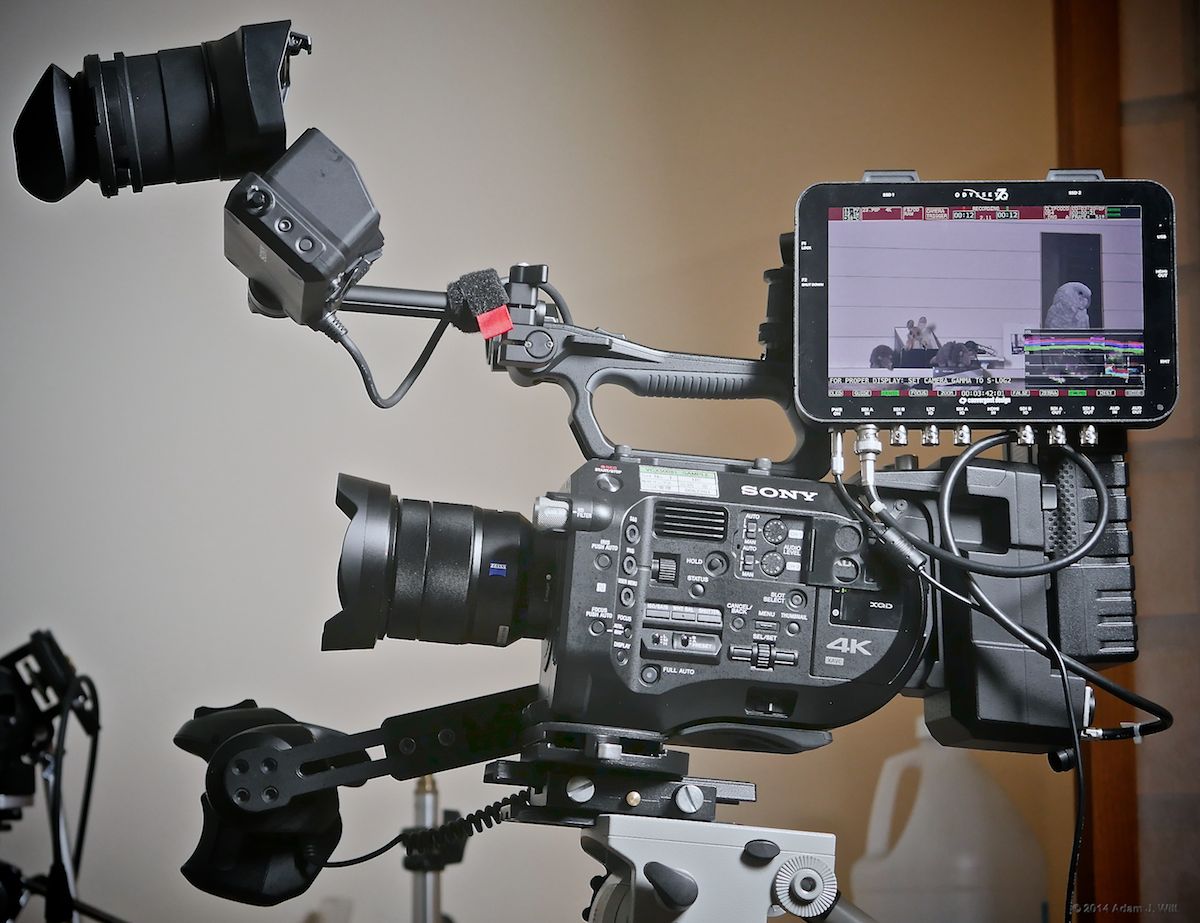
FS7 sending 4K raw to Odyssey7Q: It Just Works
In FS700 RAW mode, recording to 2K or 4K .DNG frames, the 7Q just worked, though it warned that the raw should be S-Log2 encoded “for proper display” (the FS700 uses S-Log2 while the FS7 outputs S-Log3, and the 7Q hasn’t been updated yet for the FS7). Nonetheless, the 7Q displayed the image, allowed a display LUT to be turned on, and recorded clips when I pressed the camera’s trigger: mighty impressive.
The 7Q can also be set up to record ProRes HD from the raw input, but it steadfastly refused to do so for the FS7’s S-Log3-encoded video, insisting (quite rightly) on being fed a gamma it knows what to do with before it “bakes in” a look on compressed recordings.
Convergent Design assures me that the 7Q will fully support the FS7 by the time the FS7 actually ships.
The extension until will also allow the camera to record 1920×1080 HD as 10-bit ProRes 422 and ProRes 422 HQ when it ships in December. I’m assuming that raw video will come into the extension unit, an internal ProRes codec will compress it, and it’ll be sent back to the camera for recording on the XQD cards, but again, that’s just a guess at this point.
XQD Cards; importing FS7 clips
The FS7 uses dual XQD cards for internal recording. Like CFast cards, these are industry-standard successors to Compact Flash cards for high-data-rate recording. The format was announced in 2010 and the first camera I know of that used them was Nikon’s D4 DSLR in 2012.
An XQD card is a bit larger all around than an SD card, and about twice as thick. Its contact pads are inside three slots in the end of the card, not exposed like an SD card’s are. The card rattles slightly when shaken, and it has a heavy feel to it. It reminds me of the AXSM “memory slabs” used in the R5 recorder shrunken down to SD card size.
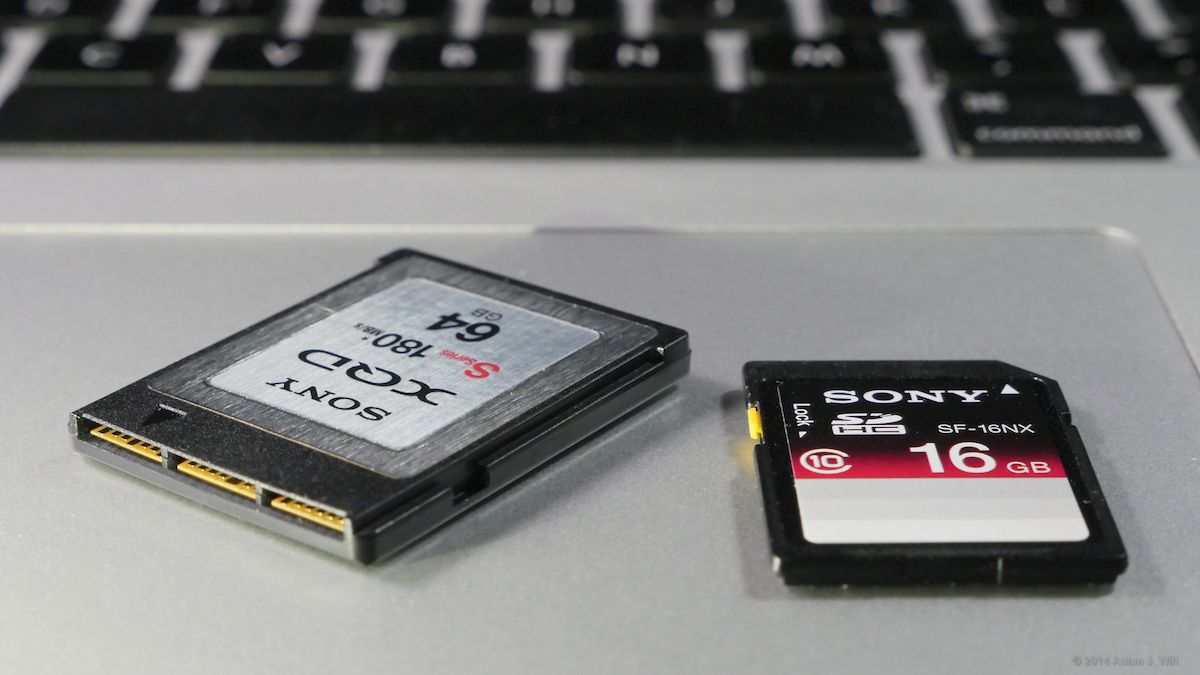
XQD and SD cards
Sony’s MRW-E80 Memory card reader connects using USB-3. I had previously installed a variety of plugins to read F55 media on my MacBook Pro, and whether or not any of those were needed, the XQD card appeared on my desktop and was immediately usable.
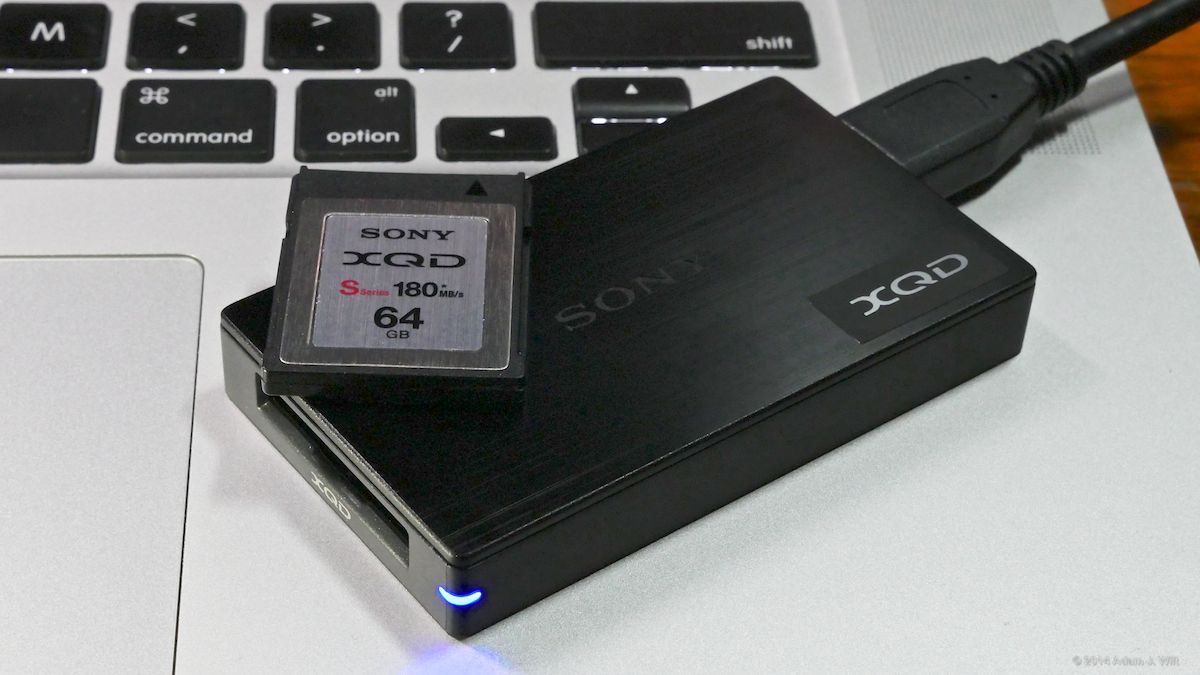
XQD card reader
XAVC-I (intraframe) clips were recognized by FCPX 10.1.3 and by Resolve 11, possibly due to my having installed the February 2014 version of the XAVC plugin. XAVC-L (long-GOP) clips were invisible to FCPX; Resolve imported them, but showed mostly black frames with an occasional, partly scrambled frame thrown in. Content Browser 2, updated in August 1024, happily displayed both XAVC-I and XAVC-L clips (Content Browser is being retired and will soon be replaced with Catalyst). Sony tells me that Adobe products handle XAVC-L today, and that FCPX, Resolve, and others will all be able to handle it either natively or through updated plugins by the time the FS7 ships.
MPEG-2 clips recorded on the FS7 imported into FCPX and Resolve just like any other XDCAM clips would.
Etc.
Like the F55, the FS7 won’t let you white-balance in Cine EI mode: you get three preset white balances at 3200K, 4300K, and 5500K, and that’s it. There’s no green/magenta “tint” color correction setting, either. If you switch to Custom mode, even if you stay in S-Log3 gamma, you can both dial in custom white balances and use the auto white balance button – but you can’t output raw in Custom mode.
I worry about the coiled cable running from the SmartGrip to the camera body. It’s hardwired into the SmartGrip, yet it’s awfully vulnerable to mashing, twisting, and pinching. I’d feel happier if it had a LANC plug at both ends, so it could be easily swapped out in the field if it gets damaged.
The 28-135mm zoom is a great runaround lens, but somewhat lacking on the wide end for my taste. I think it’s a better match for the full-frame a7S rather than the Super35mm FS7. I like my wide angles too much, and I can only hope that Sony is working on something like a 16-75mm or a 17-80mm f/4 optimized for this camera.
With the top handle installed, there’s no place to mount accessories aside from the shoe on the back of the handle. There are two 1/4″ sockets on the body near the back of the handle, but they’re so close to the handle that I couldn’t attach a Noga arm: its ball socket was too fat and interfered with the handle. I was able to start threading in a cheap Pearstone arm, but only after removing the knurled nut from its end, leaving a 14mm long screw that would bottom out in the threaded hole long before it could be tightened (which I dared not do for fear it would break through and damage the camera). It you need to mount a monitor or recorder, you’ll need to use a shoe mount as I did for the 7Q, or wait for the aftermarket to whip up some sort of snazzy mounting system.
Initial Impressions, part 2
I keep catching the FS7 “Vérité” with its 28-135mm out of the corner of my eye and thinking I’m seeing my long-departed Beaulieu 5008 S. Quite aside from both being black, beveled cameras with zoom lenses and diagonally-downward handgrippy things, they both have the same aura of being designed for a purpose – they’re consciously shaped for handheld work; they aren’t just indifferent lumpy boxes with a lens banged on the front. Like the 5008 S, the Vérité makes you want to pick it up and go shoot something.
That’s powerful. We now have a large-single-sensor camera that, out of the box, doesn’t just allow you to go handheld, but actively encourages it.
I don’t mean to dismiss the Arri Alexa and Amira, or the Aaton Penelope Delta. Those cameras have taken the balanced, cat-on-shoulder approach and shown that “large sensor” and “ergonomic” aren’t mutually exclusive. I also want to give a shout out to the new AJA CION, designed from the start for shoulder-mounted operation, and exuding a similar pick-me-up-and-use-me vibe.
Where the FS7 arguably surpasses them all is in its use of the SmartGrip.
Fifty years after Donn Pennebaker stuck a handle on the front of an Auricon, we have a large-sensor digital camera that takes the same approach: a front handgrip is good thing to have, and no, you shouldn’t have to build it yourself out of Tinkertoy bits. But that’s just the start.
We’ve had start/stop triggers and zoom rockers and iris controls and the like on grips before, mostly on broadcast zooms and ENG-style cine zooms like the Fujinon Cabrios. Caleb Crosby’s Knucklebunny and follow-on designs have blazed a trail for ergonomic grips with integrated controls. The FS7 goes a step beyond: the SmartGrip is integral to the camera itself, part of its fundamental design and operating philosophy. It’s both a control panel and a camera support, and it conforms to the body of the operator and the needs of the shot. Move it up; move it down; slide it out; pull it in; put it where it needs to be.
Combine that SmartGrip with a body contoured to sit on the shoulder – one with rounded ends and beveled sides, not just a rectilinear brick with radiused corners – and you have a tool uniquely designed to work in the embrace of a human being.
Perfection? Not yet; I stand by my complaints in Part 1. But it’s the most fully thought-out package I’ve seen to date when it comes to considering how a large-sensor camera needs to be built for handheld use with both big zooms and small primes, in conditions allowing for careful craftsmanship as well as complete, full-auto chaos.
Of course, what I say doesn’t matter: there’s nothing in camera design more idiosyncratic or personal than how you dance with your machine. The real test of the Vérité comes when you have it on your shoulder. I just hope I’ve given you a few insights to trigger your own investigations when the camera becomes more widely available.
Good luck, and stable shooting!
Disclaimer: Sony sent me a prototype FS7, extension unit, and two lenses for review, but Sony hasn’t provided any payment or other material compensation for writing this article. And all the gear has to get shipped back to Sony. Darn it.