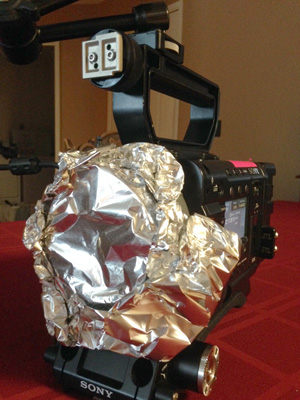
Years ago I turned a low-end SD camera into a pinhole device by covering the lens port with black wrap and poking a hole in it. I decided to try again with a much higher-end camera. Here’s what happened…
In times past, when dinosaurs roamed the earth with 480i cameras, I found myself sitting in a lit studio waiting for talent to arrive. This was before smart phones became a “thing,” and I was at a loss at to how to amuse myself until they arrived. The camera at hand, a Sony D30, was very light sensitive for the time, and I wondered if it was possible to turn it into a crude pinhole camera and get an image out of it.I grabbed a piece of black wrap, pulled the lens off, and taped the black wrap over the lens port. I then cut a small and crude hole in the center of the black wrap and cranked the camera’s gain up to something crazy — I think it went up to 32,000db! Much to my surprise I saw an image on the monitor. It was fuzzy and a little dim, and the angle of view matched what I’d see with a 60mm lens, but it worked. I was completely amazed.
It struck me that, over a decade later, I have never repeated this trick. As I’m temporarily in possession of a Sony F55 I decided to try again.
I covered the lens port with a piece of aluminum foil and poked a hole in the center with a sewing needle, then walked around my condo handheld to see what kind of images I could create.
The effect is pretty cool. It’s definitely a look: I had to crank the ISO to 10,000 just to see an image so the overall effect is very soft and noisy. I recorded internally to an SxS card in 4:2:2 S-Log2 mode and graded the footage in Resolve 10.
The angle of view is pretty narrow. It looks to be similar to an 85mm-100mm lens.
Not being content to rest on my laurels, I decided to see what happened when I added a couple of additional pinholes to my foil lens. I added two more: one horizontally adjacent to the first, and another above and between the two to make a triangle:
The third, vertical hole is a bit too far away from the others as its image doesn’t overlap obviously unless something really bright appears at the top of frame. Still, it’s a very interesting look–and it’s also interesting to note the exposure was a bit brighter than the one hole setup, which I guess shouldn’t be terribly surprising.
Not being satisfied with three holes, I decided to try nine in a cross pattern:
Okay, that’s pretty crazy.
I’m not sure how practical this technique is to use on an actual project but it sure is fun. Pinhole work requires a ton of light and a lot of contrast: if it were sunny outside instead of overcast I think the results would have been a lot more interesting, and if I were doing this on an interior set I could see employing a lighting style with very bright hard sources and dark, black shadows.
“Normal” pinhole apertures–those that are made professionally–are drilled with a laser to ensure that they are completely round as the shape of the aperture will have a definite effect on the resolution of the image. They also have a specific aperture, usually f/8 or f/11, that puts them somewhat below the diffraction limit for large sensors, so the image isn’t any softer than it has to be. A pinhole will never create a really sharp image–you need a lens for that–but they do have a look that’s all their own.
If you’re interested in pursuing this kind of thing yourself you can find pre-made pinhole lenses from Holga in Nikon and Canon mount at various online stores, and Lensbaby makes a version in PL mount.
The one positive about a pinhole lens is that everything is in focus… or at least as focused as a pinhole will allow. As long as you don’t need a perfectly sharp image you’ll never have a really, really soft one either.
About the Author

Director of photography Art Adams knew he wanted to look through cameras for a living at the age of 12. After spending his teenage years shooting short films on 8mm film he ventured to Los Angeles where he earned a degree in film production and then worked on feature films, TV series, commercials and music videos as a camera assistant, operator, and DP.
Art now lives in his native San Francisco Bay Area where he shoots commercials, visual effects, virals, web banners, mobile, interactive and special venue projects. He is a regular consultant to, and trainer for, DSC Labs, and has periodically consulted for Sony, Arri, Element Labs, PRG, Aastro and Cineo Lighting. His writing has appeared in HD Video Pro, American Cinematographer, Australian Cinematographer, Camera Operator Magazine and ProVideo Coalition. He is a current member of SMPTE and the International Cinematographers Guild, and a past active member of the SOC.

