
Still photographers love histograms. Cinematographers hate them.
Here’s why our world is so different from theirs in this regard…
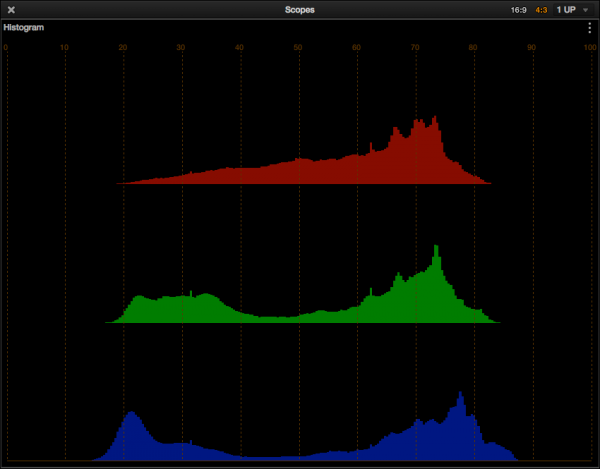
This is a normal histogram, pulled from Resolve 10. Histograms count pixels, nothing more, and they only tell us how many pixels in an image fall into a specific brightness range. Black is at the far left; white is at the far right. Brightness increases from left to right, and the more pixels that fall into a brightness range the taller the peaks will be.
In the example above there are a lot of bright pixels in the image so all three color channels show peaks on the right side. The shadows are a little cool so we see low peaks in the green and blue channel but not the red channel. And the mid tones are a little warm because there are some red pixels in the center of the histogram while the green and blue channels show a dip. This is valuable information… but it tells us zero about how bright any specific object is in the scene. That’s because histograms are not meant to give us precise exposure information; instead they tell us generally whether we are capturing enough information to do as much as we can later in a color grade. They give us zero information about consistency of exposure. It is a brute force exposure tool.
The histogram above is “normal” because there are gaps to the left and the right, which tell us that we’ve captured all the available brightness information in the scene.
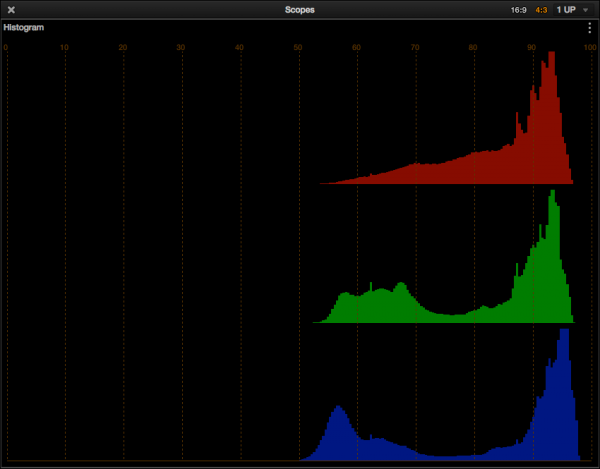
This is an “ETTR”, or “exposed to the right,” histogram. There is really only one reason to expose this way, and that’s to eliminate noise. By pushing the exposure all the way to the right the “meat” of the image is pushed as far from the noise floor as possible, so that when this overexposed image is pulled down to look normal the noise is crushed into the darkest of shadows. Shadow detail is pushed away from the noise floor, which helps in the event that a colorist needs to make a low contrast image out of a high contrast image.
ETTR works well for still photographers, who often grade their own images and do so one at a time. For those of us in the cinematographic world this is not a great idea as it’s common for someone else to grade our images and they need to have some idea of what look we’re going for.
ETTR became popular with the first RED ONE camera as it showed a fair bit of noise in the shadows, and this technique results in very clean images at the expense of a high ISO rating. (ETTR means exposing the image brighter than if you were to calculate an exposure using a meter at the camera’s recommended ISO–and by doing such you’re effectively shooting at a lower ISO.) Many who shoot with the Blackmagic Cine Camera advocate the same working style. This technique only works with raw or log-encoded recording formats where there’s no additional processing going on in the highlights or shadows… but the worst part is that it only works one shot at a time, and no moving image stands alone.
Imagine you are a colorist who has been handed a hard drive full of shots for a commercial about, oh, let’s say garden products. Every single shot has its own exposure: the outdoor shots vary in exposure based on the brightness of the sky or a distant highlight, while the indoor shots are very bright overall unless there’s a window in the background, in which case the mid-tones are darker to try to retain exterior highlight detail.
Rather than see exposures based on the most important tones in the frame–the mid tones, where flesh tone lives–they are instead based on highlights, which fluctuate from shot to shot and are rarely the most important things in the frame.
If every single shot has a custom exposure based on the brightest object in the frame, the question becomes: what look does the DP really want, when every single shot looks different?
Here’s another question: how much money does the producer have for color grading, and do they have enough considering every single shot needs its own custom grade?
And yet another question: when the exposure for every shot is different, and the grade for every shot is different, doesn’t this also mean that the noise level in every shot will be different? And isn’t this a problem when all these shots have to cut together into a sequence?
Budgets are tight these days, and even in the best of times our job as cinematographers is to stretch the budget dollar as far as we can. Those of us who work a lot do so by over delivering, but also by ensuring that the look we envisioned–the look that we agreed upon with the director in prep–is the one that ends up on the screen. What’s the better way to do this: expose consistently by using a handheld meter or a waveform monitor, or expose every shot in its own way using a histogram, zebras and ETTR and trust that someone else will fix it all later?
I get much better results using a handheld meter and a waveform monitor. I choose an ISO that delivers the level of noise that is right for the project (more often than not I prefer to shoot “clean” at a low ISO) and I use that as my exposure reference for the entire project. Once the colorist grades the first shot they should be able to see what I want and where I’m going, and 80% of the additional corrections should be as simple as copying and pasting the base look onto all the other shots. In this way I get a consistent look and the producer gets the most for their post dollar.
There are a few times when I’ll use ETTR for individual shots. An example might be an extremely contrasty and wide landscape shot as this will often stand alone and need a lot of tweaking in post. Generally, though, I save ETTR for emergencies. I strive for consistency. Not only is that the hallmark of a good DP but it saves time and money in post and shows the producer that you really do know what you’re doing.
About the Author

Director of photography Art Adams knew he wanted to look through cameras for a living at the age of 12. After spending his teenage years shooting short films on 8mm film he ventured to Los Angeles where he earned a degree in film production and then worked on feature films, TV series, commercials and music videos as a camera assistant, operator, and DP.
Art now lives in his native San Francisco Bay Area where he shoots commercials, visual effects, virals, web banners, mobile, interactive and special venue projects. He is a regular consultant to, and trainer for, DSC Labs, and has periodically consulted for Sony, Arri, Element Labs, PRG, Aastro and Cineo Lighting. His writing has appeared in HD Video Pro, American Cinematographer, Australian Cinematographer, Camera Operator Magazine and ProVideo Coalition. He is a current member of SMPTE and the International Cinematographers Guild, and a past active member of the SOC.
Art Adams, Director of Photography