
Every time I download a new version of Resolve I have to fill out the little questionnaire that asks me what features I’d like to see added quickly. I always write, “Add a waveform scale that reads in percentages!” And Blackmagic Design never does.
I’ve asked several people at Blackmagic why they don’t add this feature and the answer is consistently “I don’t know.” When I recently asked them to provide equivalents for their internal data values (which is what Resolve 10 scopes are currently set up to display) in common waveform percentage values I was told they can’t do that as it’s a bit of a “gray area.” This frustrates me.
I find waveform monitors to be hugely valuable tools, both on set and in post. First and foremost they are great for detecting clipped highlights that aren’t immediately visible on a monitor, which is helpful given most onset monitors are often viewed in less than ideal lighting conditions and many have an unfortunate habit of clipping highlights prematurely themselves, making it hard to see what’s really clipped and what’s not. Secondly they are great for quickly determining whether an important object in the frame–such as an actor or actress–is actually exposed the way you think they should be. Tired eyes lie, and it’s easy to find yourself lighting faces too brightly at the end of the day because they don’t “pop” as much as they did when you were somewhat rested at the beginning of the day.
I consult for a test chart company, DSC Labs, for whom I’ve developed a film-style color reference chart called the OneShot. Color charts are great tools for communicating visual information, such as exposure and color balance, to a colorist so they can enhance the look you created rather than create their own. The chart contains known reference colors and gray scale values that can help a colorist quickly neutralize color casts and match your on-set exposure in the grade… assuming they know how those colors and gray scale values fall on a waveform monitor. In this regard Blackmagic is not much help.
For example, middle (or 18%) gray is a key value for any working cinematographer. In theory it is the value that falls directly between diffuse white and black on a logarithmic scale: it is supposedly the “average” value of any natural exterior scene. It is also the value that every light meter is calibrated to reproduce: if you use your meter to properly expose a middle gray card then that card should appear middle gray in the resulting footage. That’s not always precisely the case; different log curves from different manufacturers stipulate different values for middle gray (Canon says 32-33%, as does Sony, while Arri says 38-39%) so having a middle gray reference in the shot can help place that value where it really counts: at the proper signal level for the footage’s destination medium.
The ITU 709 (“Rec 709”) HD standard states that middle gray falls at 41.7% on a waveform monitor. If the final footage is mastered such that a middle gray reference is placed at that value then it should appear to be middle gray on every HD TV set in the world. (The reality is that manufacturers tend not to follow the Rec 709 spec as closely as we might like so there is some variation, but at least they have a target to hit–which is better than not having a target at all.) If a scene is shot in Sony or Canon log then it can be awfully handy to shoot a middle gray reference so that the colorist can then translate that tone from its log value to its proper Rec 709 value. In this way the cinematographer’s exposure intent can be preserved…
…if the colorist knows where middle gray falls on a waveform monitor.
Professional post houses don’t see any of this as a problem. Often their grading rooms incorporate external waveform monitors that read out in either percentage values or millivolts so the colorist can see exactly what’s happening in the signal that’s feeding their reference monitor. They don’t have to rely on Blackmagic’s “internal code value” scopes. The rest of us, who are grading without expensive external waveform monitors, do have to rely on Blackmagic’s scopes, and more and more independent filmmakers, commercial and corporate productions, viral web video productions and even TV shows are doing their final color correction in BlackMagic DaVinci Resolve Lite using only the internal scopes and a color critical monitor. In situations like this it’s handy to know what BlackMagic’s scopes are really telling us.
As I couldn’t get an answer out of BlackMagic I decided to see if I could translate their data values into percentages using references created in software that does employ proper scopes. I created a series of test images in Final Cut Pro 7 that contained various shades of gray: 0%, 20%, 40%, 60%, 80%, 100% and 109%. 40% is roughly middle gray on a Rec 709 vectorscope; 60% is the high end of normal flesh tone brightness; 100% is broadcast white and 109% is “super white.” I exported this footage to ProRes422HQ in YUV (video) format and then brought it into Blackmagic DaVinci Resolve 10. I then used the RGB color picker to see where those values fell on Resolve’s 10-bit (0-1023) waveform. I learned some interesting things.
Most importantly, how the data is presented on the waveform depends on how you want to view it. In the media room it’s possible to select a clip, right click on it and view its attributes. In that menu you can select whether you view it as a “data” file or a “video” file. This setting causes some not-so-subtle differences in how the waveform displays information:
A “data” file will show you the actual values as they fall. For example, 10-bit encoding standards for an HD “video” signal specify black at code value 64 and white as code value 940, on a scale of 0-1023. The code values above and below that range are meant to be used for data other than brightness information, although the range above 940 can be used for “super white.” Super white is when brightness values exceed 100% on a normal waveform: the Rec 709 standard allows capture of brightness information up to 109%, which is great for capturing additional detail and preserving contrast in highlights, although this must be pulled down to 100% or below when broadcast or TV transmitters will clip off that top 9%. (This is not the case for Internet video or DVDs.) Most cameras will allow capture of super white values, so it’s nice to have access to that in the grade. In “data” mode Resolve makes that information obviously accessible: I could see a clear difference between 100% white and 109% white, with 109% white being very bright white and 100% white being a little less bright.
The story is quite different in “video” mode. Resolve tries to be helpful by scaling the 64-940 code values to full range 0-1023, so that black is at code value 0 and 100% white is at code value 1023. That’s really helpful for setting black and white values… but not so helpful for everything in between. Where exactly is middle gray? How do I translate the flesh tone value I saw on my in-camera waveform into code values? Blackmagic doesn’t seem to have an answer for this.
Fortunately I was able to reverse engineer some values from my test footage. I came up with the following formulas to translate percentage values to data/video values:
For data value monitoring of a video signal: (percentage * 876)/100 + 64 = data value
or
For video value monitoring of a video signal: (percentage * 1023)/100 = video value
 :
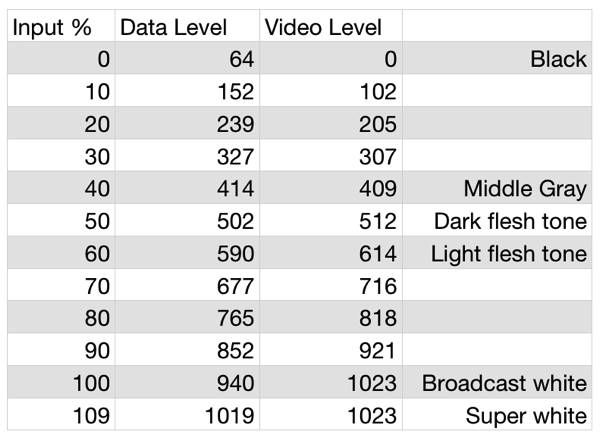
I should point out that video values above 109% don’t work in the video level formula for several reasons, not the least of which is that Resolve maps any brightness information from 101%-109% to code value 1023–in other words that data gets clipped unless you bring it back into range. That information is still there, but it’s pushed up beyond code value 1023 unless you pull it down using the gain or offset controls.
As best I can tell my math holds up pretty well in the face of a real world test. If not, please be sure to let me know!
About the Author

Director of photography Art Adams knew he wanted to look through cameras for a living at the age of 12. After spending his teenage years shooting short films on 8mm film he ventured to Los Angeles where he earned a degree in film production and then worked on feature films, TV series, commercials and music videos as a camera assistant, operator, and DP.
Art now lives in his native San Francisco Bay Area where he shoots commercials, visual effects, virals, web banners, mobile, interactive and special venue projects. He is a regular consultant to, and trainer for, DSC Labs, and has periodically consulted for Sony, Arri, Element Labs, PRG, Aastro and Cineo Lighting. His writing has appeared in HD Video Pro, American Cinematographer, Australian Cinematographer, Camera Operator Magazine and ProVideo Coalition. He is a current member of SMPTE and the International Cinematographers Guild, and a past active member of the SOC.