
There’s always one place I can put a light that’s out of the shot, and that’s directly behind the camera. Do not lose hope: this can still look great. Read on to learn how…
Years ago I shot a lot of internal corporate media for a large healthcare organization. Many of this company’s exam rooms were quite small, and as the subject of most of these videos was healthcare delivery I found myself crammed into them more often than I’d like. Other camera people were content to shoot using the existing overhead lights as the space was too cramped to squeeze in a Chimera or other soft source. I was not content to do this.
Unless it’s thematically appropriate, hard toppy light is not my favorite look. Primarily It often leaves eyes dark and lifeless. Healthcare should be a happy topic, and I wanted to create a prettier, smoother and friendlier look where others threw up their hands and said, “This is good enough.”
The rooms were probably 8’x12’, and one of the 8’ walls had a door in it. Over time I noticed that I could avoid shooting the wall next to the door in most circumstances and I formulated a plan. I taped a 4’x4’ bounce card to that wall, at roughly eye level, and bounced a 650w fresnel into it, creating a soft horizontal wash of light across the exam room.
This wasn’t a perfect solution by any stretch of the imagination, especially as 80% of my shots were taken from a camera position directly in front of the door and immediately next to my light source. What I expected was boring flat light, but what I got was fairly was smooth soft light that dug into eye sockets and cast very soft and subtle shadows on the back wall.
My only available lighting option turned out to be the best one, and that got me to thinking…
There’s one place in every set that’s never going to be seen, and that’s directly behind the camera. Light from this direction is generally considered uninteresting but if you have a nuanced eye you can create some really interesting looks by putting a light in the one spot that every film school teaches students to avoid.
Lighting direction is important, but so is the size of the source. A small non-diffused light placed directly behind the camera is generally doesn’t work well because it makes people and things look obviously lit. There are situations where this kind of lighting does work–we see it all the time in older movies when a female star has to look her best–but for modern work it feels a bit forced.
Softening this source with a 4’x4’ frame of diffusion, or bouncing the source off a 4’x4’ bounce card, makes it a little more interesting. Soft light tends to be more flattering to faces, and while many sources in the world are specular and cast hard shadows we almost never see hard shadows away from direct sunlight. (Walk down an urban street at night and notice how many small point sources there are, and then note the quality of the light. The light sources blend together, reducing their overall contrast to the point where shadows from point sources no longer feel very sharp.) We accept artificial soft light as realistic much more readily than we do artificial hard light.
Putting a big light source directly over the camera has its uses, particularly as a beautiful age-eliminating fill light. Often I’ll put a frame of diffusion right next to the lens, putting the lower corner of the frame just next to the matte box, to get the source as close to the lens axis as possible. I once operated on a TV series where the DP regularly filled from the key side using a 2’x3’ frame of Lee Opal or 250 placed just this way and it made stars look great. The closer the light source is to the lens axis the more it fills in the shadows cast by unfortunate skin imperfections, and because the shadows are smaller or nonexistent the light source feels softer than it really is.
The closer a soft light is to the lens axis the smaller it can be, and the smaller it is the brighter it appears to be. If we light two different sizes of diffusion with the same amount of light the larger diffusion will appear dimmer to the eye because each point on it is radiating less light, even though the amount of light emitted may be the same because the surface area is larger. Knowing this can be handy when lighting talent with a very large amount of light–perhaps because you’re lighting them in front of a large interior window on a sunny day–because a large source with a 6K PAR behind it will be much easier to look at than a 4’x4’ source lit with the same light. The larger diffusion passes the same amount of light but each point on the surface of the diffusion is dimmer because the light is spread across a greater surface area, and that makes it easier to look at.
The one time this is not desirable is if you’re trying to create an eye light. Eye lights are actually reflections of light sources in the liquid that coat eyeballs, and a large source may appear too dim to create a pleasing eye light because no part of it is particularly bright. A smaller light source–say, a 2’x3’ frame of diffusion–will create a much nicer highlight in eyes because the same amount of light is coming through a much smaller piece of diffusion so every point on the diffusion is brighter. If that 2’x3’ frame is right next to the lens then it’ll appear in any eyes that the camera can see, and the source will appear softer because the shadows it casts are mostly behind the subject and hidden from view. If this source is on the same side as the key then its shadow can often hide in the shadow of the key, making it nearly invisible.
A 2’x3’ frame is a good size for closeups, but wider shots might require something a bit larger. Soft light is all about the size of the source in relation to the subject, so while a 2’x3’ frame might look soft on a face that’s only 5’ away it’s going to cast a much sharper shadow on a person that’s 10’-15’ away.
The size of the diffusion is important, but so is the kind of diffusion. Thinner diffusion creates harder shadows but also brighter eye lights. It’s worth experimenting with different kinds of diffusion to see what works for the lighting style you’re using on a project.
Every once in a while I end up having to shoot a set from the direction of the main light that’s illuminating the set. I learned a while back that this doesn’t have to be a painful experience. This is where the size of the source becomes vitally important. Bigger is better. Subtle shadows are a big part of the story, but so is shadow direction.
Let’s look at some stills pulled from a project I shot a while back using a Phantom. At the time the highest usable ISO was around 250 (it’s now more like 800) and at 1000fps I needed 1000fc of light just as base fill. The best way to do this on a small stage was to build a 12’x20’ light source and put six MaxiBrutes behind it, for a total of around 80,000w of light. (I used full grid for diffusion as I didn’t want multiple shadows.)
The setting is a living room. Mom and dad are getting ready to go out, while son and daughter are dressed for bed and are bouncing off the walls–almost literally. There are three shots in the sequence:
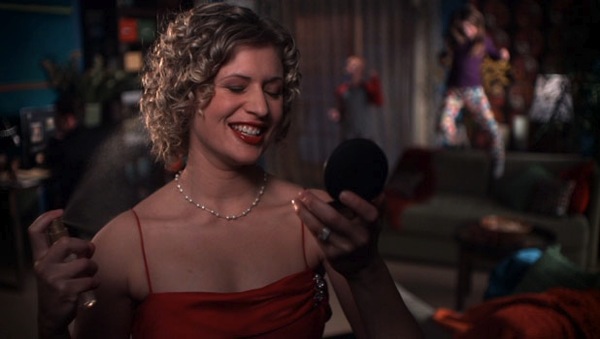
This angle isn’t bad at all. The big bright source is to the right of frame, and I had to block it off the actress and light her from the left side as her face looked better lit from that direction. The rest of the set looks fine: the base fill reads okay as soft light from frame right, and side lights and backlights punch up elements of the background. (The little girl jumping on the couch in the background is lit entirely by the big soft fill source as she was quite close to one end of it.)
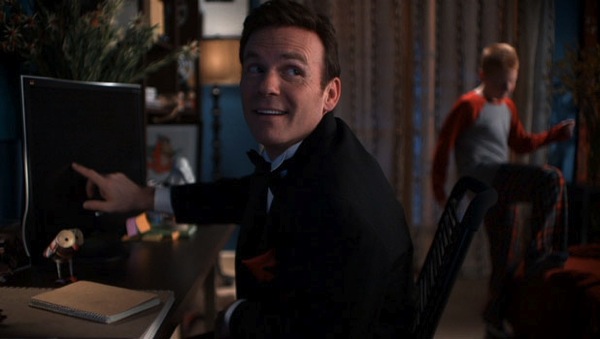
This shot is okay too. I added a frame of light diffusion on camera right to help the big source wrap around dad’s face a bit more, and the fill light is a tungsten PAR gelled with full CTB bounced off a 2’x3’ bounce card placed to the left of the lens. (I added the CTB to create the illusion that the fill light was coming from the computer monitor on frame left. I was working blind as the screen was added in post.) It’s fairly obvious in this shot that my big fill light is acting as a sidelight from this angle.
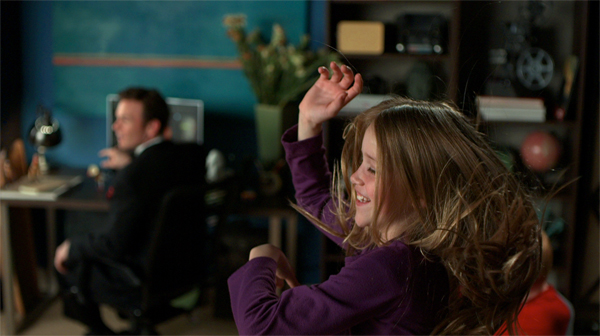
This is the angle where the big broad source is behind the camera and to the left. Most every film school teaches that this is the exact worst position to light from but I think it works quite well for this environment. By exposing for the girl I make the background a little darker, and the difference in exposure and focus helps define her as being a fair distance away from that back wall. The computer monitor casts a nice dark shadow as does nearly everything else that is close to the wall (look at the lamp next to the monitor as well as the objects on the bookcase). The globe on frame right has a beautiful highlight in it as does the projector reel above it. The fact that the light source is behind and to the left of the camera, with the camera at its far right edge, means that as soft as this source is there’s going to be a lot of shading on the right side of everything in the frame. You can see this on her hand and fingers.
Possibly the most understated but important aspect of using a source this big is that it creates large and subtle highlights on everything in the frame that’s remotely shiny. This includes skin. I can see subtle highlights in the girl’s face and hand, in the shiny wood of the bookcase and the lamp next to the computer. If any of these actors had dark skin they’d glow as if they were lit from the inside.
All these little cues–from the large-yet-subtle highlights, the very soft directional shadows and the positioning of the big source source to one side of the lens axis–create a very interesting, sophisticated yet natural look, even though that final shot is lit from the only position in the room that allowed me to stack up the firepower necessary just for basic exposure: almost directly behind the camera.
A big part of this look is due to the art direction. I specifically requested dark walls because I knew I was going to be painting light with broad strokes and there was no way I was going to be able to flag light off the background to create the illusion of depth. By making the background dark, as well as a color complementary to skin tone, the actors popped out of the background regardless of where the lights were.
I’ve used this trick in white rooms as well and it still works, but it’s a very different and much cleaner look.
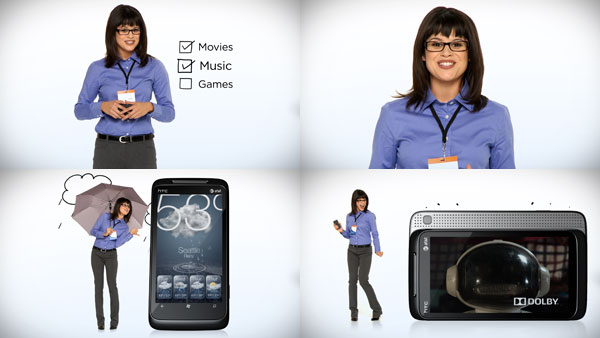
I shot this project a couple of years ago for HTC. (The vignetting was done in post.) The only way to light this well was to put the light directly behind the camera because the actress moved all over the place, and the best way to light the stage somewhat evenly was to put the light source as far away from her as possible. That position turned out to be directly over the camera.
There are two things happening here that helped me out. One is that I controlled the size and placement of the source to give her a soft chin shadow, which helps define her face and keep her from looking flat. Another is that her face almost glows because there’s a large soft source reflecting in it.
I first got the idea of using big soft sources behind the camera by looking at the effect of sunlight bouncing off the side of a large building. Every shiny surface near that building wall lit up like a product shot. I remember thinking, “Everything I was taught in film school says a big source behind me should make everything look dull, so why doesn’t it?”
This is a trick I keep up my sleeve. If I have to light a large set quickly and the only place to light from is behind the camera I can bail myself out if I make the light source big enough. It doesn’t always work, but it works often enough to be an occasional lifesaver.
About the Author

Director of photography Art Adams knew he wanted to look through cameras for a living at the age of 12. After spending his teenage years shooting short films on 8mm film he ventured to Los Angeles where he earned a degree in film production and then worked on feature films, TV series, commercials and music videos as a camera assistant, operator, and DP.
Art now lives in his native San Francisco Bay Area where he shoots commercials, visual effects, virals, web banners, mobile, interactive and special venue projects. He is a regular consultant to, and trainer for, DSC Labs, and has periodically consulted for Sony, Arri, Element Labs, PRG, Aastro and Cineo Lighting. His writing has appeared in HD Video Pro, American Cinematographer, Australian Cinematographer, Camera Operator Magazine and ProVideo Coalition. He is a current member of SMPTE and the International Cinematographers Guild, and a past active member of the SOC.
Art Adams
Director of Photography
www.artadamsdp.com
Twitter: @artadams