
Now that I’ve had the GH4 for a while (initial review here), I’ve been able to explore it more detail, and use it on a couple of gigs. I’ve taken a closer look at the dynamic range and the various gamma options, shot timelapse (and encountered some, erm, interesting workflow issues), and gotten a bit more experience with audio and with HDMI monitoring.
Dynamic Range
I had previously tested the camera with a 13.3-stop Stouffer wedge, and found up to 10 stops of dynamic range – but I had a slight light leak at the edge of my my chart, washing out the lower reaches: the entire chart is brighter than the surrounding mask. So who is to say whether the lower limit was ten stops, or all 13.3 stops, or something in between?
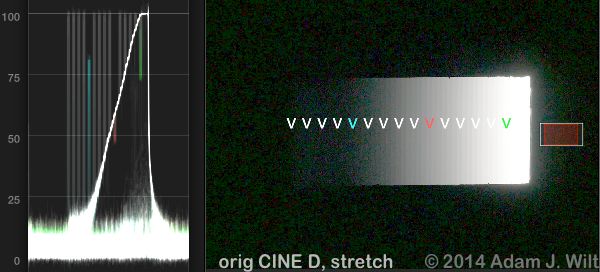
Original test chart, with midtones raised to stretch shadows.
Late last month I had a chance to try again, using the DSC Labs Xyla 21 in a darkened studio. The Xyla has its own built-in light source and individual test chips with black surrounds, so it’s easy to tell the difference between any given chip and the background.
Cutting to the chase: 11+ stops in every gamma setting. VIVID and CINE V styles give you 10+ stops free and clear, with the 11th stop separating from black with a stretch of the shadows. All the others show 11 stops and a bit more, as-is (and yes: that’s 11 distinct stops visible between white clip and full black: there’s another fraction of a stop between that darkest distinct stop and full blackness, hence 11 plus stops of dynamic range).
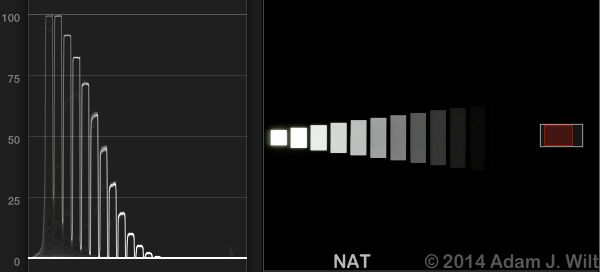
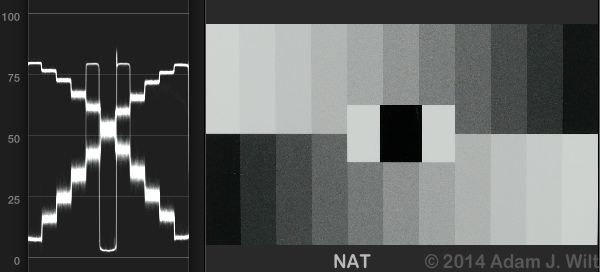
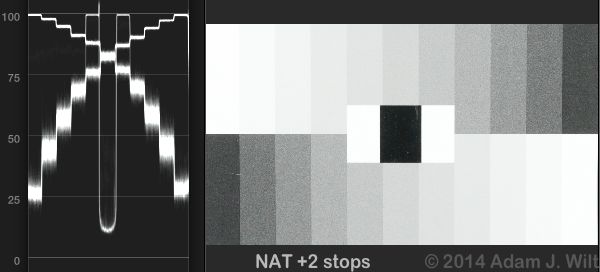
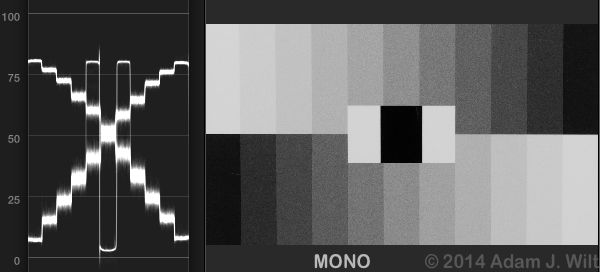
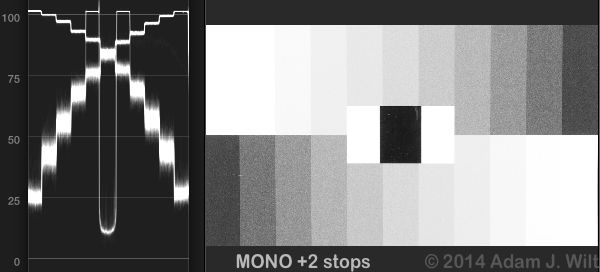
Details: I had the camera on defaults, with i.Resolution and i.Dynamic off, Highlights and Shadows set to Standard, and I changed just the “Photo Style” (preset combination of color and tone settings). I then rolled through apertures until the second-brightest patch just hit the same level as the brightest patch. I then counted steps between that level (white clip) and black. Raw data? Comin’ atcha:
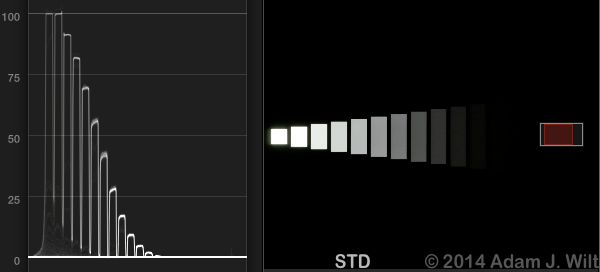

(10 discrete stops shown. If I lift midtones, the 11th stop lifts from the black.)
")
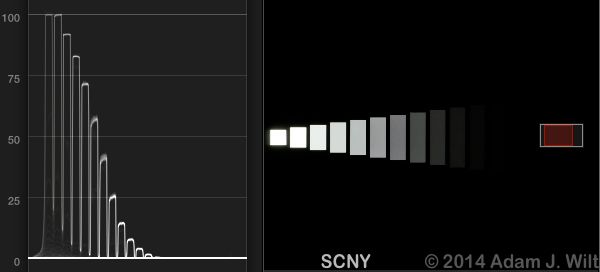
(10 discrete stops shown. If I lift midtones, the 11th stop lifts from the black.)
The CINE D style is especially interesting: there’s clearly more going on there, as I count at least 13 stops visible as bumps on the waveform. Let’s stretch the shadows a bit, using the “midtone” control in FCPX’s color corrector (yes, FCPX: I’m one of those people):

Sure enough, 13 perceptible stops, though that last one is mighty iffy, depending on where you stop counting (typically, where you consider the noise amplitude to be significant compared to the amplitude of the darkest stop visible above the noise). DxO Labs rates the GH4’s sensor at 12.8 stops; I’d say count on 10 stops in VIVID and CINE V, 11 stops in other styles (Art Adams would call these “paycheck stops”, with anything else you can eke out of the shadows being “gravy stops”).
Not bad for a $1700 camera, eh?
Tonal Scale Handling
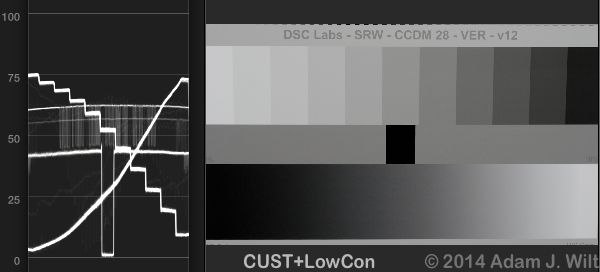
Xylas are fine for dynamic range testing, but it’s hard to get a feel for tonal-scale handling from them. A Rec.709-scaled 11-step chip chart is better; on a waveform monitor, the steps of such a chart will ramp up (or down) in a straight line in a Rec.709-encoded image. Any curves in those lines will show us how and where the tonal scale rendering varies with brightness, such as when a knee or an S-curved response comes into play.
This time, I focused the GH4 onto the chip chart at the center of my trusty DSC Labs ChromaDuMonde12R. Zoomed in that closely, the camera can easily see the “dithered” pattern of lighter and darker inks that make up the individual shades of gray; as a result, the WFM of any given gray level shows as a thick line. The thickness is due to the varying inks; it’s not a function of camera noise: I looked at the WFM for the chart at ISO 200 and ISO 1600, and the WFM traces were almost identical.
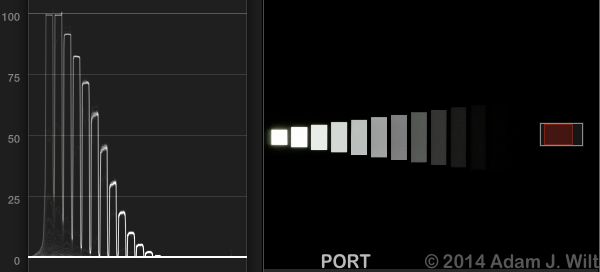
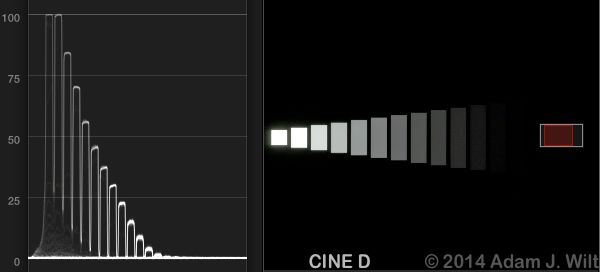
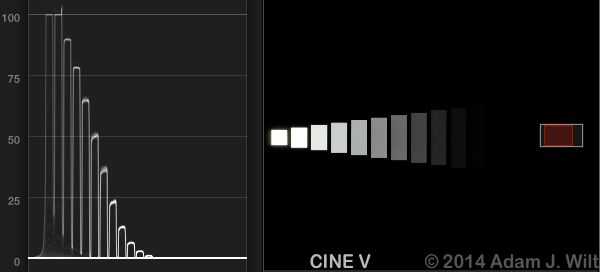
For each Photo Style, I shot at the fixed exposure setting that placed the midgray crossover at 50% for the STD style. I also shot two stops brighter, which put the whitest bars right at 100%. I’ll present ’em side-by-side for each Photo Style so you can get a good idea of how the entire tonal range is handled…
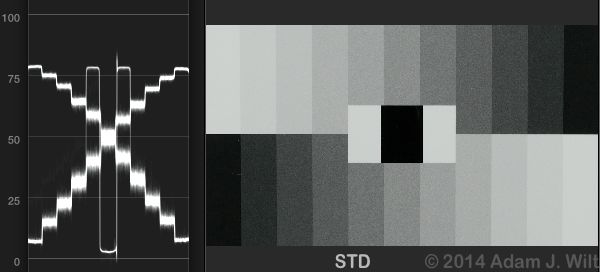
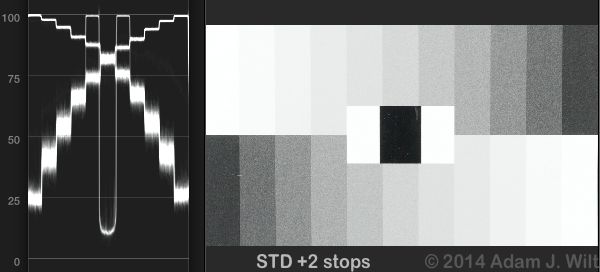
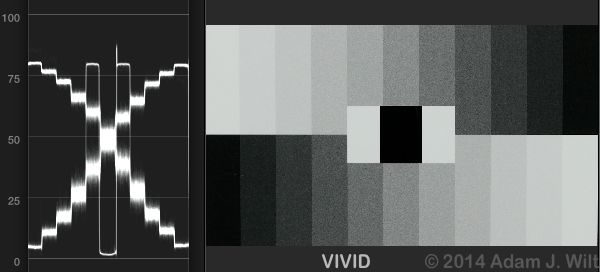
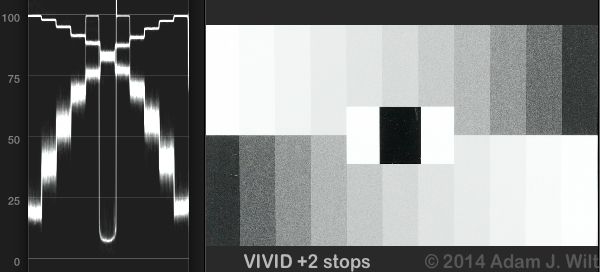
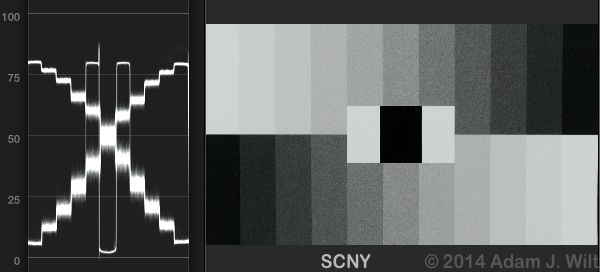
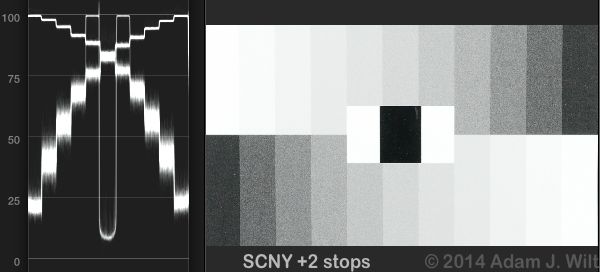
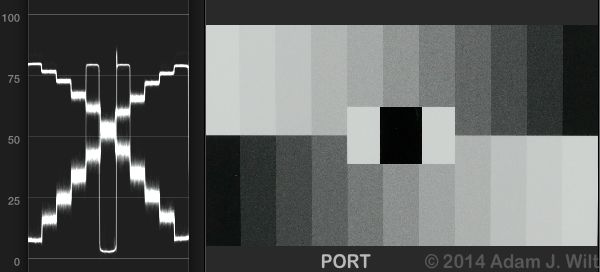
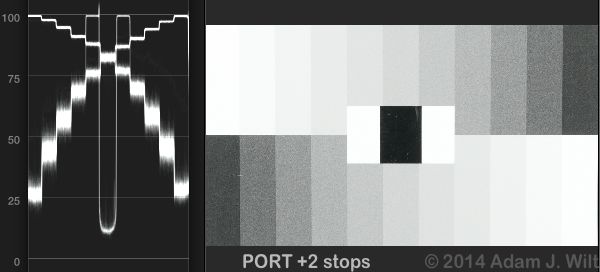
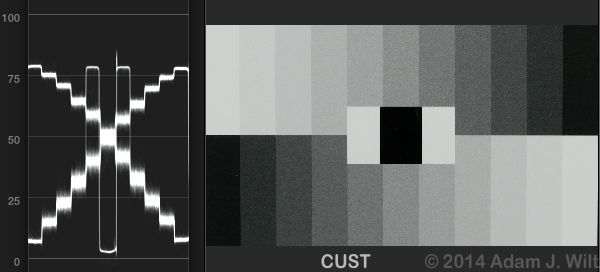
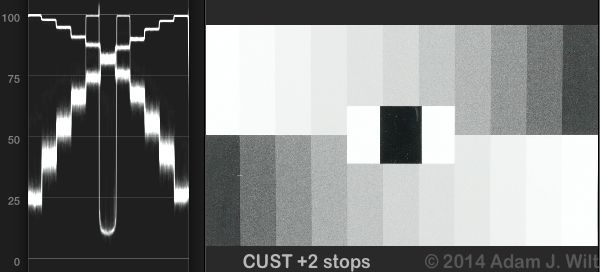
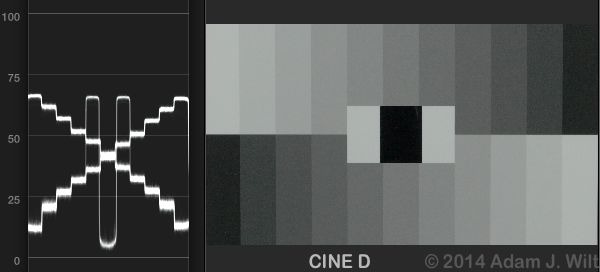
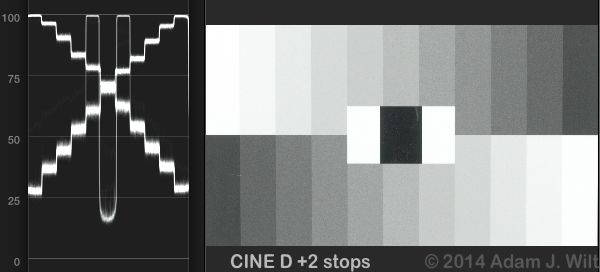
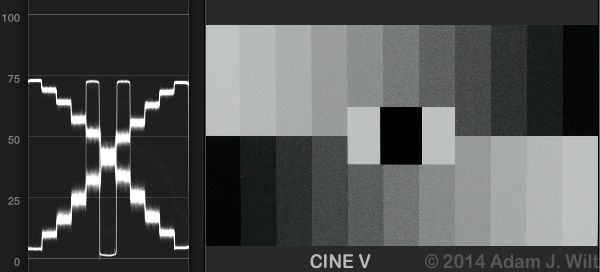
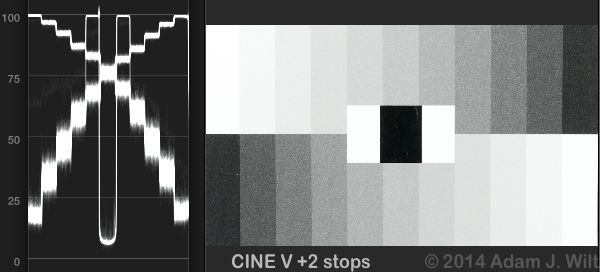
Only CINE D is a standard, Rec.709-style gamma; the rest are all S-curved at the top, almost like a Sony Hypergamma setting, though without the characteristic asymptotic flattening of the tonal scale just before clipping. Some also have S-curving in the shadows. Note how thick the lower midtone steps are (say, between 20% and 60%) for most of the styles: it looks like the camera is stretching shadows a fair bit, pushing midtones higher and progressively compressing highlights in every style other than CINE D.
Log?
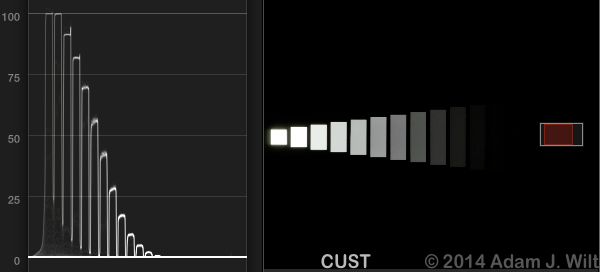
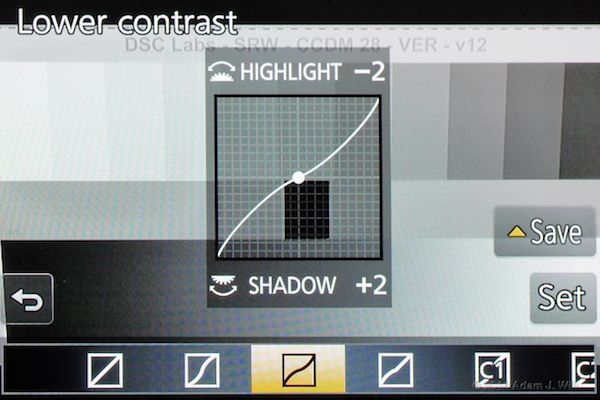
Hmm, upwardly-bowed 11-step chart waveforms… y’know, that’s what logarithmically-encoded video pictures will do. I wondered… so I played around with the GH4’s “Highlights Shadows” setting, and used it to pull out a bit of the S-curving at either end of the tonal scale, using the CUST style:
I shot the center of a DSC Labs Cine-ChromaDuMonde chart, with a log-encoded ramp as well as an 11-step chip chart. Just as the stepped chip chart should appear as a linear staircase on the WFM for gamma-encoded video, the log ramp should show as a straight diagonal line for log-encoded video:
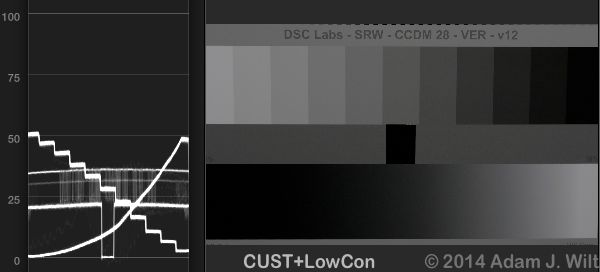
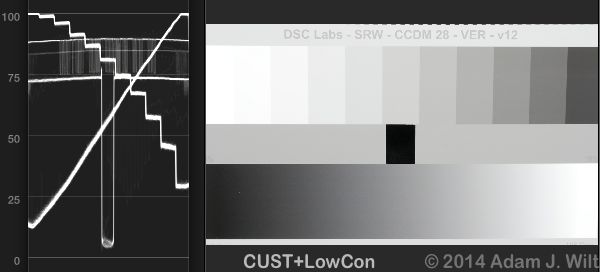
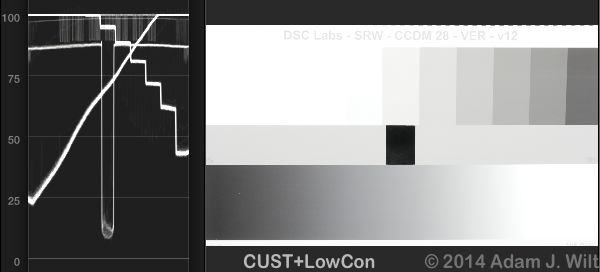
It’s not perfect, but it’s amusingly close (bear in mind that all real-world log curves show some flattening at the toe for practical reasons, and there’s a slight dip in the log curve of the printed chart, just to the right of center). While the GH4’s response is not a proper log curve, it’s not far off. With this week’s rumor of log encoding coming in a future firmware update, probably in response to the Sony A7s‘s inclusion of S-Log2, it’s interesting to see that with a few settings tweaks the GH4 is already halfway there.
i.Dynamic
The GH4’s “i.Dynamic” setting is described by Panasonic thusly:
Contrast and exposure are compensated when the brightness difference between the background and subject is great, etc.
In practice it seems to be a sort of localized tone-mapping system, like “Dynamic Range Optimizer”, or similar functions. It tends to raise shadow areas and apply local contrast enhancement; in its higher settings, it can lead to light and dark haloes near contrasty edges. It has, um, interesting effects on the picture:
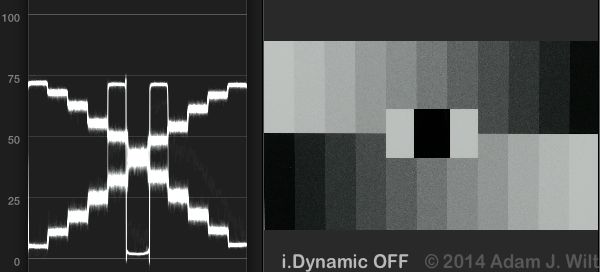
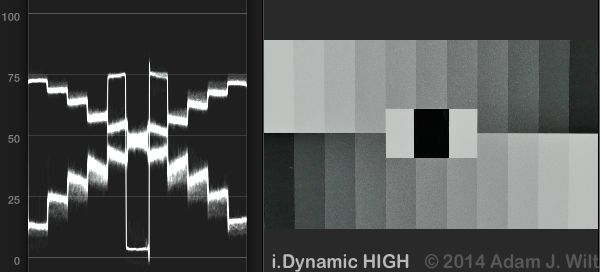
Notice that while it’s raised the low midtones quite a bit, it hasn’t moved the central black patch much at all, and the local-contrast affect is very apparent in the tilting of the steps on the WFM. Also look at the center line between the upper and lower chips; the edges of dark chips adjacent to light chips have been darkened rather a bit more than the edges of the light chips have been lightened.
One could put i.Dynamic on High, set ISO to 3200 (to get the “trailing” effect from the high-ISO recursive noise reduction), and turn noise reduction all the way up, use MONO style and boost contrast… and have the best solid-state emulation yet of image orthicon performance!
Timelapse
The GH4 lets you shoot timelapse footage with any interval from 1 second to 99 minutes 59 seconds, durations up to 9999 frames, and start times ranging from “now” to any preset time in the next 24 hours. The camera captures a sequence of stills, using your current settings for frame size and compression quality, then compiles them into an MP4 clip (if your image settings include an aspect ratio other than 16×9, you’ll wind up with a pillarboxed image in the 16×9 clip).
It works a treat. By capturing a still sequence, then compiling it into a movie, the GH4 avoids the problem of what happens if power fails. If the battery dies, still-frame capture simply stops. Pop in a new battery, and you can either resume capture, or compile what you’ve got into a clip.
However, the side effect is that you need to ensure you have enough room on your SD card for both the still sequence and the finished clip. A minute-long 4K clip (about 1500 frames) clocks in at more than half a gigabyte, so be sure to have some spare space available. (You’ll also need to remember to delete those 1500 frames in the still sequence when you’re all done; fortunately the camera gives you the option of deleting a sequence in one operation, so you don’t need to select each frame individually.)
You start timelapse capture with the shutter release. To stop capture before grabbing all the images you’ve programmed, press the Fn1 button on the top of the camera, select “Pause” or “End” from the menu that pops up, and press the Set button. Simple enough… unless you’ve set a short time interval between frames, because the pop-up menu disappears when it’s time to grab the next image. I ran a timelapse with only a second between frames, and found I couldn’t get the camera’s attention for long enough to stop capture! Instead, I used the power switch: the camera calmly said, “Time lapse shot paused”, and cleanly shut down. Upon power-up, it then told me to press Fn1 again to bring up the timelapse menu, and it let me resume where I’d left off, or end the capture and create a clip.
When capture is done, you can choose to compile your clip, or exit. No worries if you exit; you can always compile the clip at a later time from the camera’s playback menu.
When you do decide to compile a clip, keep in mind that the process is not instantaneous:
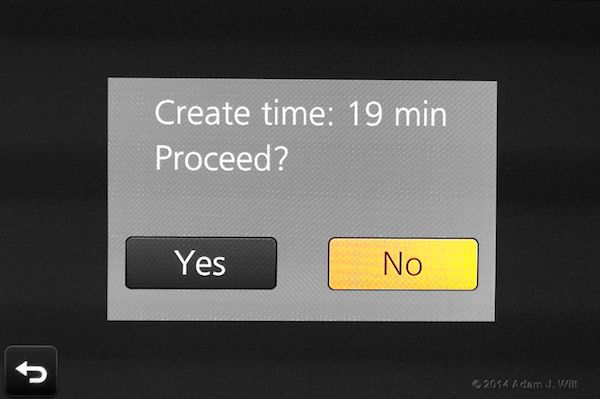
On my first timelapse outing, I had happily shot about 2000 frames over the course of three hours, and had run my battery down to one bar (it wasn’t freshly charged to start with) – seeing this sort of warning can be a bit distressing when power is running low!

It seemed as if the green bar would never grow… on the other hand, the battery meter never shrank (it starts flashing red when you’re in real danger), and the clip was properly made. And, of course, I could always have deferred actual clip creation until after I had installed a fresh battery.
One slight annoyance: when you create your timelapse clip, you’re given a choice of frame rates. Here are the selections for an HD clip with System Frequency set to 59.94Hz; a 4K clip leaves out the 60fps option:
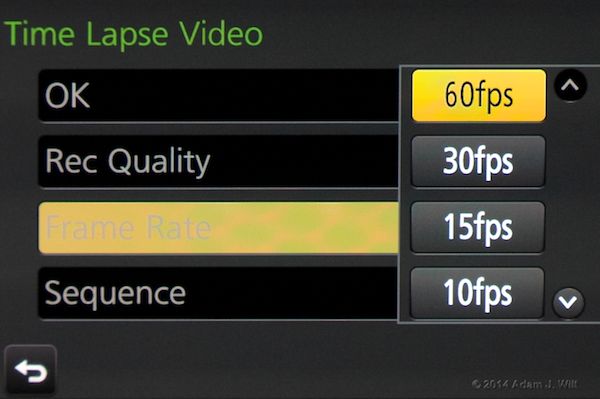
Note the absence of a 24fps choice. Also, you can’t make timelapse clips at all if your System Frequency is set to 24.00Hz Cinema. These seem like odd omissions on a cine-oriented camera.
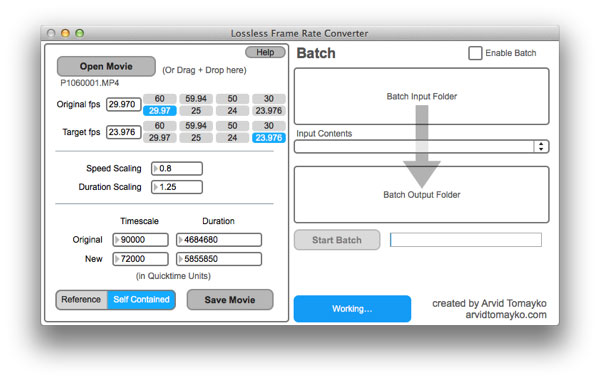
All is not lost, however: many NLEs let you conform the clip to a 24fps timeline. FCPX, unlike FCP Classic, happily recovers all the frames if you retime the clip: a 30fps clip retimed to 80% in a 24fps timeline shows you every original frame. The “Interpret Footage” option in Adobe software similarly lets you reset the frame rate as you see fit.
The free Lossless Frame Rate Converter lets Mac users reconform a clip, saving either a reference movie or a new self-contained movie (handily rewrapping the MP4 clip in a Quicktime MOV wrapper in both cases). The UI is a bit bare-bones, but it works well, and very quickly, too.
Cinema Tools, however, won’t do it: the GH4’s MP4 clip isn’t recognized as a valid input format for Cinema Tools.
Etc.
Audio
The dreaded buzz remains, and Panasonic hasn’t disclosed a permanent fix. Practically speaking, keeping the input gain low minimizes it to the point of inaudibility in real-world conditions. I’ve been shooting with an on-camera Sennheiser MKE-400 on high gain (the mike has a VOL switch with + and – settings, and I’m using +), with the camera’s gain set anywhere from -12dB to -9dB. If I turn the mike off, I can hear the buzz, but as soon as I switch the mike on, ambient audio completely buries the camera’s own electronic noise.
The Mic Level Limiter in the camera is a peak-end limiter with a relatively slow release. Loud sounds cause the limiter to decrease levels rapidly, but it can take a couple of seconds for levels to recover afterwards, so even though it doesn’t pump quiet sounds up, it still has some of the characteristics of an AGC. For critical work, I’d still prefer the limiter on my Sound Devices 302 mixer… and, until the buzz is fixed, probably a separate recorder, at least as a backup in case of buzz.
HDMI Monitoring
The GH4 happily outputs an HDMI feed while still showing a picture on its own EVF or monitor. The only annoyance I’ve found is that switching to playback causes the camera’s own displays to say “TV output in progress” on a black screen, so suddenly you’re driving blind and have to refer to the separate monitor.
The HDMI port’s micro connector is low down on the body, so you can easily rotate the monitor to allow for low-angle work:
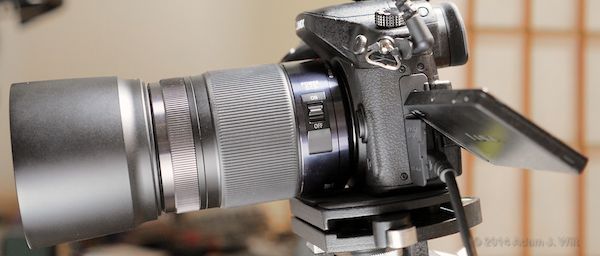
The headphone jack is higher up (just behind the top right corner of the monitor in the image above), and a headphone cable plugged into it prevents rotating the monitor – but if you close the monitor halfway, rotate it nearly flat, then open it again, it’ll slide right under the cable’s plug. The plug will block the view of the top right corner of the screen where the battery meter is, but the active picture area is still visible.
Seven Weeks On…
I’ve had this camera for about seven weeks now. Audio buzz issue aside, it hasn’t coughed up any nasty surprises. The more I explore it, the more impressed I am at what Panasonic has managed to squeeze into a $1700 package.
More significantly, for the first time I feel that I don’t have to make excuses about the image quality from an affordable large-single-sensor camera, especially one in the DSLR form factor. I shoot 4k for an HD finish, and the quality is superb: crisp, full HD resolution; no aliasing or moiré to speak of; very pleasing color; great dynamic range.
The flip side of this, alas, is that I can no longer blame the equipment when my images aren’t picture-perfect. Darn it.
Disclosure: I bought a GH4 with my own money. I paid the same street price as any other civilian ($1698 plus tax, with free shipping). I still have a GH3, and have owned GH1s and GH2s previously. Panasonic has not helped or contributed to this review in any way (inquiries to see about getting one for an early review were made, but were entirely ignored), and there is no material connection between me and Panasonic.
I worked for DSC Labs at NAB this year, and they have kindly loaned me the Cine-ChromaDuMonde chart the another gig, but I used it in this article with no prompting from them nor any compensation for doing so. I paid full freight with my own funds for the older ChromaDuMonde chart.