
Several people commented that the base flesh tone exposures in my CineGear presentation looked “dark.” I did a little research and I think I know what’s going on…
Not long after the Sony F55 became widely available the DP of a major TV series stated on the Cinematography Mailing List that he sets the camera at its default ISO of 1250 but sets his meter for ISO 800, as that gave him exposures that looked consistent with what he expected from a camera or from film stock. The base ISO of 1250 looked “too dark” for his tastes when he exposed strictly by light meter.
I got the same feedback after showing the flesh tone tests seen in my last article. One commenter said the “normal” exposure looked as much as one stop darker than they expected. While flesh tones didn’t pop as much as I’d normally like they looked acceptable to me. I regularly give flesh tones just a little bit more exposure anyway, so I figured that exposing them normally would look a little dark to my eye as that’s not the way I normally work. Still, knowing how easy it is to fool the human brain—and given how, theoretically, I’m using one of those in the course of my work—I opted to take a closer look to see if there was something to these complaints.
Here’s a JPEG created from a DPX file output from Sony Raw Viewer:
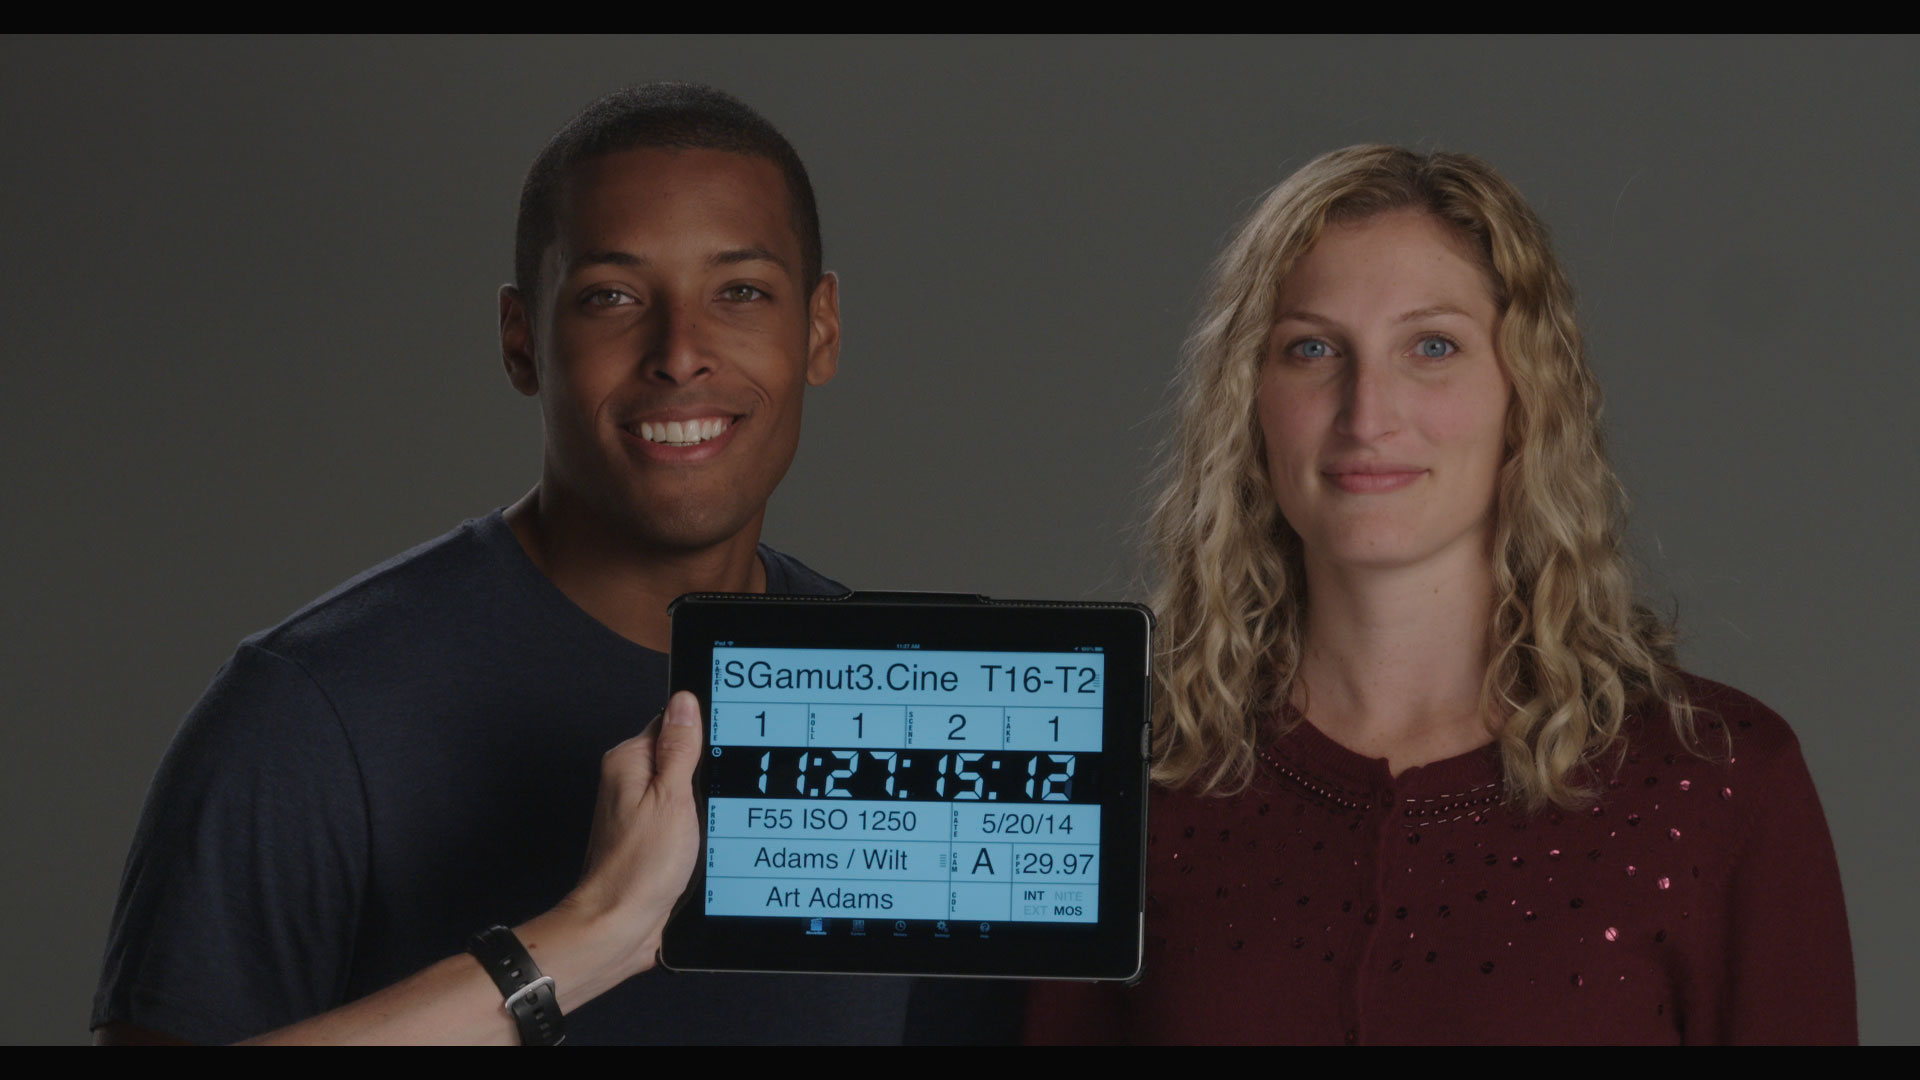
SLog3/SGamut3.cine, with the LC-709 Type A Look Profile applied.
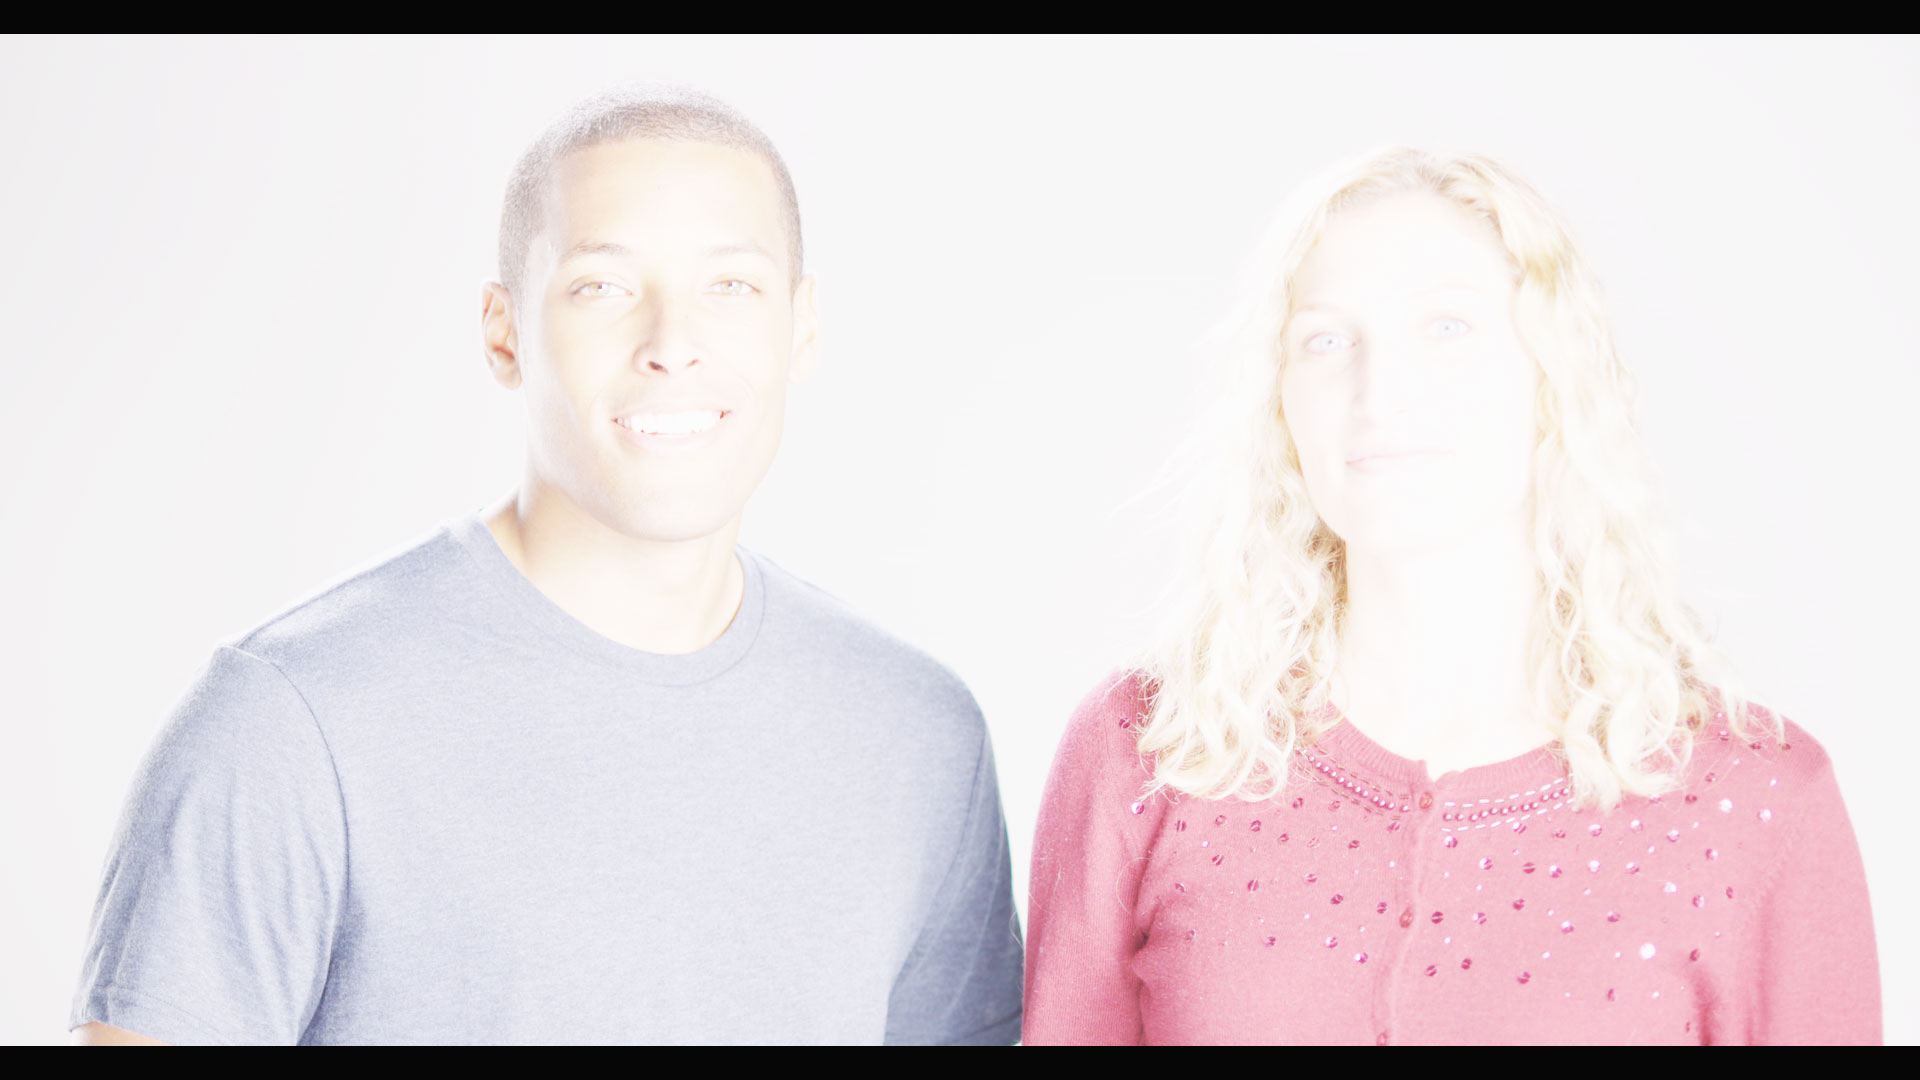
This was shot in SGamut3.cine/SLog3, recorded to XAVC and processed through the LC-709 Type A “Alexa” LUT. As a comparison I processed the same image in “Custom” mode using Rec 709 color and gamma presets:
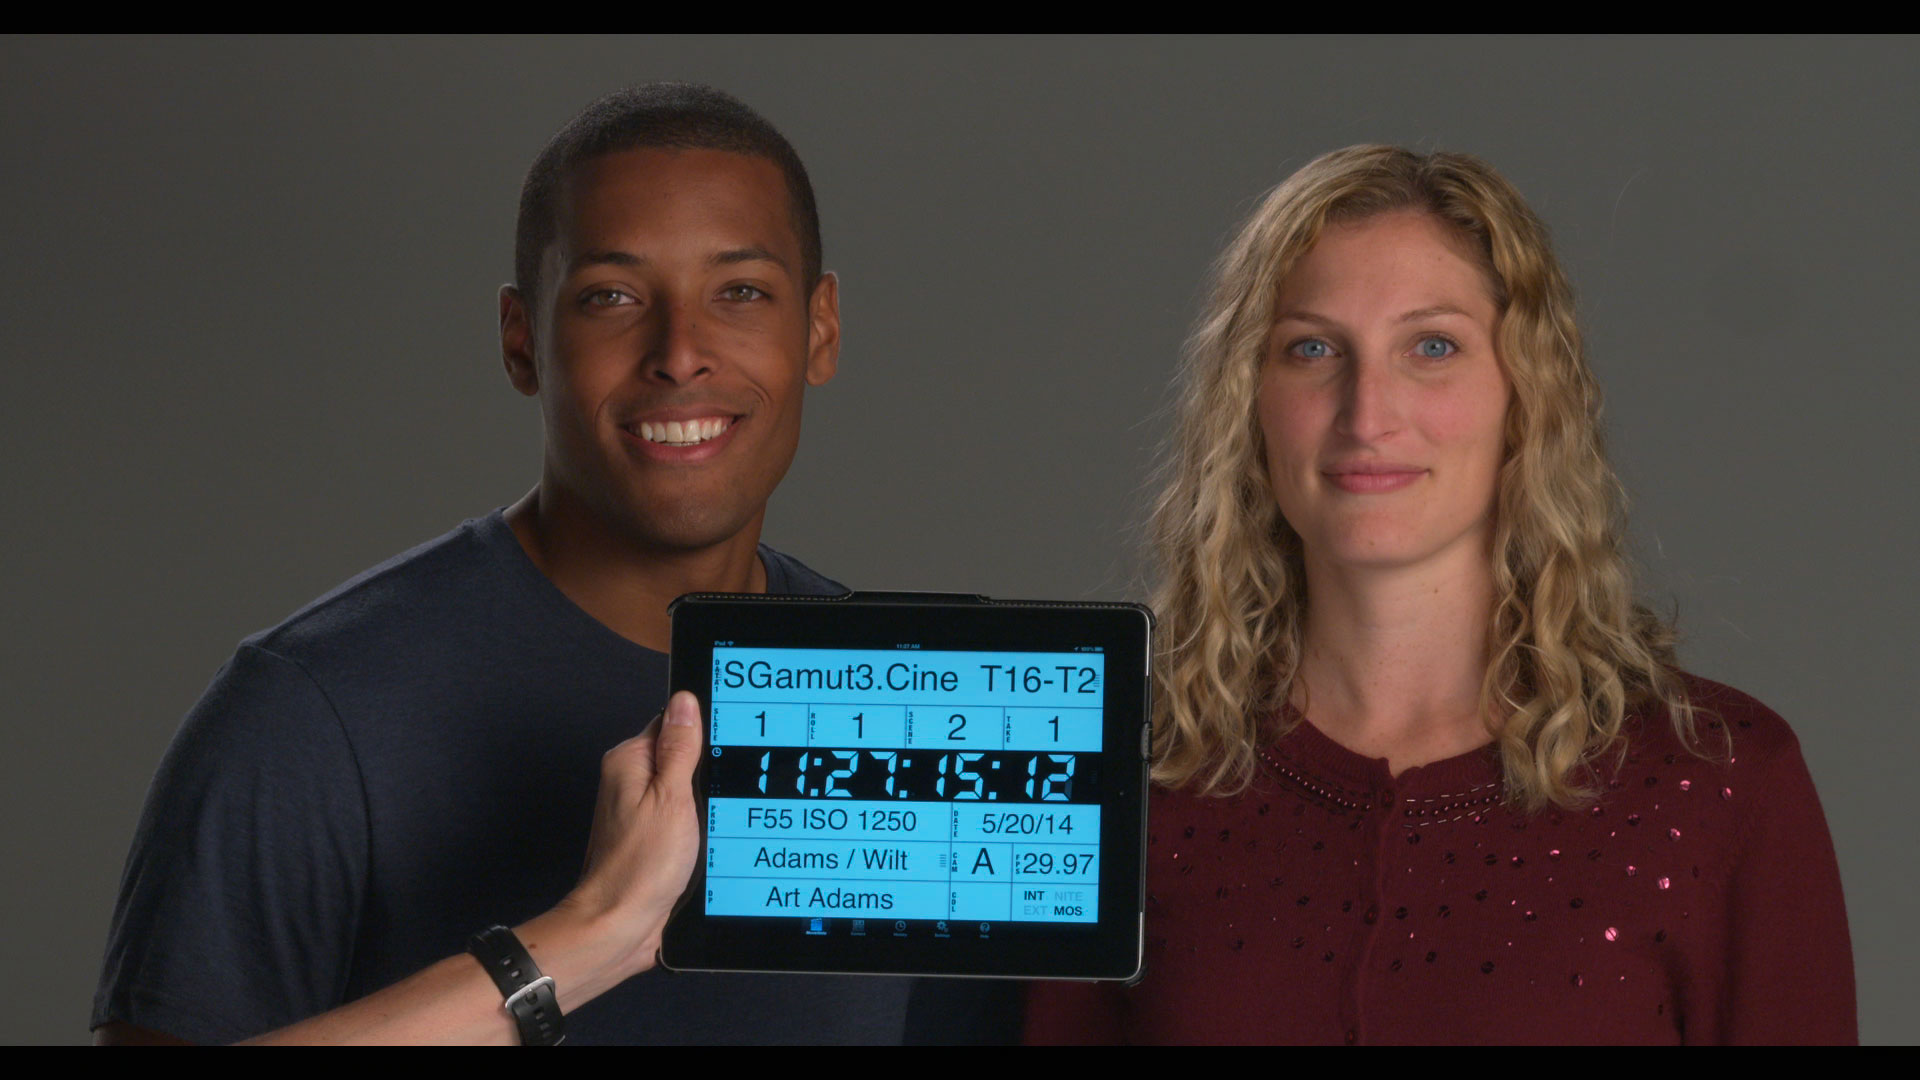
Rec 709 800%, 1D LUT applied in “Custom” mode.
This is the same image but with different contrast and colorimetry applied. It definitely “pops” a bit more. But why?
True Rec 709 is the dumbest mode you can ever opt for in a camera. The original Rec 709 spec was defined to capture six linear stops of scene referred brightness information. SIX STOPS! The worst cameras out right now capture ten stops. The problem, though, is that unless you’re transferring HD to film or projecting in P3 you’re limited to six linear stops of dynamic range in your “bit bucket,” which is the most that can be seen on the average Rec 709 display.
What can a manufacturer do when faced with the dilemma of building better cameras whose footage will primarily be seen on displays whose design specs are hopelessly outdated? They can cheat! And cheat they do: they take advantage of what our eyes do anyway, which is to increase contrast in the mid-tones, where we’re most sensitive, and reduce it in the highlights and shadows.
I do a lot of consulting for DSC Labs and as a result I have a lot of their charts at my disposal. One is the Xyla dynamic range chart, with which I can quickly visualize any gamma curve and plot the full dynamic range of any camera:
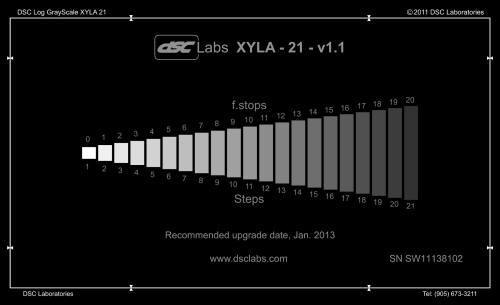
The DSC Labs Xyla chart. Every rental house and school should have one.
Each step is exactly one stop apart. As the only common exposure reference we have across all image sensors is where they saturate (“clip”) then that becomes our common reference: we clip the first chip and count down from there.
Here’s what Xyla looks like on a luma waveform monitor when shot by an F55 with Rec 709 gamma:
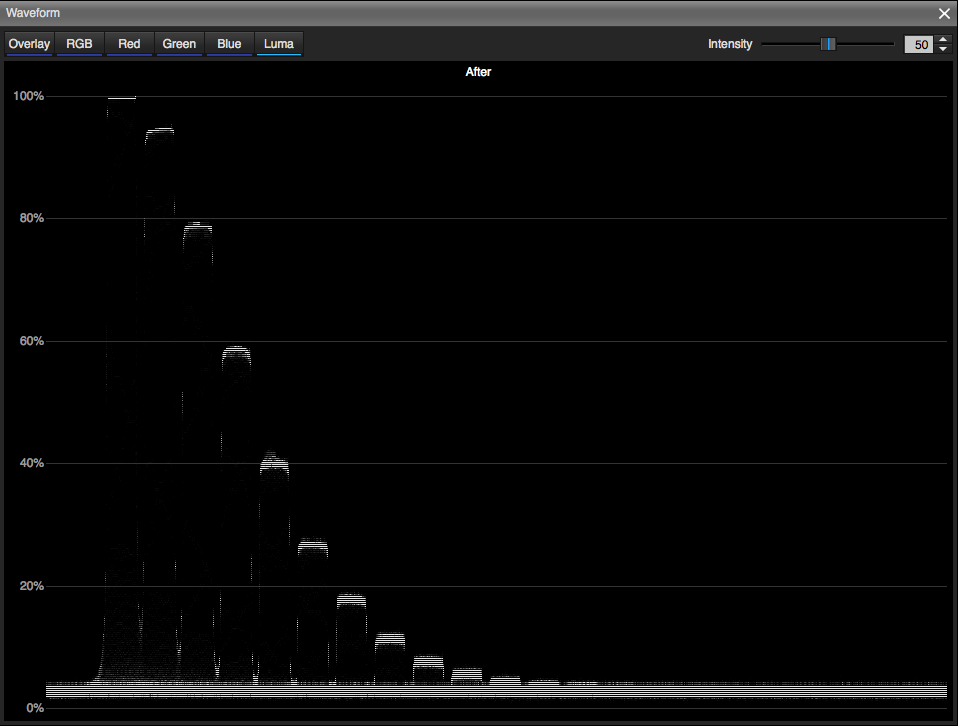
Rec 709 800%.
This isn’t true Rec 709 gamma, but rather Rec 709 800% which squeezes another stop of dynamic range into the Rec 709 “bit bucket.” (Regular Rec 709 only allows for about 2.4 stops of overexposure above middle gray, which falls at about 40%, whereas this curves gives us four stops. If you start at the top of the curve and count down from there, without counting the top step, you count four steps, or stops, before hitting 40%.) Our eyes are most sensitive to mid-tones, so the key is that the middle stops must have enough contrast to look “right” on Rec 709 displays. The steps at the top and bottom of the curve can be compressed, or closer together vertically, but the middle steps must have a bit of space between them.
Here’s a chart I made of reflectance values and their matching IRE values for a previous article:
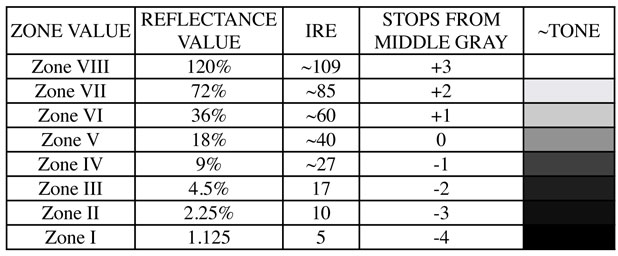
This chart is based on a formula I was given by Charles Poynton.
Every time a reflectance value doubles or halves it changes exposure by one stop. What I notice from this chart is that the first two stops above middle gray cover about 20IRE each (if middle gray is 40IRE, then one stop brighter than that falls at 60IRE and two stops brighter is roughly 80IRE.) and the two stops below middle gray are roughly 10 IRE each (one stop down is 27 IRE, and two stops is 17 IRE—so, in theory, we could round those off to 30 IRE and 20 IRE). The closer the mid-tones in a gamma curve land to those values the more “natural” they’ll look on a Rec 709 display. (There’s some room for cheating, but as a general rule that’s the way things seem to work.)
In the Rec 709 800% chart above you’ll see that Zones III, IV, V and VI land exactly on the IRE values I show in the chart above. That seems to be the key: if the middle five stops of dynamic range (middle gray plus/minus two stops) land roughly in a range between 20 IRE and 80 IRE, mid-tone contrast looks realistic on an average HD display.
Here’s what the LC-709 Type A look profile looks like:
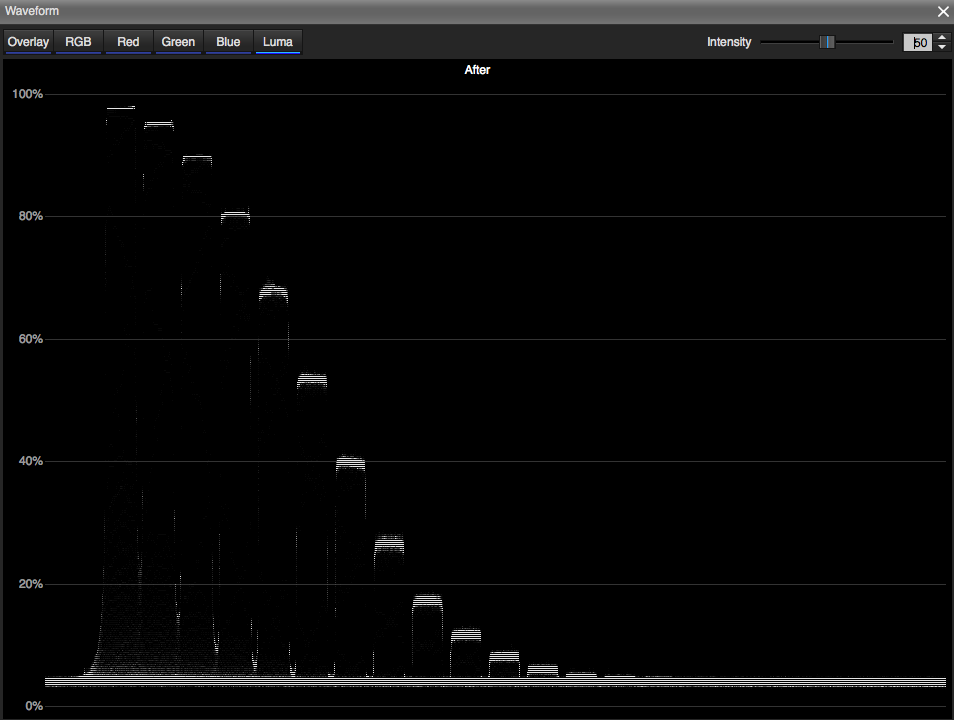
LC-709 Type A Look Profile. Notice how many stops fall between 40IRE and 80IRE.
The two stops below middle gray fall on 27% and 17%, which is where Rec 709 expects to see them. The difference here is that instead of two stops between 40-80% there are actually three! Zone VI should be at 60% but looks to be around 53-54% instead, and Zone VII should be at 80% but instead falls at 68% or so.
None of this is truly bad news. We’re way beyond strictly adhering to the Rec 709 spec; it’s hideously outdated, and we’d be crippling ourselves artistically if camera manufacturers truly followed it. What’s interesting to see is how manufacturers find ways to cram a camera’s full dynamic range into the Rec 709 spec in usable ways. In this case Sony gives use six stops of dynamic range above middle gray where the Rec 709 spec only calls for about 2.5, and they roll off contrast nicely in the highlights while preserving a fair amount of contrast in the mid-tones. Still, some say that mid-tones look a little dark on the Sony F55 when exposed normally, and the reduced contrast that comes from placing an extra stop of information between 40IRE and 80IRE may be why.
The first thing I checked was to make sure that middle gray actually fell where it was supposed to:
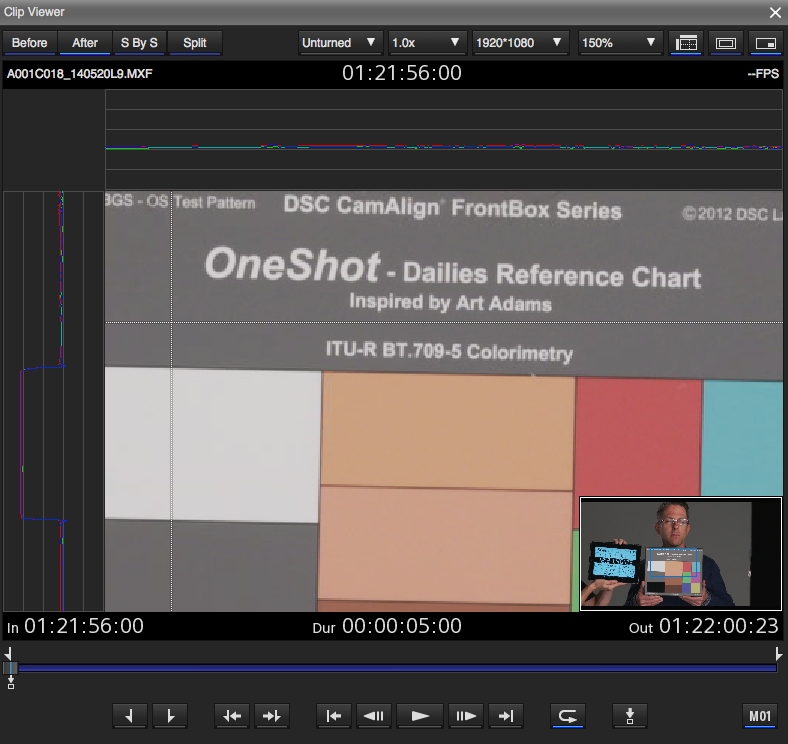
This is the DSC Labs OneShot Dailies chart. The background is a perfect 18% middle gray. I used “line” mode in Sony Raw’s viewer to verify that it was exposed correctly. (“Line mode” only reads values on a single horizontal and vertical line. For example, the horizontal waveform at the top of the frame is only reading values that fall under the dotted horizontal line. The same thing happens on the left side of frame with the vertical dotted line.) The gray background appears to fall at 40IRE, which is exactly where it should. (Exposure was determined using an incident meter calibrated at Quality Light Metric in Hollywood.)
I then looked at the flesh tone patches:
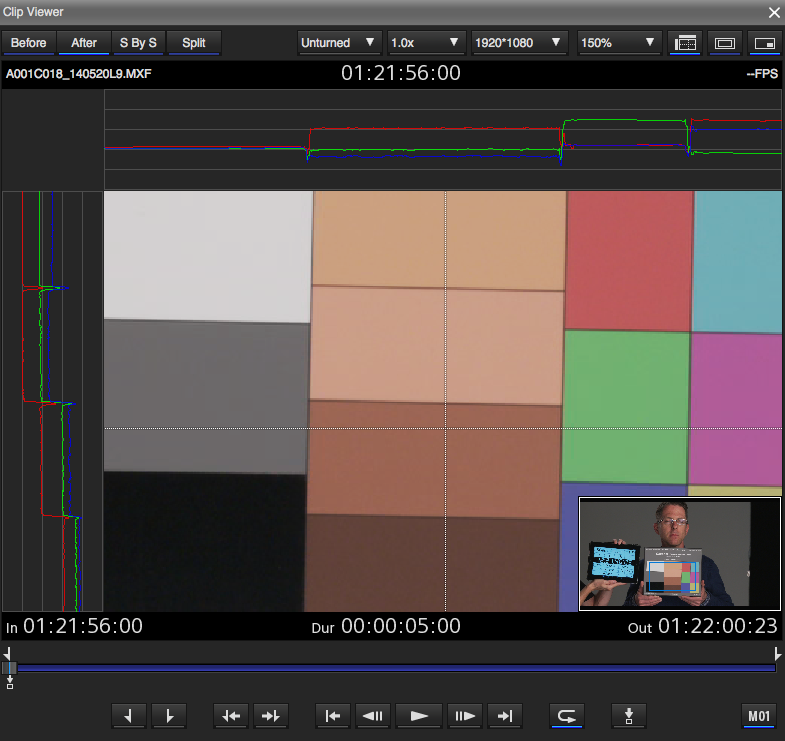
The vertical line passes through all the flesh tone patches so I can see their values on the left-side waveform. The green channel is generally a good reference for determining where luma falls as 70% of the luma channel is derived from green, and for the three brighter patches green falls at 40IRE or 60IRE. That seems bright enough to me…
I decided to play around a bit in Sony Raw Viewer and see if I could make LC-709A look a little more like a classic Rec 709 image, at least in the mid-tones. I made a curves adjustment to expand the steps between 40IRE and 80IRE, pushing the second step up from middle gray to 80IRE and pushing the third step farther into the highlight curve. I went from this:
Three steps from middle gray (40%) to 80%.
To this:
Two steps from middle gray (40%) to 80%.
Here’s the curve adjustment:
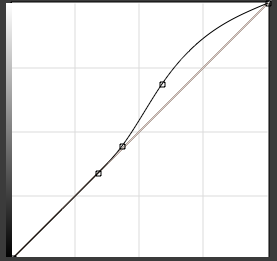
Curve adjustment in Sony Raw Viewer.
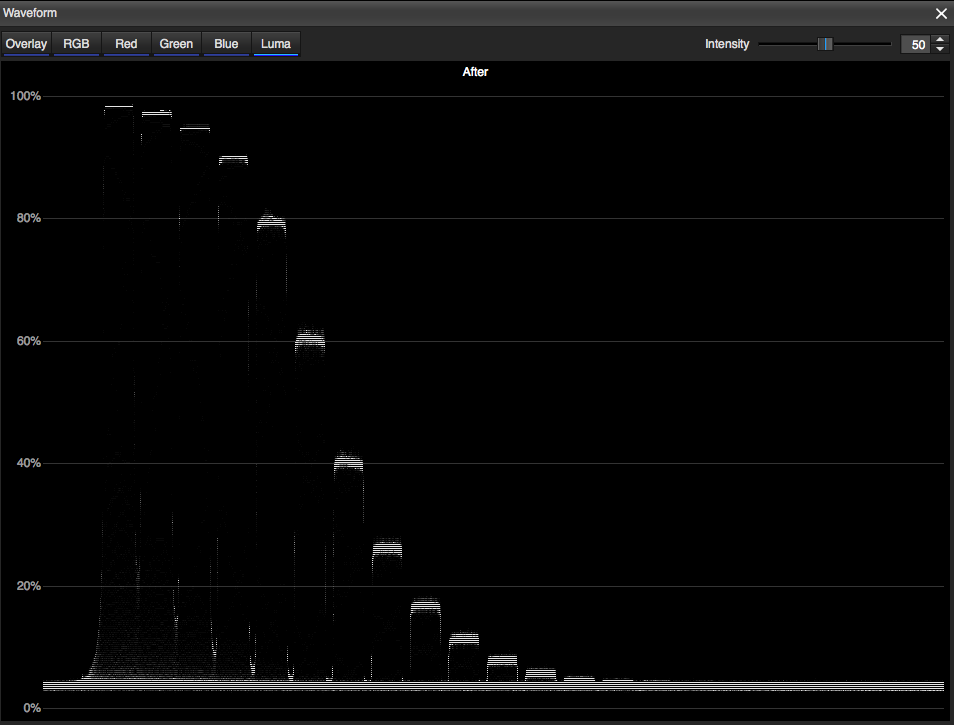
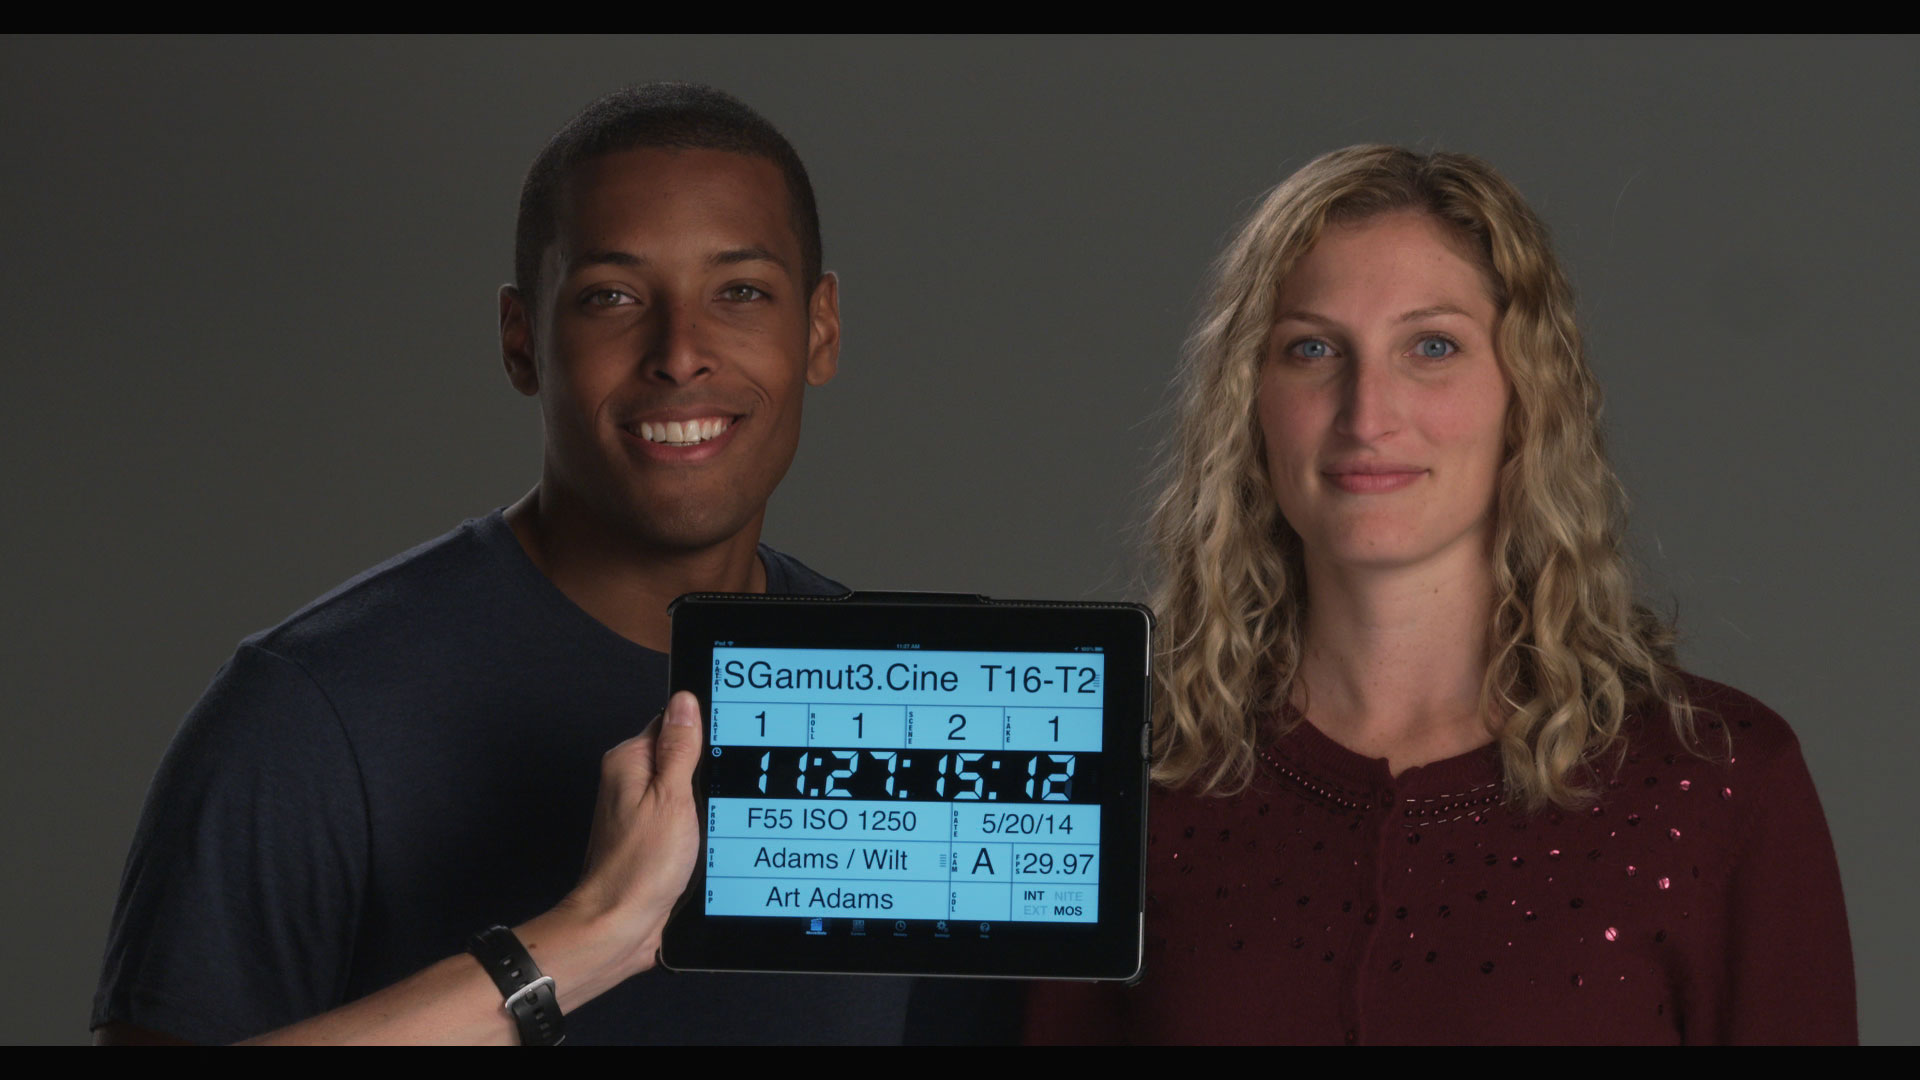
And, lastly, here are the pictures. Before:
LC-709A without curves adjustment.
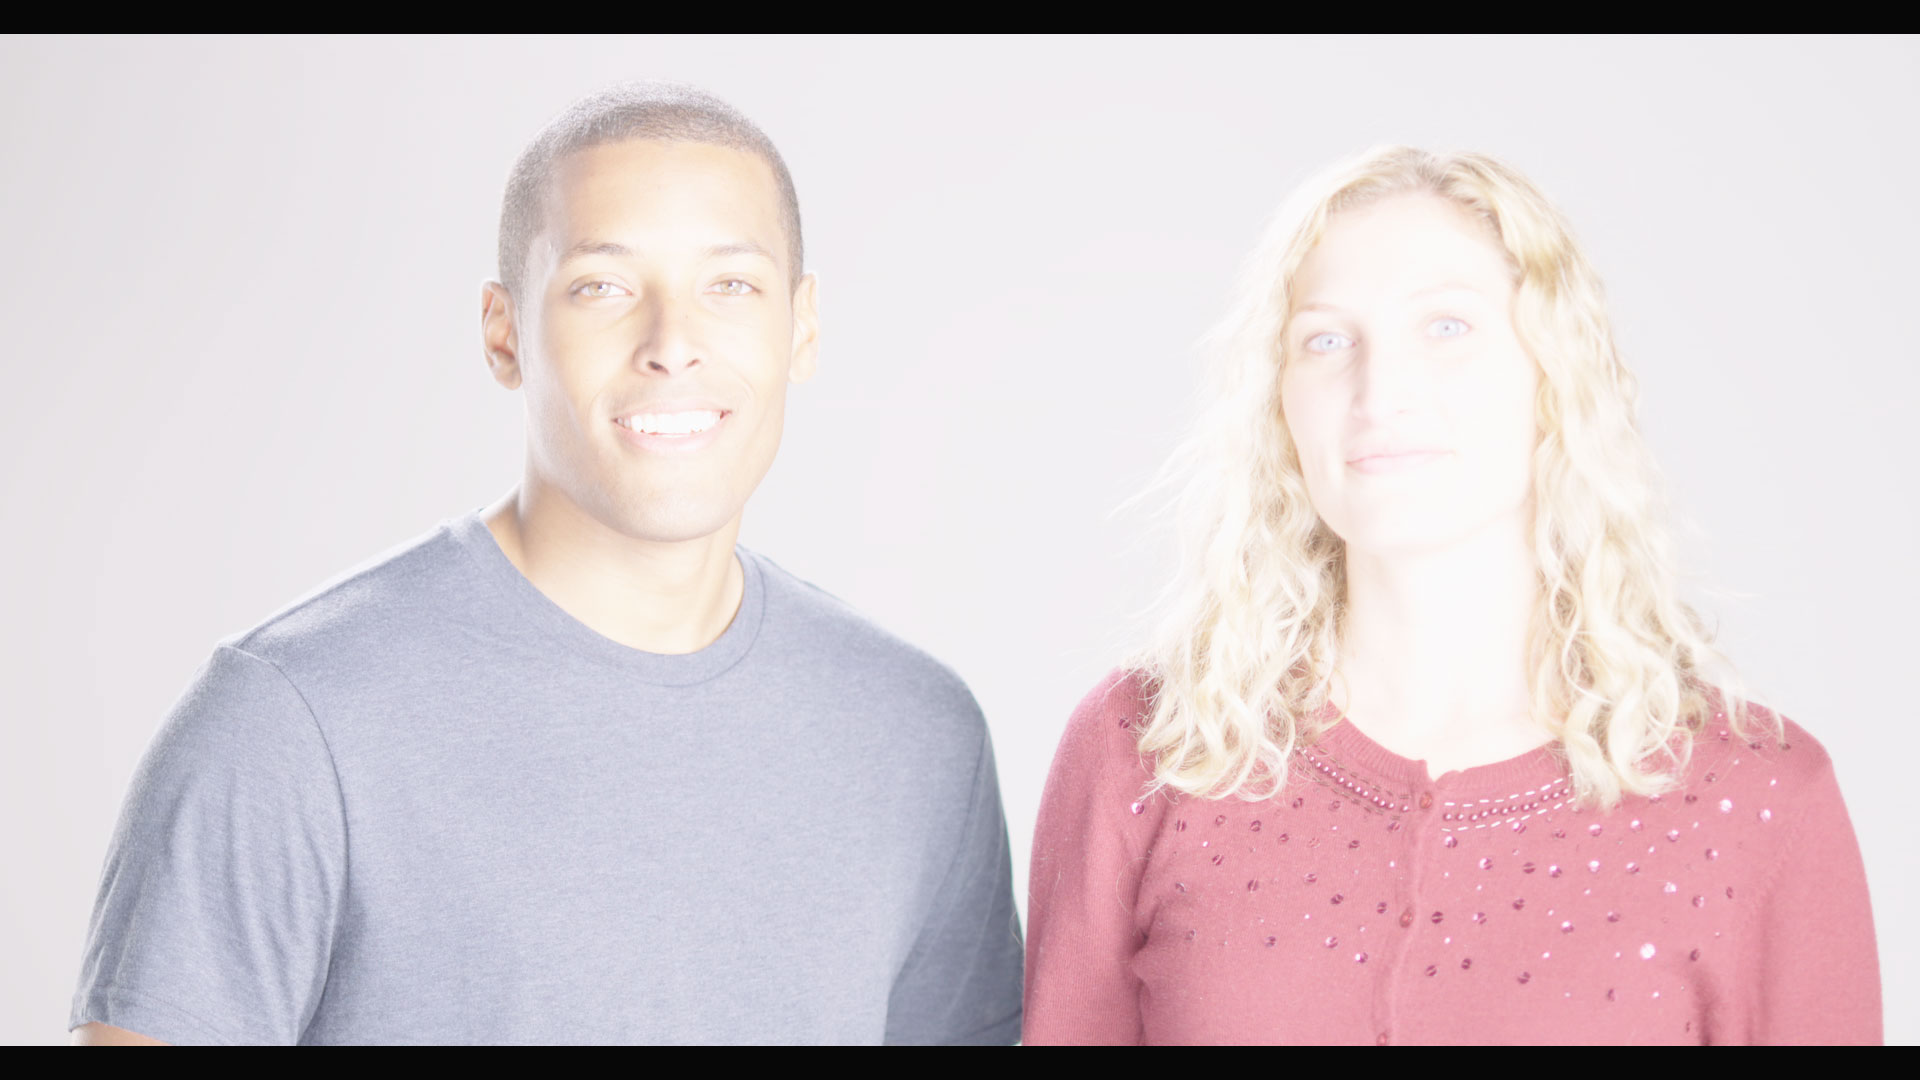
And after:
LC-709A with curves adjustment.
Both looks have their merits. The look with the curves adjustment looks a lot more like what I’d expect it to after basing my exposure off an incident meter reading, but the non-curved version has a pleasing “filmic” quality.
There’s always a tradeoff, however. Here’s what the same shot looks like when it’s overexposed six stops. Here it is without the curve:
+6 stops, no mid-tone contrast curve.
And with the curve:
+6 stops, with mid-tone contrast curve.
You don’t get something for nothing. By increasing contrast in the mid-tones we reduced contrast in the highlights, so while highlight detail holds without clipping it looks washed out because the stops in the highlight curve are jammed closer together.
Ultimately, though, we’re just messing around with a prebuilt LUT here. The beauty of the F55, in combination with Sony Raw Viewer and Resolve, is that you can build your own LUTs and either load them into the camera, or into a LUT box on set, or into Resolve or another post grading tool. Everything I’ve done here I did on top of log footage captured to XAVC. That’s where we are now: we can combine the power and beauty of log curves and LUTs and record them to a very basic recording format. For all the changes happening in the industry right now, the one thing you can’t say is that our tools are becoming less flexible.
If you’d like to try this curve out, you can download it here: LC709A with Zone 6 tweak. I take no responsibility for your results unless they are good ones. Use at your own risk, and when in doubt—test.
NOTES:
In this article I refer to IRE values, when the currently correct terminology is actually “%”. I’m aware of this, but I’m also aware that an article that refers to both waveform percentages and reflection percentages can quickly become confusing.
I’ve worked as a paid consultant to both DSC Labs and Sony, Inc.
About the Author

Director of photography Art Adams knew he wanted to look through cameras for a living at the age of 12. After ten years in Hollywood working on feature films, TV series, commercials, music videos, visual effects and docs he returned to his native San Francisco Bay Area, where he currently shoots commercials and high-end corporate marketing and branding projects.
When Art isn’t shooting he consults on product design and marketing for a number of motion picture equipment manufacturers. His clients have included Sony, Arri, Canon, Tiffen, Schneider Optics, PRG, Cineo Lighting, Element Labs, Sound Devices and DSC Labs.
His writing has appeared in HD Video Pro, American Cinematographer, Australian Cinematographer, Camera Operator Magazine and ProVideo Coalition. He is a current member of the International Cinematographers Guild, and a past active member of the SOC and SMPTE. His website is at www.fearlesslooks.com. Find him on Twitter: @artadams.