
Behold: the Canon XC10. A two-pound, 4K, stills & video camera with a fixed 10x lens and no XLRs. Kinda small. Kinda lumpy. What gives?
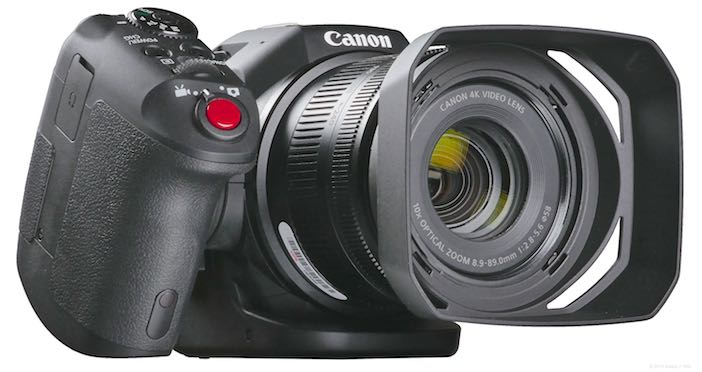
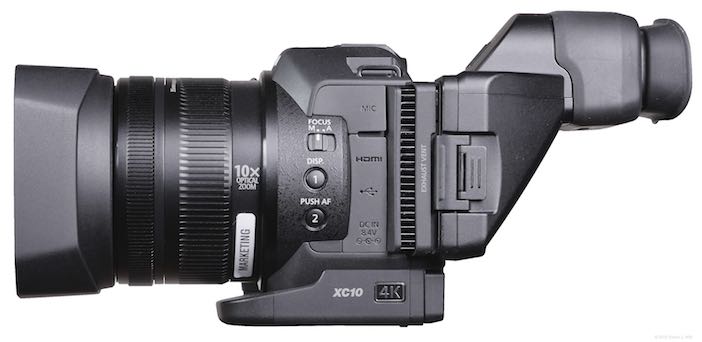
The Canon XC10 (in real life, the start/stop button is solid red, but JPEG web compression messes it up)
And lo, it came to pass in those days that the wire services and news bureaus didst return, saying unto Canon, “like, we totally dug what you did with the 5D Mk II, but dude: it’s 2015. Fotogs aren’t being asked to shoot video any more; fotogs are being fired and the reporter now has to do it all. Think one overworked individual who isn’t a camera person, yet needs to shoot stills and clips while covering a story. We need a superzoom, because no one has the time or baggage allowance for multiple lenses. 4K UHD of course, because dude: it’s 2015, and we have to be able to pull stills from the clips. Make us a compact, lightweight, do-everything camera that won’t take a Master’s degree to operate, because this one-person news team is too busy to fiddle with controls. Give us something small, cheap, robust, and quick to use: something that gets the shot.”
And Canon created the XC10.
And the commentariat were sore confused, and wailed, and rent their clothing, and gnashed their teeth, for the XC10 was an odd little beast unliketh anything else that Canon had made before.
The Canon XC10 is an odd little beast. Understanding its creation story is the key to understanding its purpose and primary market. Its design favors journalists whose primary job isn’t running a camera, but covering a story; people for whom a camera isn’t the focus of their professional lives but a necessary technical tool.
Many of the controls that we, as camera enthusiasts and operators, expect to see are either buried in menus or omitted entirely in the quest to keep the camera simple, robust, and compact. While the XC10 allows full manual control, it’s really optimized to operate in a partially- or fully-automated mode: it’s a camera designed to be working within three seconds of pushing the power button and getting the shot, without worrying about ISOs, shutters, or any of that technological razzle-dazzle.
If you think of the XC10 as a mash-up between a still camera like the 5D Mk-whatever and a video camera like the C100 or XA10 or XF-305, you’re missing the point. If you think of it more like an oversized 4K GoPro with an optically-stabilized 10x lens, vastly better ergonomics, and wireless remote control via smartphone—one that does a really good job of capturing attractive, usable images without requiring a lot of technical fumbling on the operator’s part—you’re on to something.
Overview
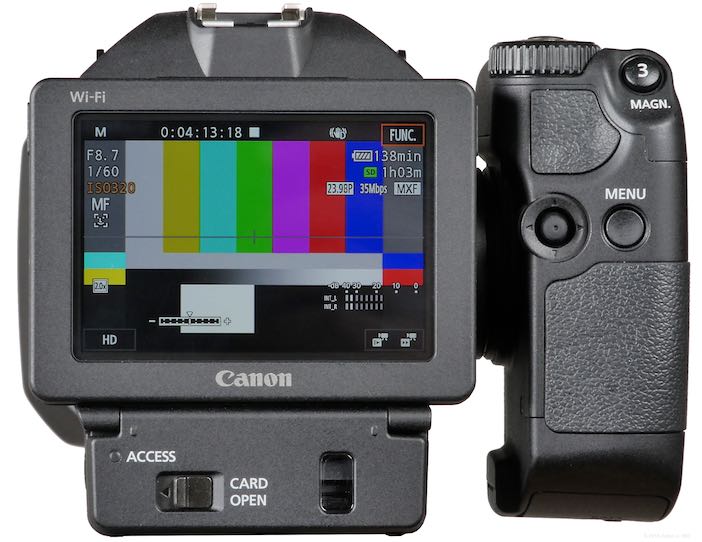
The $2500 (list price) Canon XC10 uses a 1”, 12 Megapixel single sensor behind an optically-stabilized 10x manual zoom lens with an internal 3-stop ND filter. A 3” LCD capacitive touchscreen provides viewfinding, with a clip-on reflex loupe converting it to a proper eye-level finder. A contoured, rotating handgrip affords a stable, secure, and comfortable grasp. The camera does not appear to be weather-sealed.
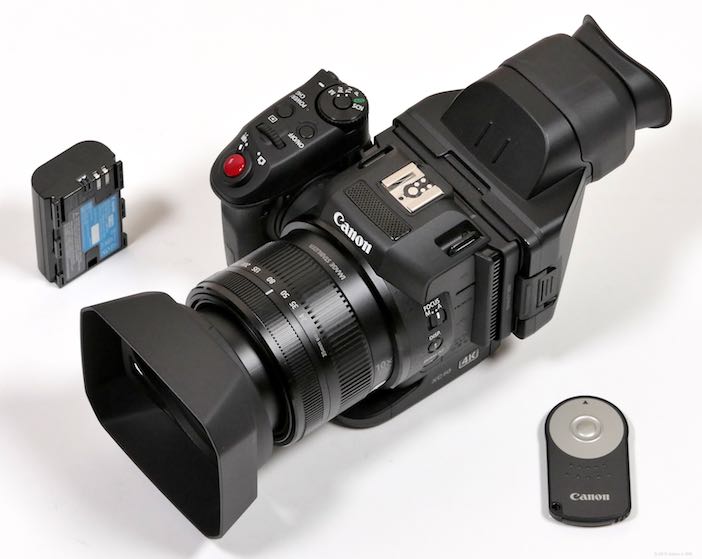
XC10 with its remote control and LP-E6N battery
In photo mode, the XC10 shoots JPEG stills from 640×480 to 4000×3000. The camera works with Canon EX-series Speedlites for flash photography. Burst recording up to 3.8fps is possible. There is no raw recording option.
In video mode, the camera captures clips at 3840p, 1080p, 1080i, and (for slo-mo) 720p. You can grab stills in video mode, whether while recording a clip or in standby, and you can save frames of recorded video as stills, too. Stills will be 3840×2160 or 1920×1080 depending on the capture mode of the camera.
Stills and HD clips are saved on a single SD card. HD clips are captured as long-GOP XF-AVC at 35 or 50 Mbps (18 Mbps for 720p slo-mo). UHD clips are stored on a CFast 2.0 card as intraframe XF-AVC at 205 or 305 Mbps.
Stereo audio is recorded from the built-in mikes, or from whatever source you connect to the 3.5mm input jack.
The XC10 can be monitored and controlled wirelessly using any smartphone, tablet, or other computer’s web browser.
The XC10 is available in both 60Hz “NTSC” and 50Hz “PAL” versions; it’s not a “world camera”. My review is of an “NTSC” model supplied by Canon Professional Services, hence the various barcoded stickers you see in the pictures.
Hardware
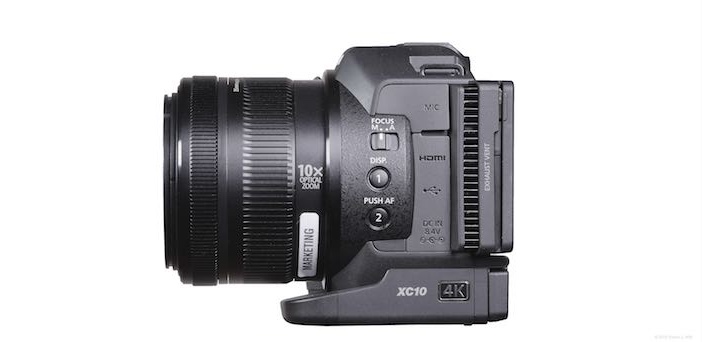
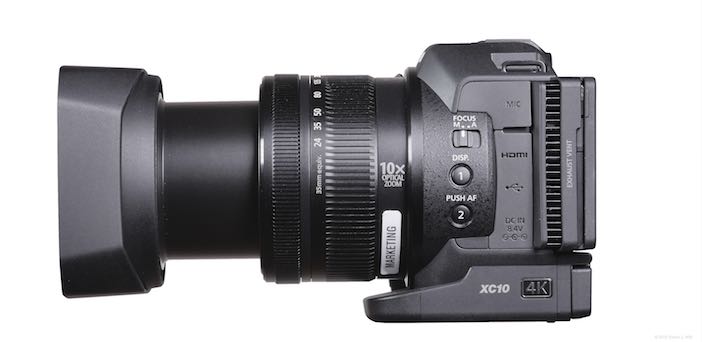
The front half of the XC1O is a stubby 10x zoom just under three inches in diameter and about 1.8 inches long, tromboning out another 1.3 inches or so when the lens is zoomed to telephoto. The back half is an equally stubby cylindrical body with a foot below, a hump above, a rotating handgrip on the right side, and a semi-articulated 3” LCD screen at the back; it echoes the design of a Cinema EOS camera like the C300.
The entire package, with lens collapsed, is only 4.8 inches long, 4 inches tall, and 4.9 inches wide (122mm x 102mm x 125mm). Add the twist-on lens hood and the clip-on EVF loupe, and the camera bulks up to 9.4” x 4.5” x 5.2” (238mm x 115mm x 131mm). Fully loaded with an LP-E6N battery, CF card, and SD card, the XC10 weighs 2.3 lbs or 10804g.
XC10 stripped; lens at wide angle
XC10 with lens shade; lens at full telephoto
XC10 with lens shade and eyepiece loupe; lens at wide angle
Lens
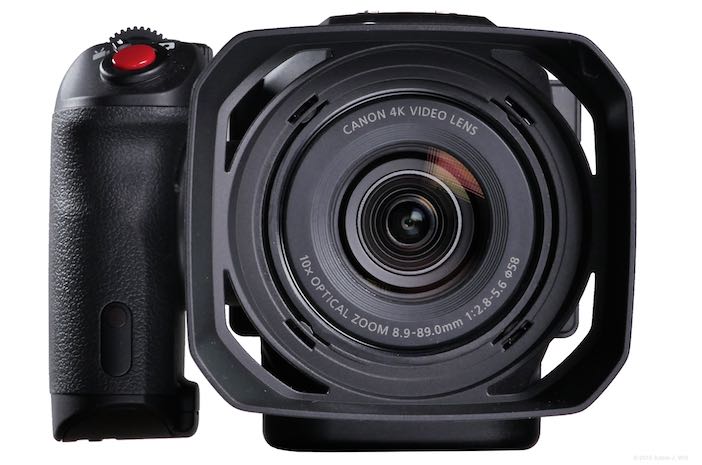
The 10x lens is an 8.9mm – 89mm with an 8-bladed iris. Maximum aperture full wide is f/2.8, but this decreases to f/5.6 (2 stops) at full telephoto. Minimum aperture is f/11.
The focus ring is free-spinning with no markings, and fairly pronounced viscous damping: you won’t bump it by accident, and it can be hard to turn quickly. You can set it to one of three sensitivities, but even the fastest setting isn’t fast enough: while it needs less than 90º rotation at full wide angle to change between infinity and close focus, it requires nearly a 360º spin at full telephoto to cover the same range. Though this makes a certain amount of sense in theory—focus is more critical at telephoto, so needs more finesse when zoomed in—in practice the inconsistency between the wide and tele sensitivities reduces the predictability of the ring’s response and impedes your ability to fix focus fast.
You can set the focus ring to pull focus in the normal manner of other Canon (and most video and cine) lenses, or in the reverse direction, like a Nikon lens.
The zoom is manual only, with a 90º rotation in the “normal” direction of cine / video and Canon zooms. The feel is well-damped and consistent through its range, like the zoom on a Canon L-series stills lens, if a bit more abrupt than most dedicated cine or video zooms. The zooming action is fairly linear through its range; it doesn’t “bunch up” or accelerate towards one end or the other the way many stills zooms do. The zoom is labeled in 35mm equivalent focal lengths: 24 – 240mm. It’s a handy crutch for people coming from full-frame 24x36mm sensors, but it only really holds for 4×3 stills where the actual range is 24.1 – 241mm. 16×9 video clips use a slightly cropped part of the sensor and the quoted equivalent range for clips (and 16×9 stills) is 27.3 – 273mm.
Both zoom and focus rings are grooved for traction, without any rubberized coating. Although the groove spacing is tighter on the focus ring, the rings aren’t readily distinguishable by touch and I sometimes found myself pulling focus on the zoom ring or trying to zoom the focus. The grooves offered plenty of traction for my naked fingers, but cold-weather gloves tended to slip across them unless I grabbed the rings very firmly.
The front of the lens extends when zooming, carrying its bayonet-mount lens hood with it. The 58mm filter thread doesn’t rotate with focus, so filters will maintain their orientation.
The XC10 has a single, internal 3-stop ND filter, accessible through the menus or a user-settable switch.
Left Side
The XC10 has two user-programmable pushbuttons on the left, and a manual/auto slide switch for focus. Four ports lurk behind tethered, pop-off rubber covers: a 3.5mm stereo mic input, a mini HDMI output, a mini type B USB port, and a coax DC IN socket for the supplied battery charger / power supply. Aft of the ports, just ahead of the LCD, is a tall, thin exhaust vent for the camera’s cooling system. The intake vent is on the opposite side, and a quiet fan draws air through the camera from right to left to keep the internal working cool.
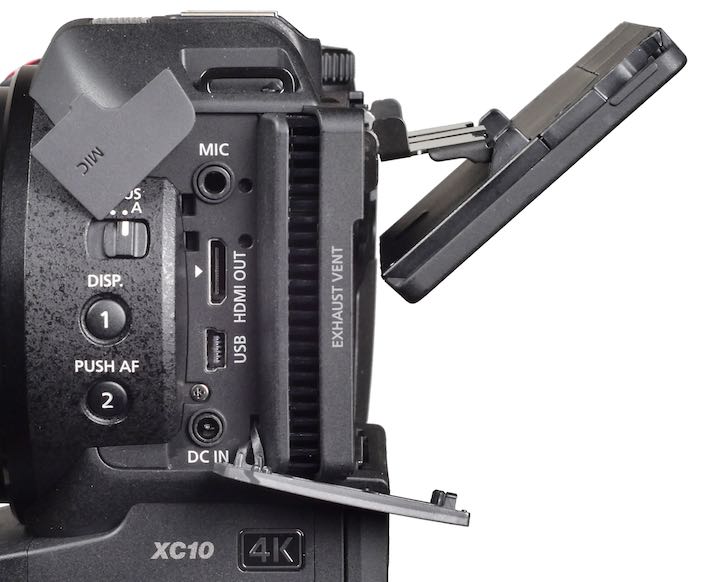
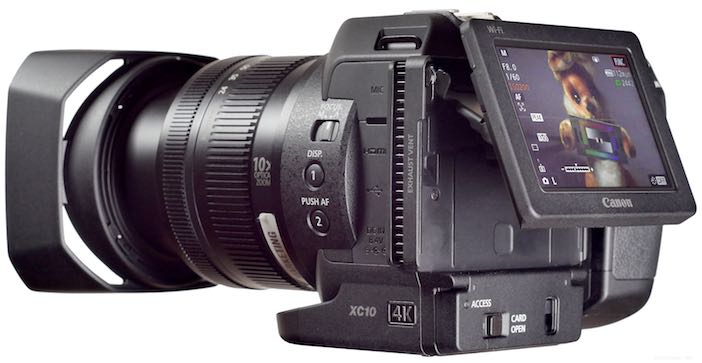
Left side. Note double-jointed LCD, angled down
Rear
The rear of the camera is dominated by the 3” 4×3 LCD touchscreen. It’s a capacitative screen, so it senses the lightest touch, but it won’t respond if the screen gets wet or you’re wearing gloves. The screen flips up 90º, and down somewhat less, but it can’t pivot to the front or to the side.
A cleverly-designed reflex loupe clips onto the screen to convert it to an EVF. Its two-mirror system, like that in a toy periscope, puts the eyepiece in line with the top of the screen, so the camera itself sits slightly below your line of sight, where it belongs: no need to hold it unnaturally high, as when using a conventional loupe on a DSLR’s LCD.
The loupe is held in place by a fixed hook on the right side and a latch on the left side. You attach it by engaging the hook and then flipping the latch closed. To remove it, you hold the left side of the camera downward while releasing the latch, so it’ll fall away from the screen and allow you pull the loupe away with one hand (if you release the latch with the camera level or left-side-up, the latch tends to remain stubbornly hooked around the LCD).
There’s a sliding diopter adjustment just under the eyepiece lens.
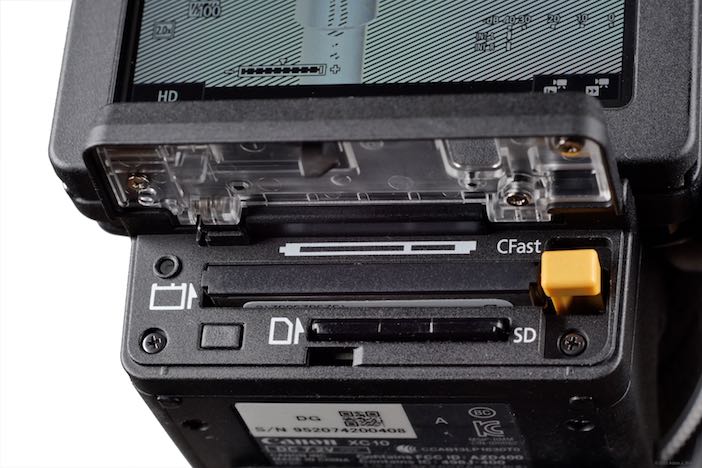
Card slots on the XC10. LCD shows 100% zebra
Below the LCD, SD and CFast card slots reside under a latched, flip-up cover. There’s a small window to show you whether or not cards are inserted, though it’s a bit small and dark to be especially useful (not a problem, as the camera warns you about missing cards every time you power up or switch recording modes). There’s also a bright red ACCESS LED to warn you when it’s not safe to pop a card out.
Handgrip
The right side of the XC10 is dominated by one of the best side handgrips I’ve ever used. The contoured grip has a pebbled rubber surface in all the needed places to afford traction. A red START/STOP/PHOTO button on the top front falls under your index finger, and a rotary mode switch around it selects between photo and video modes. A control dial sits behind the button for adjusting iris, shutter, or ISO. A power ON/OFF button and a record/playback mode button are next in line; they are slightly recessed and need to be pressed firmly for half a second, so there’s very little chance of activating either one by accident. A status LED glows green when the camera is powered up, or orange when the battery is charging.
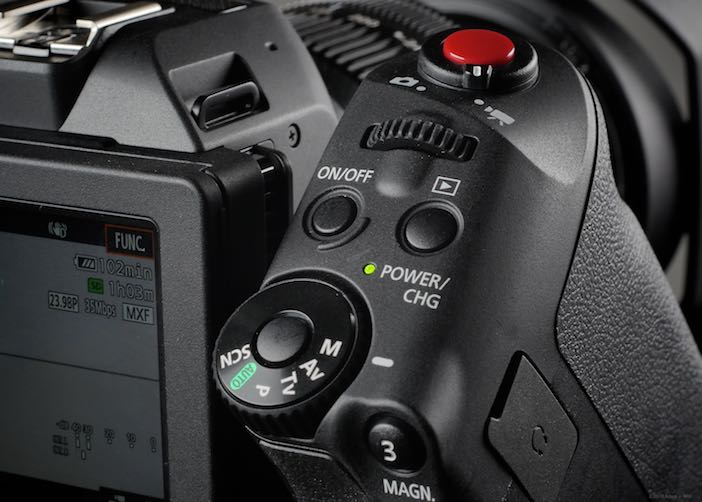
A six-position shooting mode dial with a lock button gives you the choice of full manual operations, aperture-priority (Av), shutter-priority (Tv), and programmed (P) exposure control; full-auto-everything mode; and a SCN mode with preset “scenes” optimized for different situations: backlit subjects, sports, portraits, fireworks, etc.
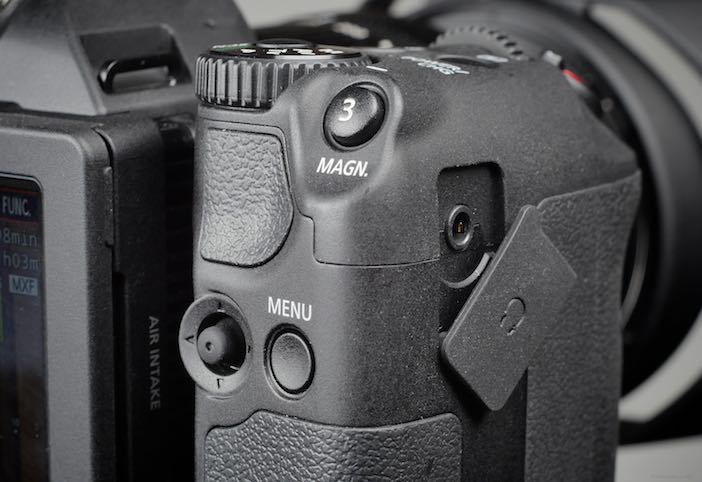
The back of the grip has user-assignable button #3 (normally the screen magnification button), a recessed MENU button, and a four-way-plus-press-in joystick for menu and function navigation as an alternative to the touchscreen. The right side of the grip has a 3.5mm headphone jack under a flip-open rubber cover, well-placed enough that it shouldn’t (and usually doesn’t) interfere with your grasp.
XC10 handgrip with headphone port uncovered
The entire handgrip rotates a full 90º back or forward. There’s no release button, just a friction clutch, so all you need to do to reposition it is grab and twist. It’s so quick to adjust I found myself adjusting it on almost every new setup (how well the friction clutch holds up over years of enthusiastic re-adjusting is unknown).
Top and Bottom
The top of the camera has an accessory shoe with contacts for an EX-series Speedlite (and the standard center contact that should trigger any flash, though I had none to test with). Built-in stereo mikes lurk beneath a grill, and strap lugs on either side of the shoe let you attach a carrying strap.
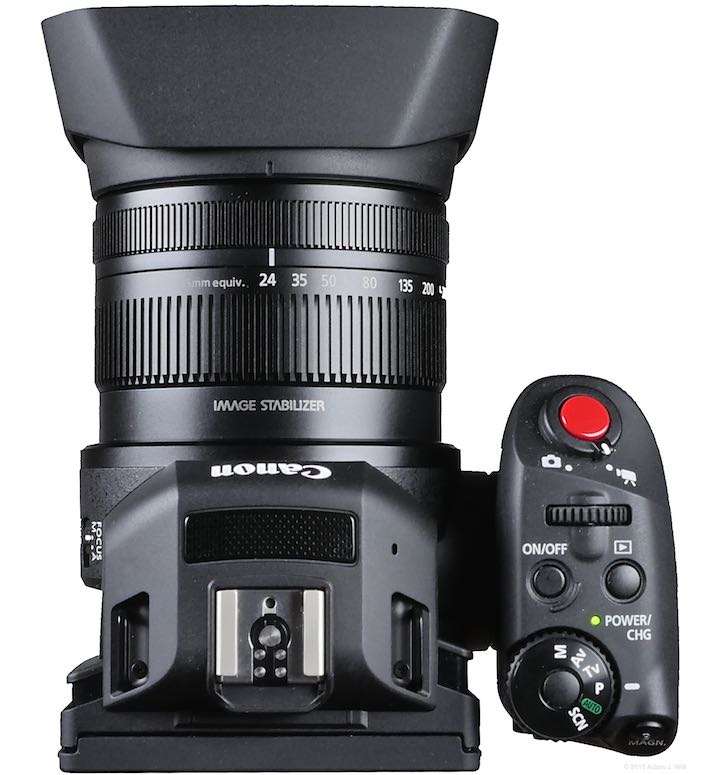
The bottom of the camera has a single 1/4×20 tripod socket and an anti-rotation hole ahead of it. The bottom extends forward with a “foot” like the ones on the Cinema EOS cameras, so the camera won’t tip forward even with the lens at full extension.
Extra Bits
The camera comes with an AC adapter, with a long enough cord that the camera can be tripod-mounted at eye-level while the adapter rests on the ground. The adapter charges the LP-E6N battery in-camera. A small IR remote control with a single button (and a two-position mode-selector switch), a shoulder strap, and USB and HDMI cables also come in the box.
The lens cap is a center-pinch, clip-on cap. There’s also a “body cap” for the eyepiece loupe so that its mirrors stay clean while it’s bouncing around in your camera bag.
Display
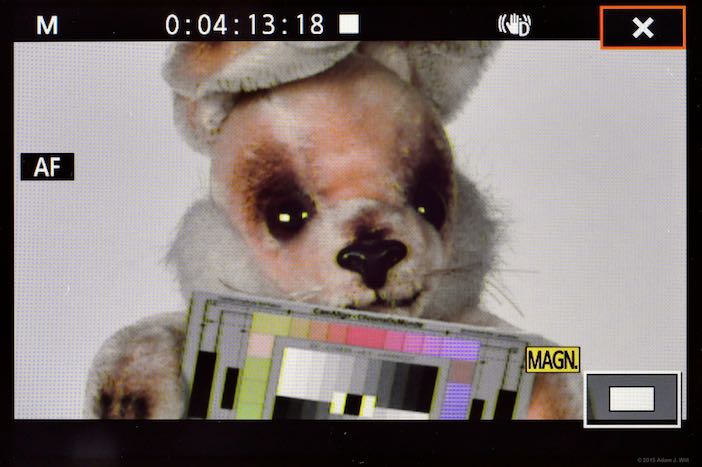
The 3” touchscreen LCD has a 3:2 aspect ratio. It resolves around 500 TVl/ph, so unaided focusing can be tricky, especially for UHD. Fortunately the camera has both effective colored peaking and a 2x magnification mode, both of which can be active while recording (half-pressing the start/stop button pops you out of mag mode, so you won’t be fooled into thinking you’re zoomed in farther than you actually are when you start recording or take a still picture, but you can re-engage it immediately).
Peaking can be turned on or off; when on, the peaking signal can be red, yellow, or blue, and the picture can be rendered in color or in black-and-white. There is no sensitivity adjustment for peaking but it almost always seems to at a suitable level; it wouldn’t surprise me if the XC10 is automatically adjusting it on the fly to optimize its behavior.
Magnification blows up the image by a factor of two. You can then drag the magnified area around with your finder or use the joystick to move it, with a small onscreen graphic showing you what part of the picture you’re viewing. With user button #3 assigned to MAGN. (a very sensible default), you can pop in and out of mag mode quickly and easily.
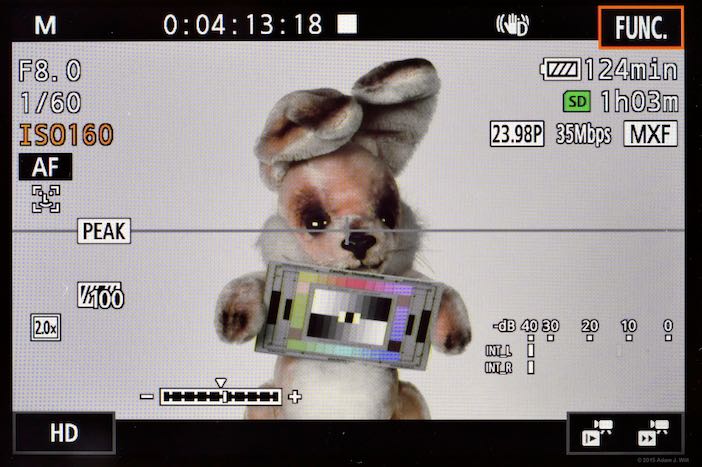
The data overlays show a good collection of useful tidbits. The screen shown is for full-manual video mode:
Here’s the same screen for stills mode:
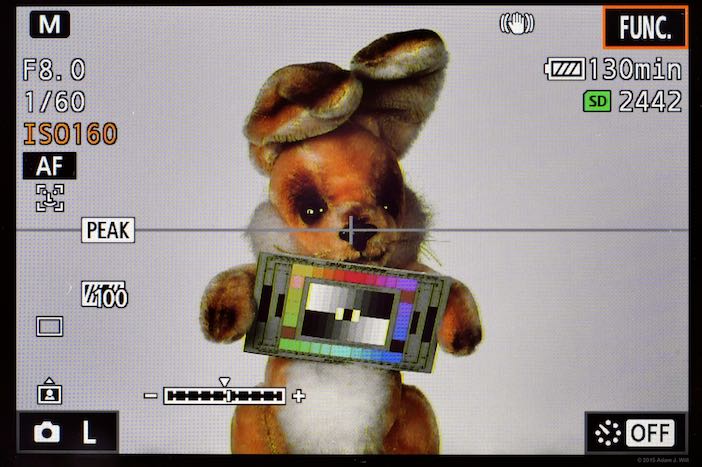
In Av or Tv mode, the full exposure data shown above is replaced with the aperture alone or the shutter speed alone, and the exposure over/under bar disappears.
When the XC10’s lens is set to manual focus, the focal distance is shown briefly while the focus ring is turned, but it vanishes after a second. If the focus ring is turned in auto mode, the lens is refocused, but no distance data are shown during the process.
Audio level meters, fortunately, are always visible (in video mode) regardless of the audio settings.
Two kinds of markers can be displayed, a rule-of-thirds grid or a level line with a center cross (as shown above), both available in white or in gray. The level line is just a line bisecting the frame; there’s no “artificial horizon” leveling aid built into the camera.
If you have a button assigned to DISP., you can cycle the data overlays between full, marker-only, and all-off aside from the recording status indicator. If you don’t have DISP. on a button, though, there’s no way to turn the displays on or off. If overlays are off, tapping the screen displays them briefly, but you can’t make them appear by moving or pressing the joystick, so practically speaking, you have to make sure they’re turned on with the button before you reassign the button to a different function.
Three onscreen buttons live in the corners of the screen. The top right button calls up the FUNC. screen overlay for frequently-used controls. The lower right button lets you set up slow & fast recording in video mode, or interval recording in photo mode. The lower left button lets you pick image size: HD or 4K for video; 4×3, 3×2, or 16×9 large, or 4×3 small stills in photo mode. The buttons are tappable, or you can use the joystick to select one (indicated by the orange outline), pressing in to activate it.
Controls and Menus
The XC10 has relatively few hardwired controls, three user-assignable buttons, and a single control dial, so many of the operations you might normally perform on the “surface” of the camera are instead invoked on the touchscreen or via the four-way joystick.
The hardwired controls are the zoom and focus rings; manual/autofocus, on/off, record/play, video/photo, menu, and start/stop buttons; and mode-selector dial.
Two side buttons and one on the handgrip are assignable. They default to DISP. (data display overlay on/off), PUSH AF, and MAGN. (screen magnify). You can reassign any of them to toggle through the zebras (70%, 100%, or off); toggle peaking, digital tele-converter (digital zoom), “Powered IS” image stabilization, or the ND filter; or trigger clip recording or still-photo capture. Tele-converter, Powered IS, and the recording triggers aren’t available when the camera is in PHOTO mode.
The control dial on the handgrip offer limited choices. With the mode selector set to M (full-manual) mode, the control dial can be assigned to control aperture, shutter or ISO/gain. In Av (aperture value) mode it always controls aperture; in Tv (time value) mode it always adjusts the shutter speed. In P (program), AUTO, and SCN (scene) modes, the dial can’t be assigned any function at all, and sits unused.
The camera comes with a small, single-button IR remote. It, too, is programmable, in the form of a two-position slide switch. In video mode, it can either start and stop clip recording, or trigger a still capture. In photo mode, it either triggers the shutter immediately or after a 2-second delay.
Everything else you’re likely to change while shooting is contained in the FUNC. screen, called up by tapping the onscreen FUNC. button or selecting it with the joystick.
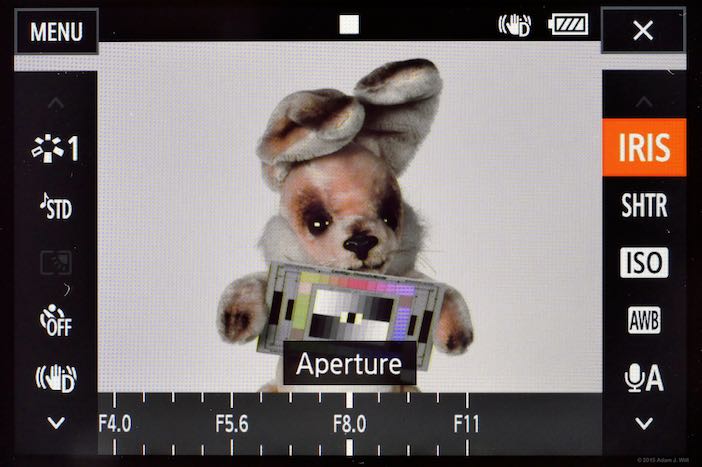
The FUNC. screen with IRIS selected
The FUNC. screen overlays three borders of the image with controls. Both sides offer up to five controls at a time, plus scrolling arrows to reveal more, while the bottom provides scrollable values or parameters for the currently-selected control, as appropriate. All controls and parameters can be operated by touch or by joystick.
In video mode, the left side controls are:
- Looks (to pick combinations of dynamic range, gamma, and color rendering): Standard, EOS Standard, Wide Dynamic Range, Cinema EOS Standard, or Canon Log. Looks can be adjusted for Sharpness, Contrast, and Color Depth (saturation). When the mode dial is set to SCN, Scenes are shown instead, where all camera settings are automatically controlled and optimized for Portrait, Sports, Night Scene, Snow, Beach, Sunset, Low Light, Spotlight, or Fireworks images. Scenes cannot be modified.
- Audio Scenes: Standard, Music, Festival, Speech, Meeting, Forest and Birds, Noise Suppression, and Custom settings. These only apply to the built-in mikes; plugging in an external input disables these choices.
- Metering Mode: Standard, Spotlight (favors highlights), or Backlight (favors shadows).
- Self-Timer: Off, 2 seconds, or 10 seconds.
- Image Stabilizer: Off, Standard, or Dynamic (Dynamic in HD only; the image zooms in a bit, as it appears to use digital stabilization in addition to the lens’s optical stabilization).
- Pre-Rec: in HD only, you can turn on a 5-second pre-record buffer, to capture material starting from 5 seconds before you press the record button.
In Photo mode, you’ll see instead:
- Scenes: Standard, Portrait, Landscape, Neutral, Sepia, Monochrome, and two User Settings. Any Scene can be adjusted for Sharpness, Contrast, and Color Depth (saturation). When the mode dial is set to SCN, the preprogrammed scenes are shown instead, where all camera settings are automatically controlled and optimized for Portrait, Sports, Night Scene, Snow, Beach, Sunset, Low Light, Spotlight, or Fireworks images. These scenes’ settings cannot be modified.
- Drive Mode: single-shot, Continuous (as fast as the camera can record stills), and AF Continuous (the camera waits just long enough to autofocus each new shot).
- Metering Mode: Evaluative, Center-weighted Average, or Spot metering.
- Focus Priority: Off (a picture will be taken immediately, even if the camera isn’t focused), AiAF (the camera finds focus in one of nine onscreen areas before snapping the picture), or Center (the camera focuses on the center of the frame, then grabs the shot).
- Self-Timer: Off, 2 seconds, or 10 seconds.
- Image Stabilizer: Turn the optical stabilization Off or On.
The right-side functions are user-settable, so you can put your most essential functions in the first five.
- Iris, Shutter, and ISO
- White Balance: AWB (Auto white balance); Daylight, Shade, Cloudy, Fluorescent (warm white), Fluorescent H (daylight), Tungsten, or Flash presets; Color Temperature mode letting you dial in a Kelvin value; plus two white balance presets letting you capture a “white” image to set the white balance.
- Audio Level (video mode only): Manual (with a slider to set the levels for both channels at the same time) or automatic.
- Exposure Lock: lock the current exposure and optionally adjust it up or down as much as 2 1/2 stops.
- AE Shift: +/- 2 stops of autoexposure compensation, in 1/3 stop increments for stills or 1/4 stop increments for video.
- Peaking: Off, 70%, or 100%.
- Powered IS (video mode only): stabilization optimized for zooming in to an unmoving subject.
- Digital Teleconverter (video mode only): Gives you a 2x digital zoom. The zoom halves resolution.
- Focus: This focus mode, when enabled, lets you tap a point on the screen for the camera to focus on. It’s a “focus here” function used in manual focus mode as a more directed version of the PUSH AF button’s function.
Note that the right-side FUNC menu is limited to 10 items, so while all 10 photo-mode functions can be displayed, you’ll have to pick your favorite 10 out of the 13 available functions for video mode.
Deeper settings menus are displayed using the dedicated MENU button on the grip or the MENU button at the top left corner of the FUNC. screen. The menus let you adjust system settings and access less common features. Any Canon DSLR user will find the menu system quite familiar:
You can enable shockless white balance, control the speed and direction of the focus ring, adjust the auto ISO limit, turn on a reduced rolling shutter setting for 4K recording, choose the frame rates for video capture, format SD and CFast cards, set up timecode recording mode and user bits, turn bars and tone on and off, enable the tally lamp, tweak the FUNC menu and user button settings, and choose between ISO and gain settings, among other things.
The Audio submenu lets you adjust the settings for the “custom” audio scene or for an external source; for any of the other audio scenes all the choices are made for you. You can select a 20dB attenuator; enable low or high audio compression (separate from the limiter, which you can turn on or off or set to engage automatically); pick from low-cut, low-boost, mid-boost, and mid/high boost equalizations; and choose monaural, normal stereo, and wide stereo separation for the built-in mikes. For an external input you can enable a low-cut filter and choose between line and mike-level sources. It you turn off auto-leveling, you can set manual levels for both channels simultaneously.
Recording
Stills and HD clips are recorded to the SD card, while 4K UHD clips are written to the CFast card. Clips are recorded in Canon’s XF-AVC format: 8-bit 4:2:2 AVC/H.264 in an MXF wrapper. HD clips are saved as long-GOP, and 4K UHD is saved as intraframe.
Note that the XC10 is not a “worldcam” but comes in different versions for 60Hz and 50Hz regions. If you buy the “NTSC” version, you can record in 23.976p and 29.97p in both HD and UHD, plus 59.94i and 59.94p in HD only. The “PAL” version gives you 25p in both frame sizes, plus 50i and 50p in HD.
UHD clips can be recorded at either 305 or 205 Mbit/sec. A 64GB CFast card holds 25 minutes of 305 Mbit/sec material or 40 minutes of 205 Mbit/sec material. I didn’t see a marked difference between clips recorded at 205 Mbits or 305 Mbits; both bitrates gave me clean and artifact-free images.
HD clips are saved mostly at 35 Mbit/sec, though 50p and 59.94p HD clips bump up to 50 Mbit/sec while 720p slo-mo clips are saved at 18 Mbps. A 16 GB SD card holds 60 minutes of 35 Mbit/sec HD clips, or 40 minutes of 50 Mbit/sec footage.
Stills are saved as JPEGs only; there is no raw option, nor can you set the compression quality.
Canon offers an “XF Utility” program for both Mac and Windows to read, catalog, and back up the camera’s clips, as well as plugins for Media Composer and FCPX. With the XF Plugin for FCPX, FCPX was able to view and import the XC10’s clips as soon as the SD or CFast card was plugged into my Mac using a compatible card reader (when I plugged the camera in via USB, FCPX saw the stills on the SD card, but none of the clips on either card). Canon tells me the clips are natively supported in Adobe Premiere Pro and Grass Valley Edius with no plugins needed.
Playback
The XC10 offers the usual onscreen playback options. When you switch to playback mode, the camera shows you the most-recently-shot still or clip for the mode you’re in, but you can “zoom out” to see thumbnails, and switch between stills, HD clips, and UHD clips. In stills mode, you can view metadata including an exposure histogram.
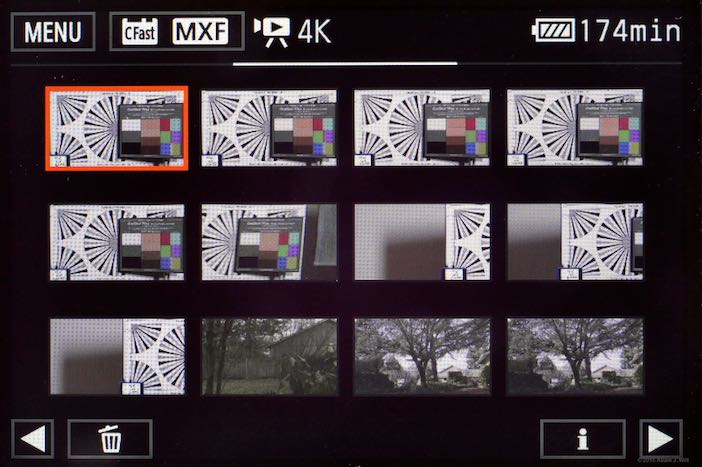
Thumbnail view of 4K clips on the CFast card
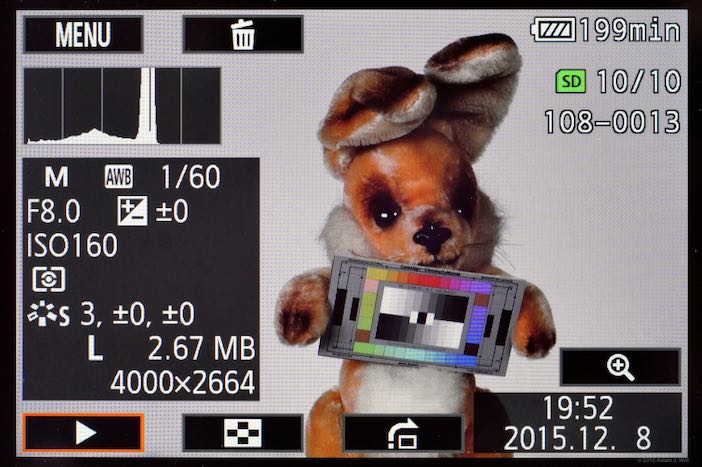
Data display for a still image
Interestingly, the EXIF data embedded in the XC10‘s stills lists the lens size as 9.2 – 92mm, though the EXIF focal length displayed is always in the 8.9mm – 89mm range.
Connectivity
A mini-HDMI port provides video and audio output. The UHD output follows the source: 3840×2160 at either 23.98p or 29.97p (unless you plug it into an HD-only display or recorder, in which case it outputs HD). The HD output, at least when connected to a Video Devices PIX-E5, is always 59.94p regardless of the recording frame rate.
The XC10 has a mini USB type B port so you can cable it to your PC or Mac for still image transfer. The USB port is also used to connect an optional Canon GP-E2 GPS unit if you wish to geotag your stills and clips.
The camera also has built-in WiFi with both 2.4GHz and 5GHz options. It can connect to an existing network to act as a DLNA Media Server for its stills (although its clips do not appear), or work as an access point for “Browser Remote” access.

“Browser Remote” allows a smartphone, tablet, or any other wireless device with a web browser remotely monitor and control the XC10.
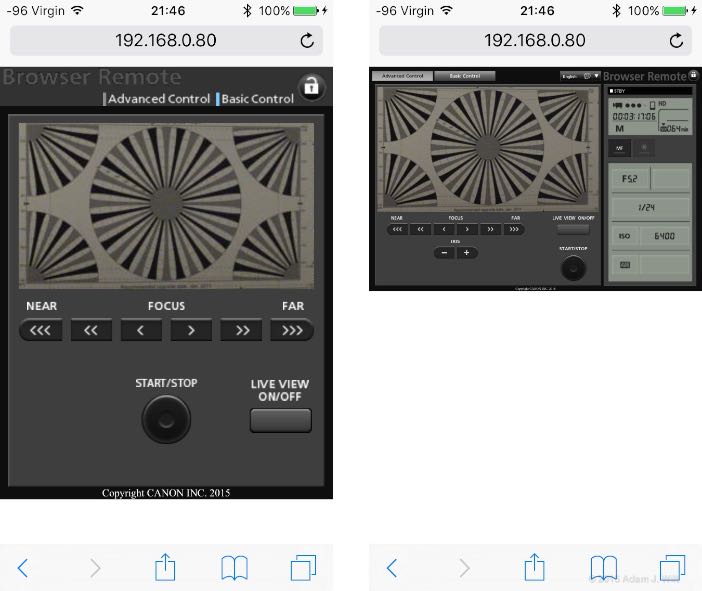
Browser Remote on iPhone 5: Basic Control mode on left, Advanced Controls on right
The Basic Control mode works well on a phone, but the Advanced Control panel really needs a larger screen like a tablet’s, due to UI elements (scrollbars, “X” buttons, etc.) that are too small to use otherwise.
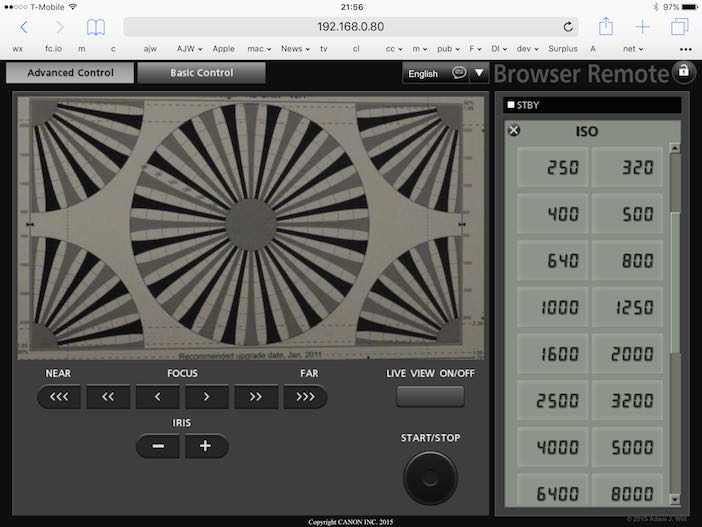
Advanced Control mode on an iPad
Both modes allow Live View; the image has a fraction-of-a-second lag and the frame rate is somewhere around 5-10fps, but it beats not having a live view. Unfortunately peaking isn’t displayed in Browser Remote, so focus assurance is tricky at best.
Browser Remote is invaluable for doing things like conducting interviews: you can sit off to the side of the camera, making unobstructed eye contact with your subject while your camera captures a fashionable 3/4 shot, yet you can still monitor and control the camera with your smartphone or tablet. It’s also handy for remote rigging situations like jib arms, car mounts, and the like where your access to the camera during a shot is limited.
When Browser Remote is running, HDMI output is turned off.
Stereo external audio can be fed into a 3.5mm jack. While the XC10 has been criticized for not offering XLR inputs, it’s worth considering that there’s simply no room on its compact chassis for such a large connector: the XC10 would have to bulk up considerably to accommodate such large plugs. Third-party XLR adapters or camera-mount recorders can easily be added if desired.
Next: Performance, Operations, & Conclusion