
[Updated 2016-02-08] It’s bright red and carbon-fibery. It shoots everything from 480i to 4K to stills. It has variable frame rates, infrared imaging, programmable focus pulls, and log recording. It’s the $4200 Panasonic AG-DVX200.
Panasonic AG-DVX200
[2016-02-08 corrections courtesy Barry Green: only usable batteries are the VW-VBD58, the IDX, and “batteries made for the PX270 and X1000” cameras; 2160p output possible while recording except at 50/59.94p; histogram can be moved, 4K width weirdness (see discussion below), Log View Assist can be turned on permanently with latest firmware. Details inline.]
With the DVX200, Panasonic explicitly recalls the $3795 AG-DVX100 of 2002: the first 24fps, progressive-scan, standard-definition, tape-based DV camcorder.
The new and the old: DVX200 and DVX100, side by side
The DVX100 went through two revisions before the advent of 2006’s $6000 HVX200, a hefty crossover camcorder with a 13x lens, shooting 4×3 and 16×9 DV to tape, and 720/1080-line HD on pricey P2 cards (a 4 GB card cost $650, which captured only 4 minutes of DVCPROHD). 2010 saw Panasonic introduce the AG-AF100 for $4995 (body only), a large-single-sensor camcorder with an MFT lens mount recording AVCHD to SD cards. But it wasn’t until last year—on April 13th, 13 years after the DVX100 came out—that Panasonic saw fit to anoint a successor to the original DVX.
The PDF spec sheet (70 kB) lists all the DVX200‘s speeds ‘n’ feeds and critical dimensions, while the PDF brochure (1.8 MB) is chock-full of feature lists, tables, and graphics. Rather than parrot that info I’ll try to fill in some of the gaps around the specs and discuss operational issues. If you really want all the details, I highly recommend both the operating manual and Barry Green’s guide; links to both at the end of this article. Note however that (at least at the time I’m writing this) all these documents pre-date the recent firmware updates, so they lack descriptions of Fast Scan mode and may not completely reflect the current state of the camera.
In this article, I’ll use Panasonic’s format nomenclature: 4K means 4096×2160, UHD mean “Ultra HD”, or 3840×2160, while FHD is “Full HD”: 1920×1080.
Design and Handling
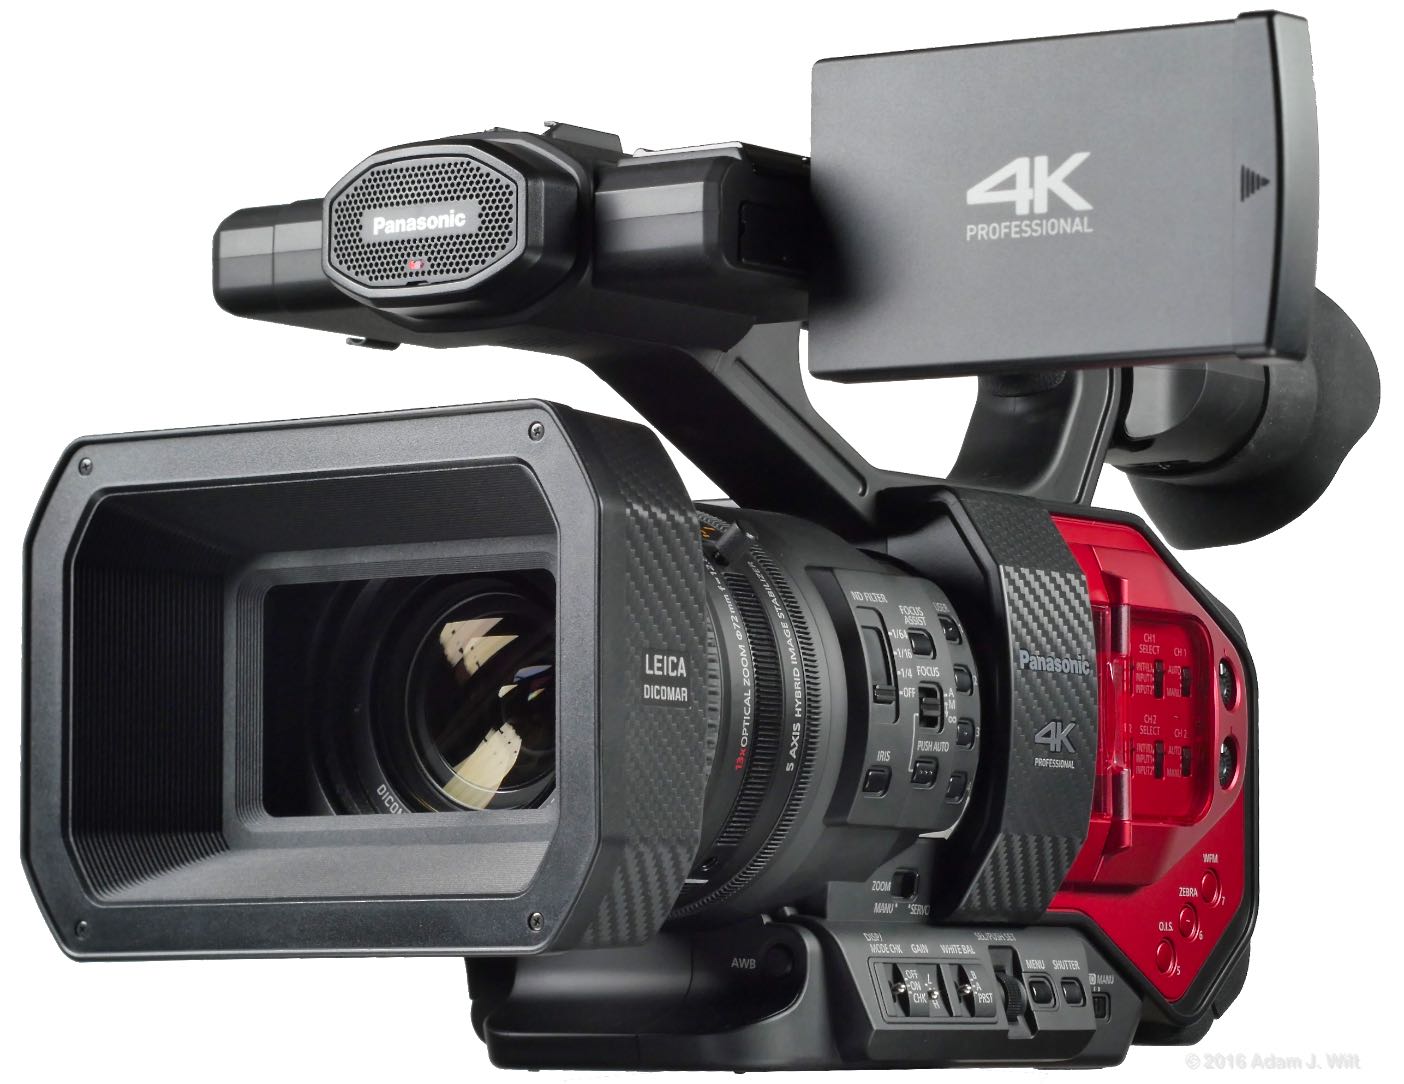
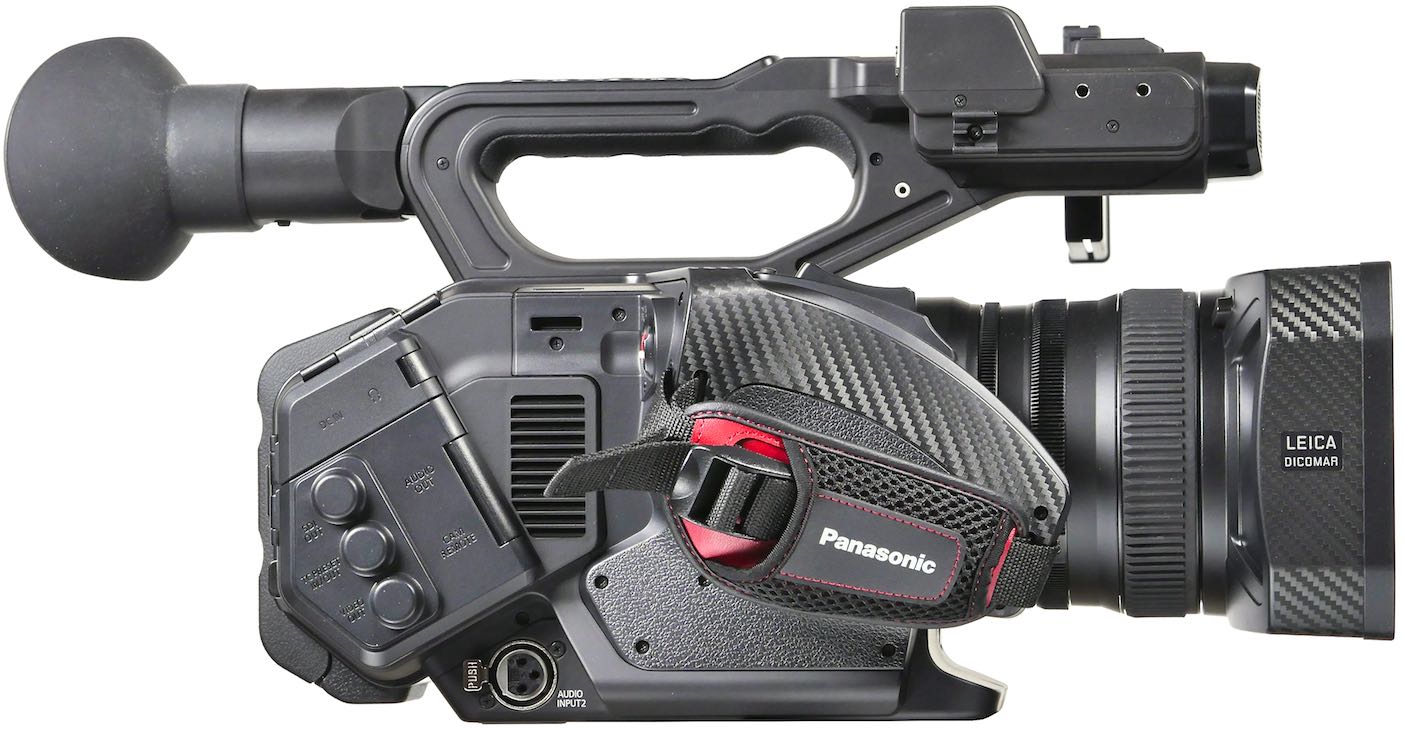
The AG-DVX200 is a handheld camcorder of largely conventional layout (albeit in somewhat unconventional packaging), with a fixed 13x zoom lens, side handgrip, pull-out 4.3” LCD, and rear-mounted EVF. For the most part, the DVX200‘s controls are found in the same place as on other similarly-designed camcorders. You can pick up the DVX200 and, without cracking the manual, be up and running with it almost instantly.
Left side view, with LCD extended and flipped upright
The semi-matte black 13x lens dominates the front half of the camcorder. It terminates in a brushed silver cylinder buried inside an angular, carbon-fiber-like frame, aft of which the body is finished in a bold metallic crimson. A fixed metal handle supports the EVF in back and the LCD, playback control, and a stereo mike in front. The underside of the handle has a textured rubber pad for comfortable carrying.
Top view, with LCD stowed
The carrying handle has two 1/4” and two 3/8” tapped accessory mounting holes, and a shoe mount sits on top of the stereo mike. The pull-out LCD is housed in the front of the handle. There’s a pad on the right of the LCD housing for attaching a microphone clamp (included, but not mounted in the photos) and an XLR mike input just aft of the mounting point for connecting that mike. On the left of the LCD housing, a flip-up smoked-plastic cover protects playback mode, timecode, and colorbars buttons. There’s also a top-mounted start/stop button under its own protective cover, and a single-speed zoom rocker, its speed selectable through the menus. A small speaker is built into the underside of the LCD housing.
Right side view
The carbon-fiber accent wraps over the top of the camera to the top of the handgrip area, though the grip’s weight-bearing area is mercifully finished in the same textured, slightly squishy rubber as the underside of the carrying handle. An amply padded, adjustable handstrap secures the camera in your hand. The power switch and primary start/stop button sit under your thumb while a zoom rocker rests under your fingers. Aft of the handgrip there’s a large air intake grille for the actively-cooled electronics; a second audio XLR input; and a plethora of I/O connectors under hinged plastic doors.
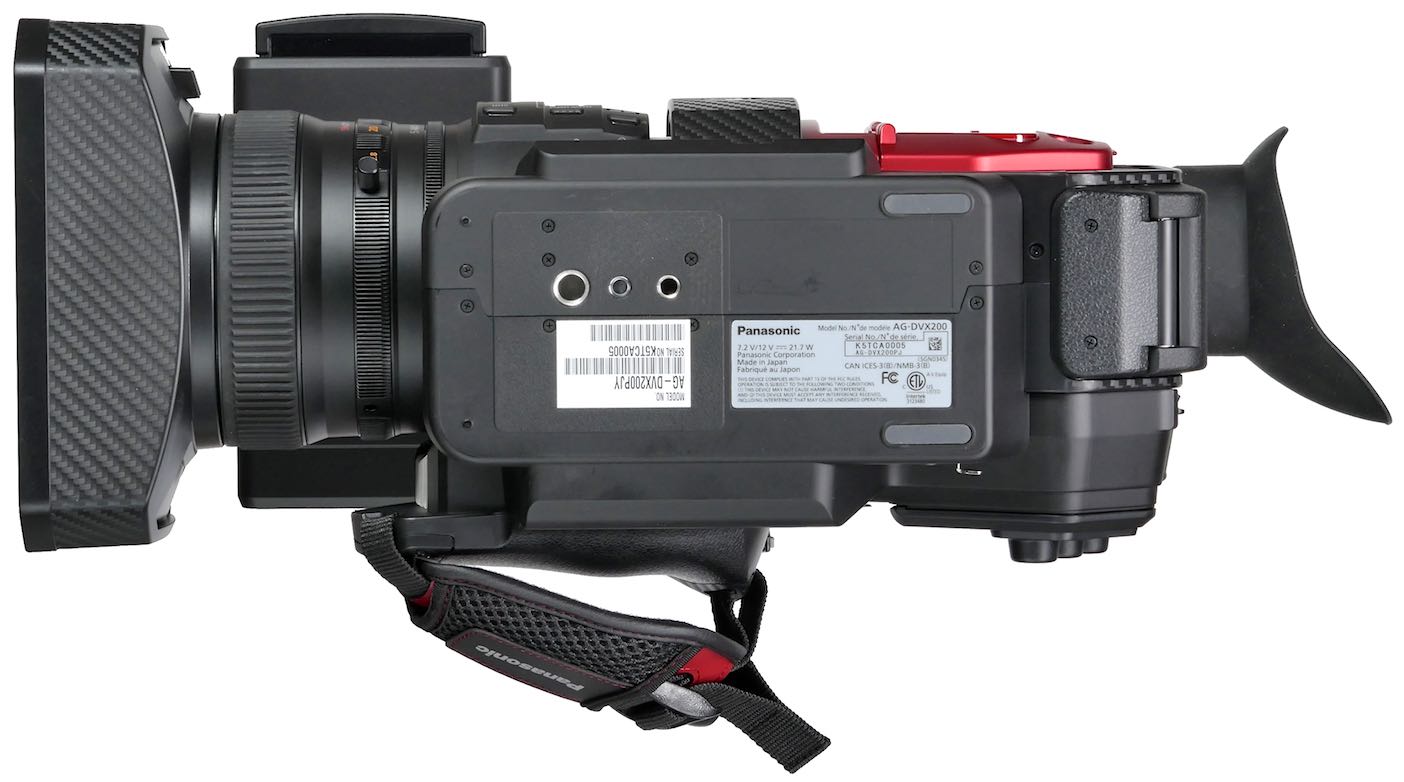 Underneath there are both 3/8” and 1/4” tripod sockets, with an anti-rotation pin socket between ‘em. The sockets are mounted on the camera’s optical centerline, though the wide, off-center baseplate makes them look laterally displaced. The camera sticks out farther on its right side than on its left, pushing the handgrip over 3 inches off the camera’s centerline.

Front view
The front of the camera is dominated by the bayonet-mounted lens shade, the pull-out LCD, and the stereo mike with tally lamp.
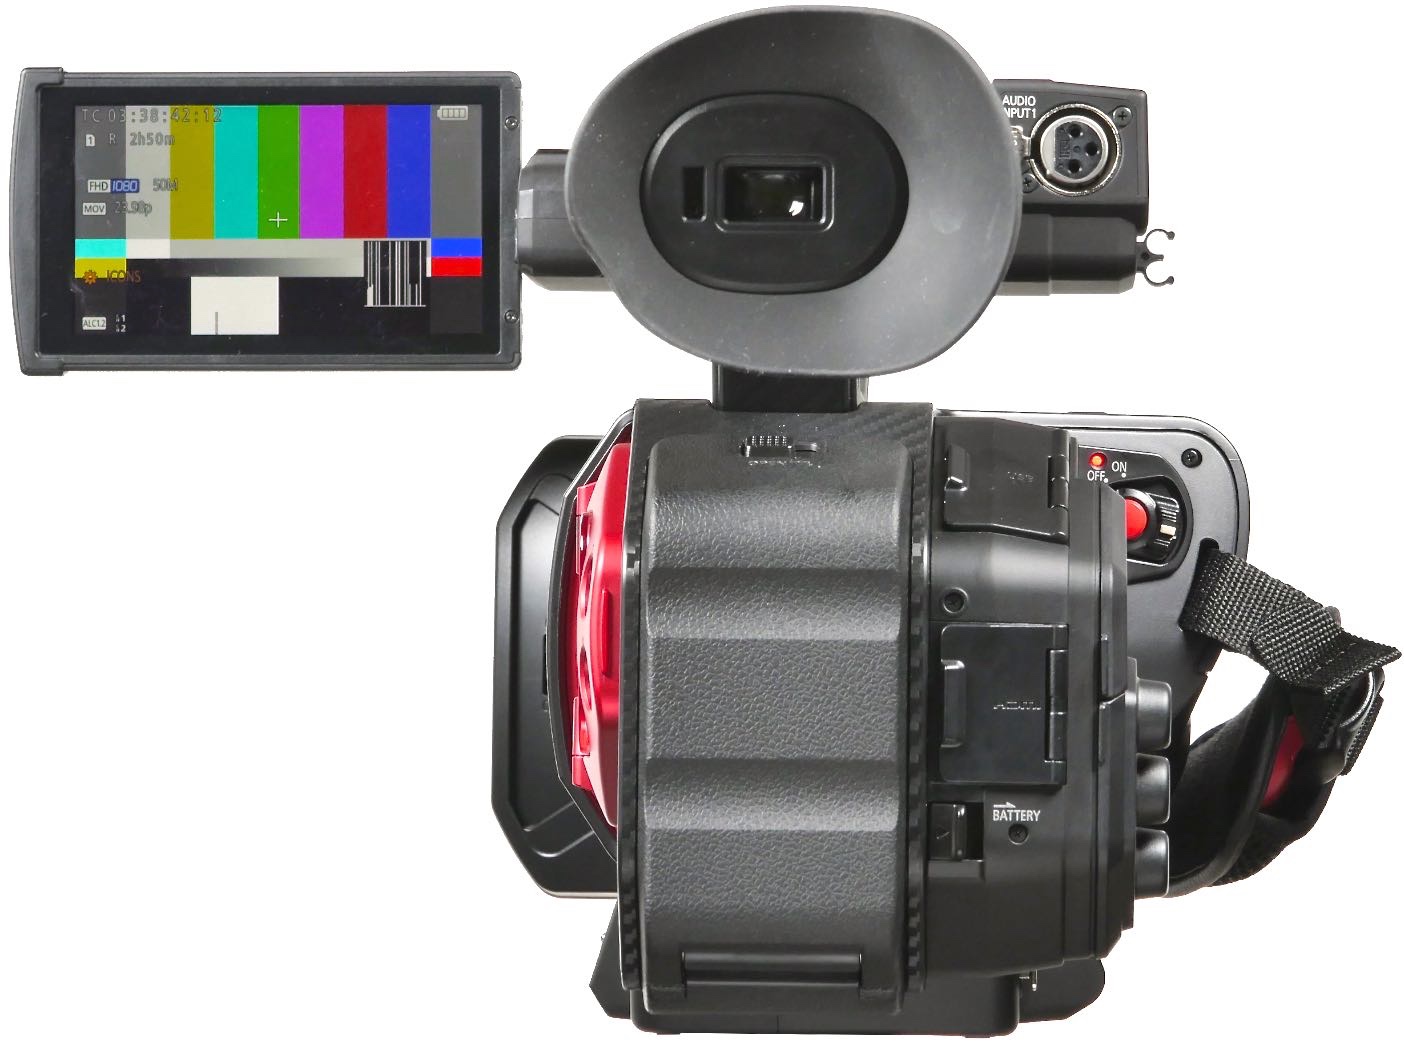
The back of the camera is a hinged door over the battery compartment. The EVF can be flipped up, out of the way, so you can hold the back of the camera against your chest for stable lower-angle shots. The EVF has an IR sensor to tell when you’re putting your eye to it, automatically switching between LCD and EVF (they cannot both be turned on at the same time).
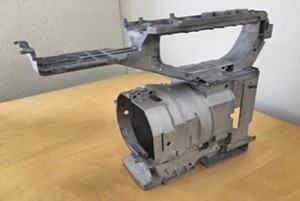
Image courtesy Panasonic
The camera is built on a magnesium frame, just like the DVX100 was, and it should be equally robust. The crimson paint is claimed to be at least as durable as more traditional finishes, if not more so. The carbon-fiber look is a stylistic element, not a structural one; there is no actual woven composite in the construction of the camera.
My experiences with DVX100 and HVX200 cameras showed them to be surprisingly strong and damage-resistant, so I’d expect the DVX200 to be considerably more rugged than its glossy paint might imply.
Lens
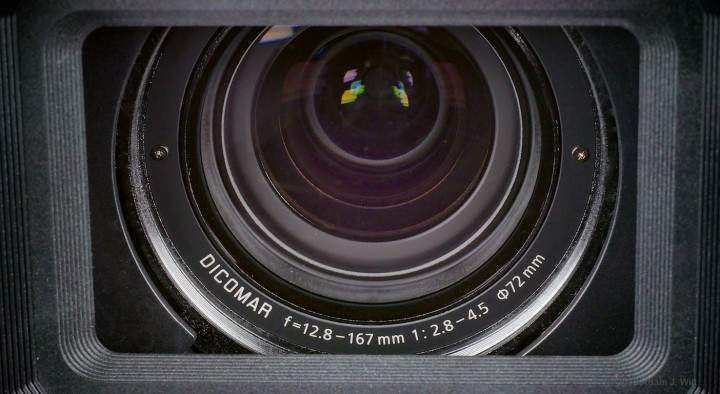
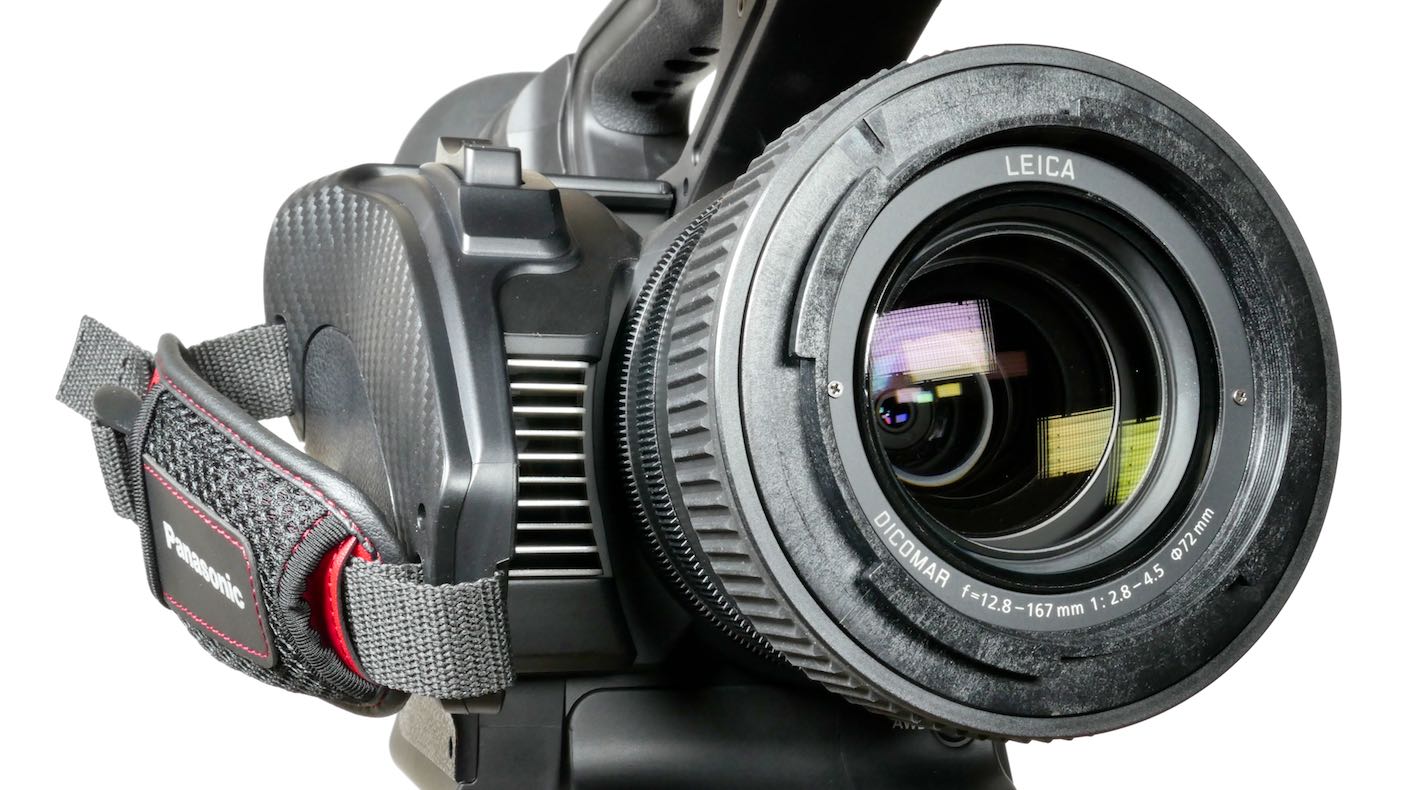
The Leica-certified 13x lens sits behind a large, carbon-fiber-look lens hood. Pop the hood off, and you’ve got a 72mm filter thread.
With the hood removed you can see the cooling air exhaust at the front of the grip
The 12.8–167mm lens opens to f/2.8 on the wide end, but at full telephoto the max aperture shrinks to f/4.5, a loss of 1⅓ stop. You might bemoan this for light-gathering and bokeh reasons, yet it’s a minimal loss, and keeps the cost, size, and weight of the lens much lower than they would otherwise be.
How much more would a constant-aperture 13x f/2.8 4/3” lens cost? It’s hard to know for certain, but compare any vendor’s f/2.8 constant-aperture zooms to their non-constant or smaller-opening counterparts.
For example, the Nikkor 24-70mm f/2.8G ED lists for $1800 while the 24-85mm f/3.5-4.5G ED VR is only $500; even the 24-120mm f/4G ED VR is only $1100.
In the Canon lineup, the 24-80mm f/2.8 II is $1800; the smaller-aperture 24-70mm f/4 IS is $850 and the 24-105 f/4 IS is $1000.
In Panasonic’s micro 4/3” lenses, the 35-100mm f/2.8 is $1300 while the 35-100mm f/4–5.6 is a mere $400.
Constant wider apertures are hard to build (read: expensive and bulky) and the jump from f/4 to f/2.8 seems especially difficult. Panasonic’s choice of an f/2.8–4.5 max aperture seems like a sensible compromise to me.
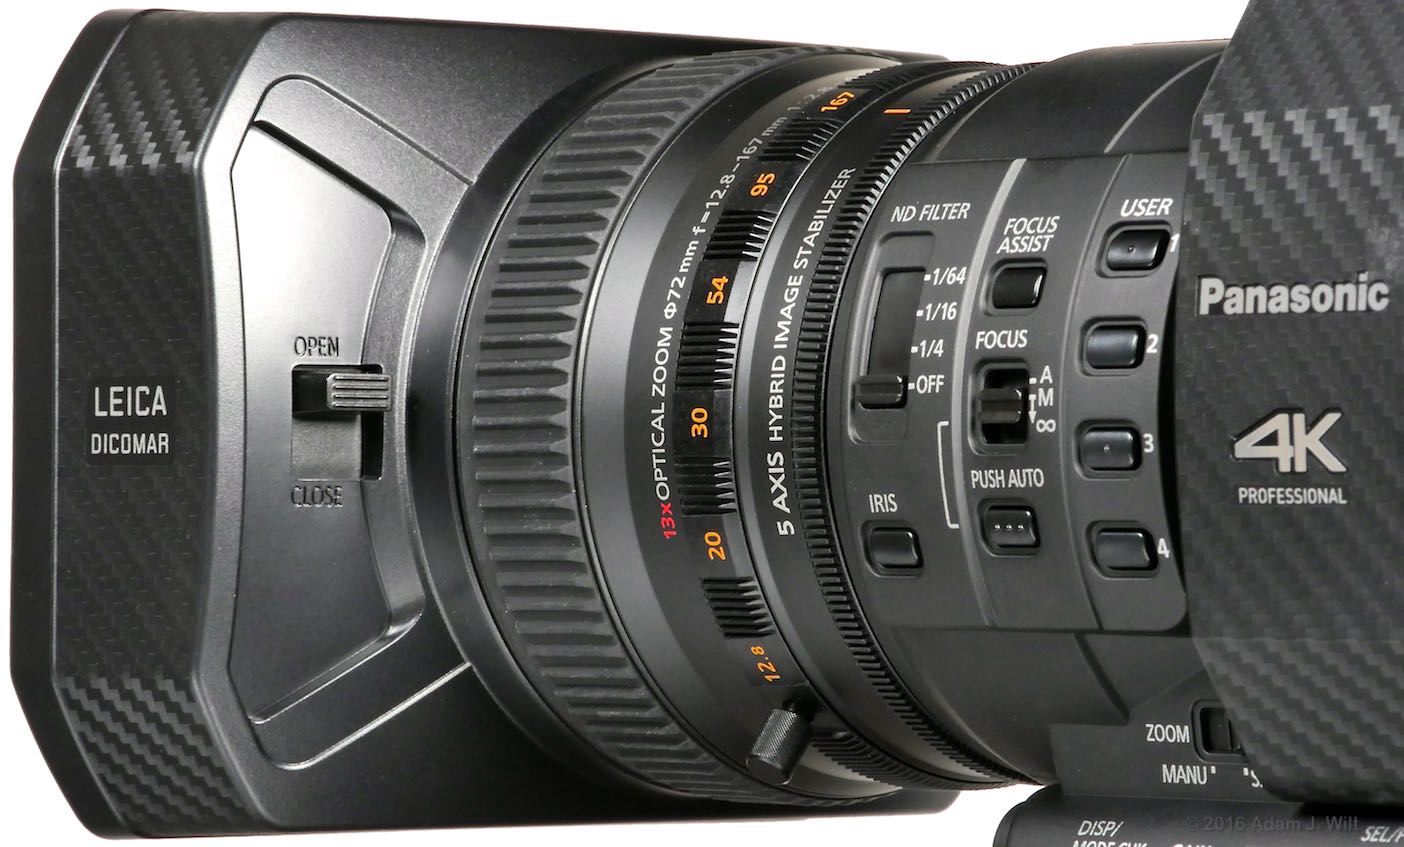
The lens hood incorporates a shutter-type lenscap activated by a slide switch on the back of the hood: it’s always there, it won’t get lost, it’s quick to operate, and it’s very welcome. All lenscaps should work this way.
The free-spinning rubberized focus ring has three operating modes. SPEED is a variable-rate control: spun slowly, it’ll turn nearly 360º to traverse the focal range, but with a quick spin you’ll cover the same range in only 60º of rotation. There are also COARSE and FINE constant-rate modes, where focus positions are repeatable as long as you don’t spin past the focus limits. COARSE is a quick-response mode better suited for live focus-on-the-fly work, while FINE is more suitable for precision work. Both the constant-rate modes can be used to hit marks if you use a follow-focus with its own hard stops.
The zoom ring is mechanically coupled and covers 90º of rotation. The stubby zoom lever, present on cine-oriented Panasonics since the DVX100, can be unscrewed if unwanted (there’s even a threaded socket to store it in on the right side of the handgrip). A mechanical switch at the base of the lens housing lets you declutch the zoom motor for easier (and quieter) manual zooms.
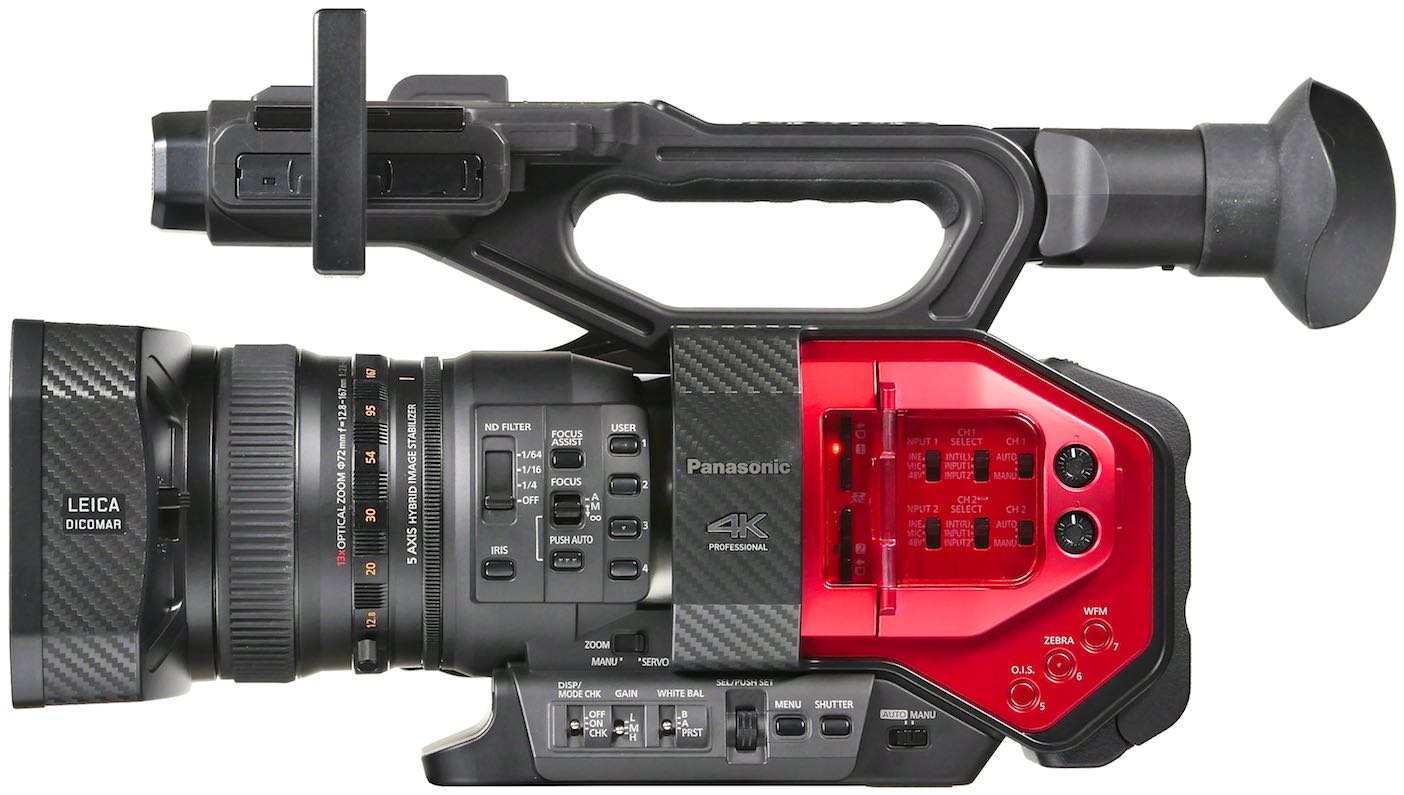
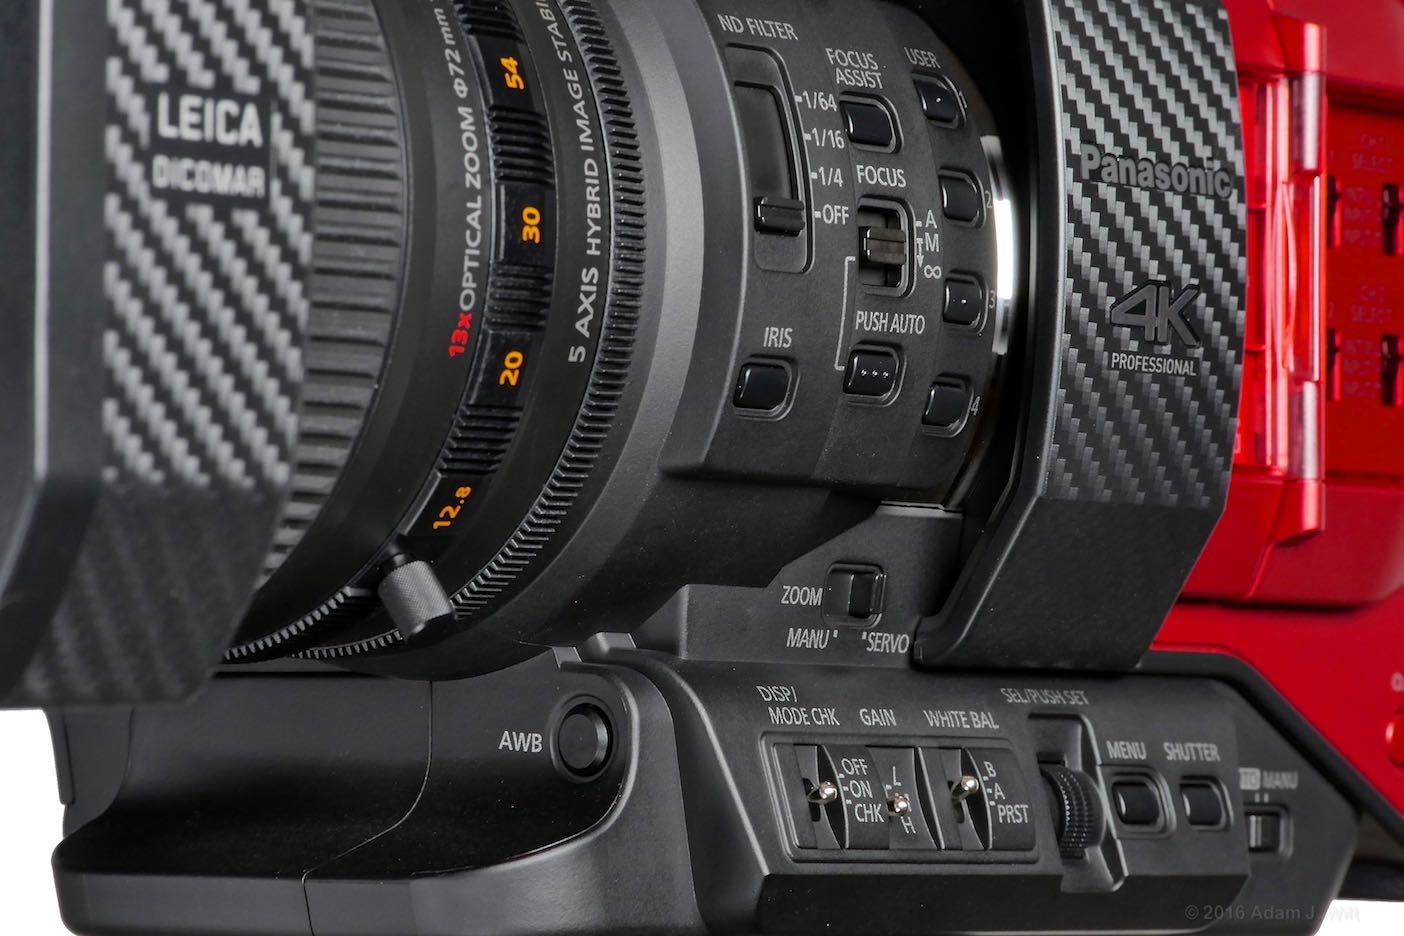
A free-spinning iris control sits behind the zoom ring, and an auto/manual IRIS button sits just behind it, below a four-position ND filter switch. Three NDs are built in, with two-stop density changes between each setting: 2, 4, and 6 stops; or 0.6, 1.2, and 1.8 densities if you prefer.
Three focus controls come next: a FOCUS ASSIST button, the traditional auto/manual/infinity slide switch, and a PUSH AUTO button for momentary autofocus.
The final four controls on the lens barrel are the first four user-assignable pushbuttons out of the eight on the body and four more on the touchscreen.
Right-side controls
An AWB button resides at the right front corner of the camera, over the baseplate’s extended foot (like the foot on Canon’s XC10 and C-series cameras).
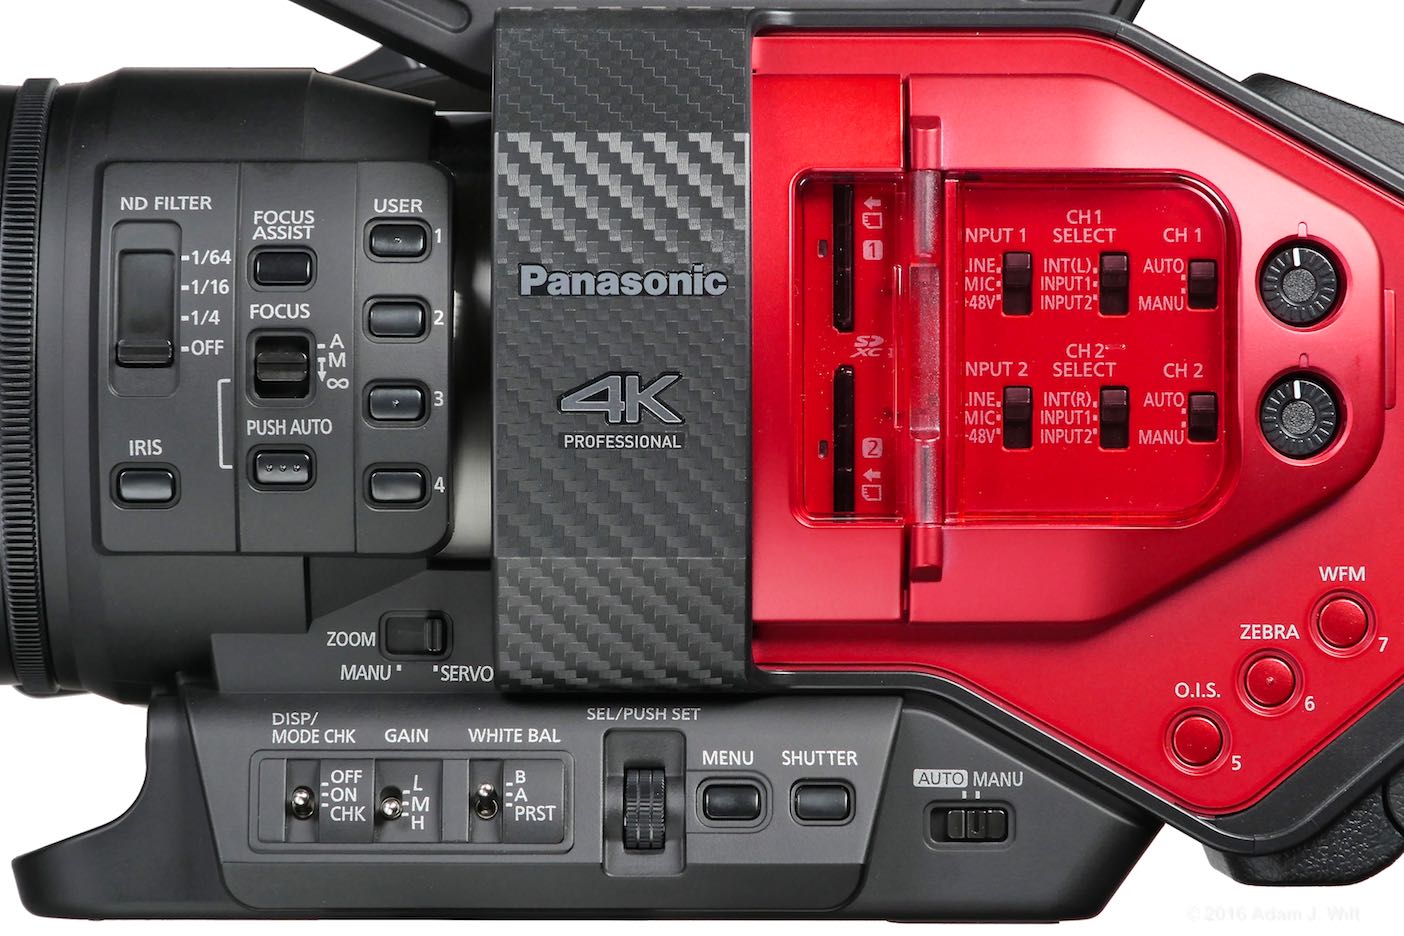
Three silver flip switches handle onscreen displays and camera status checking, three preset gains, and three white balance settings. A push-to-set thumbwheel follows; it’s used for menu navigation as well as a substitute for touchscreen taps (almost everything you can do with the touchscreen you can also do with the thumbwheel, so you can operate the camera perfectly well with the LCD closed and inaccessible). A MENU button lets you call up the camera’s setup menus, and a SHUTTER button gives you quick access to shutter-speed settings. A slide switch lets you choose between auto-operation mode and manual control; you can choose how much control the camera takes over in auto mode by enabling or disabling various overrides in the AUTO SW setup menu.
The bright red side panel has a sliding door for the dual SD card slots, and a swing-out door protecting audio controls. The two input channels each have selections for line- or mike-level signals and offer +48v phantom power. Each channel can be fed from the built-in mike or either XLR input, and set to automatic or manual level control, the latter adjusted with a rotary dial accessible without opening the door.
Three more assignable buttons with sensible default settings run diagonally along the panel. One more assignable button sits on top of the handgrip, just behind the variable-rate zoom rocker.
The camera’s power switch is a rotary control wrapped around the start/stop trigger on the back of the handgrip, where your thumb can easily toggle it—but not so easily that you’re likely to switch the camera on or off by accident.
LCD and EVF
The 4.3” touchscreen LCD pulls out of its horizontal housing face-downwards, and then only allows rotation around its long axis, with 270º of spin from down-facing through backwards and upwards (as shown) to forwards. It cannot be folded flat against the camera. The reason soon becomes apparent: the touchscreen is resistive, not capacitive, and needs a firm press, not a light tap, to actuate onscreen controls. If the screen could fold back, the force needed for the touchscreen would fold it.
Why, in the iPhone era, is the DVX200 using Palm Pilot touchscreen tech? Unlike “modern” capacitive screens, resistive touchscreens can be driven with gloves on, and are not discombobulated by raindrops. The DVX200 is an all-weather camera in this regard.
The LCD resolves about 500 TV lines horizontally and 700 vertically; the EVF shows about 500 lines in both directions. Both are so densely packed that no pixels are discernible, and I was quite comfortable focusing with either one (by comparison, the original DVX100 resolved about 200 lines horizontally and 300 vertically on its LCD, and 200 x 350 in its EVF, and both were so soft and pixellated that focusing that camera was a considerable challenge, even with the EVF DETAIL function added on the DVX100A).
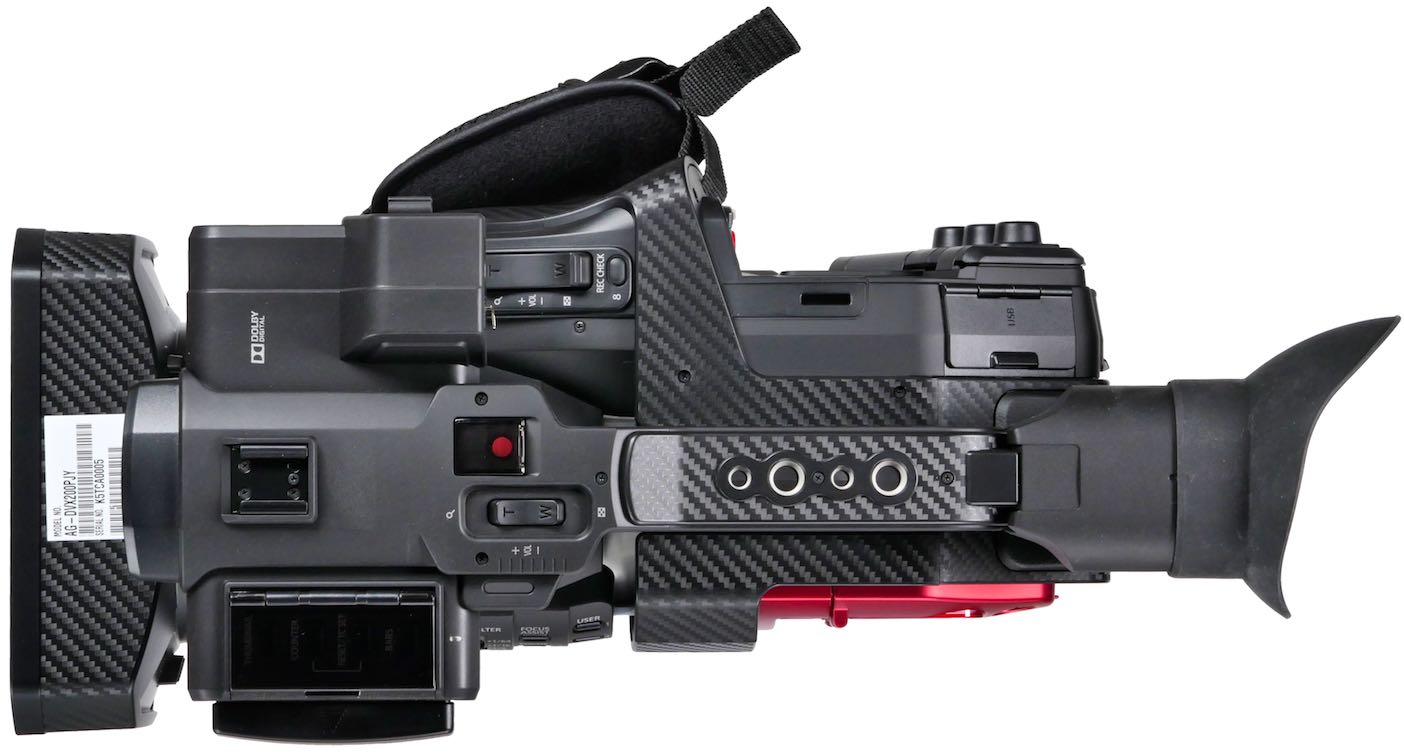
I/O
Aside from the two XLR inputs, the camera’s numerous I/O connectors live under three hinged plastic doors. The rigid doors are considerably less fiddly than the tethered rubber caps often used as port covers, though I worry that they may be more subject to breakage with rough handling.
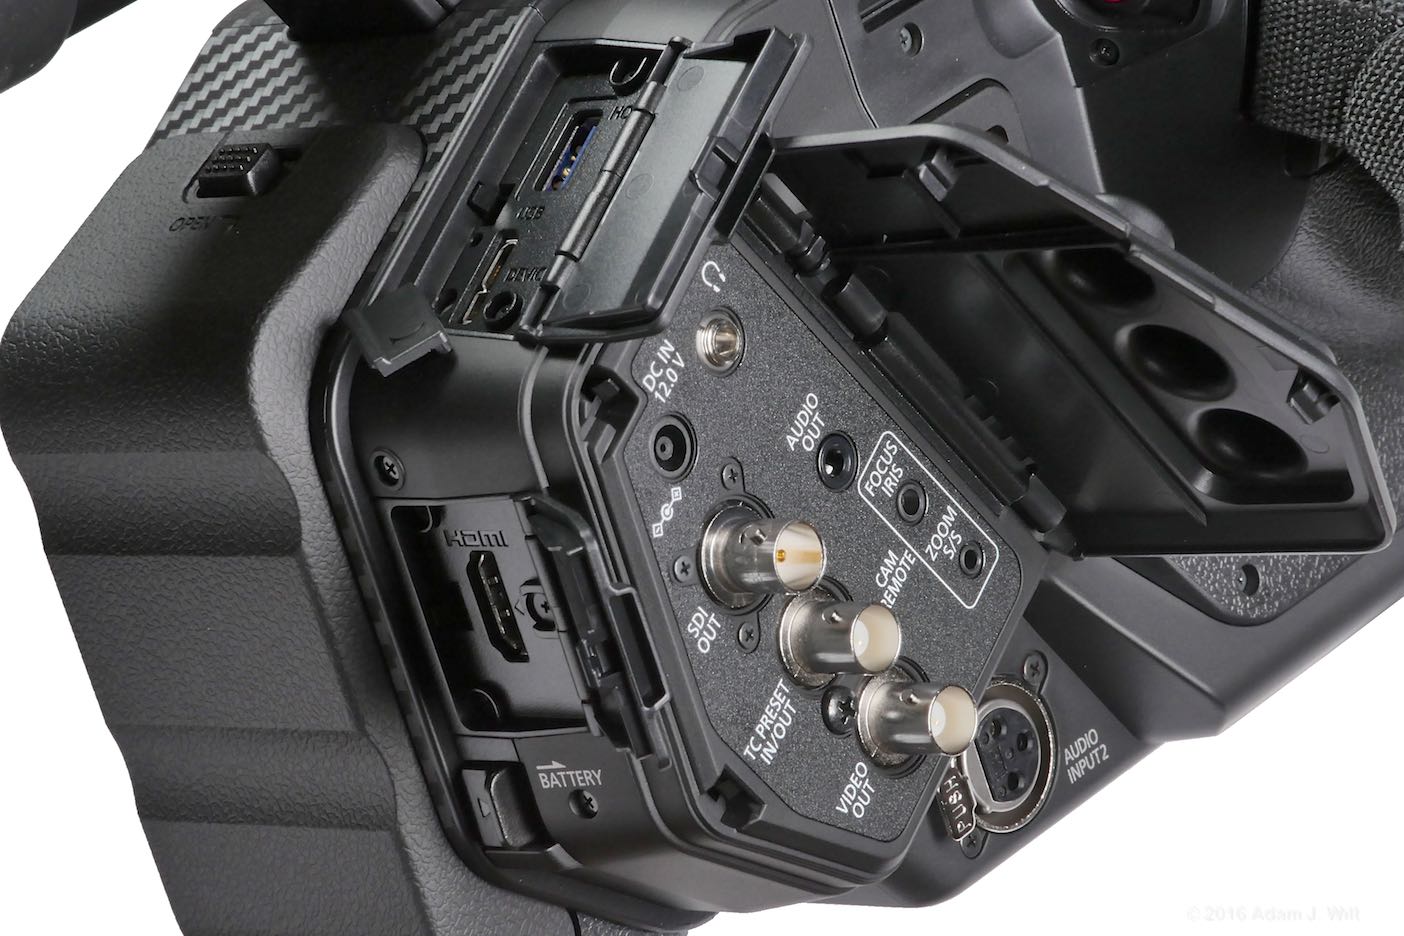
Two USB 3.0 ports lurk beneath the topmost door. The type A port, labeled HD, lets you connect an external drive for clip offloading. A type B port, labeled DEVICE, allows connection to a Mac or PC for remote clip access. The DEVICE port has its own tethered rubber cap, even though both ports are covered by the door. I’m guessing that this was done so that you could offload clips to a hard drive in wet weather without fear of water entering the DEVICE port.
A full-size HDMI 2.0 port has its own door on the back of the camera. The HDMI port fully supports 4K 24p and UHD up to 59.94p (though when recording is in progress, the output is limited to 1080p ), and like the DMC-GH4 the DVX200 can be set to output either 8-bit or 10-bit signals, though—like the GH4—internal recording isn’t possible while in 10-bit mode.
The side door covers BNC outputs for 3G SDI (1080p/59.94 capable) and analog composite video. Another BNC handles timecode I/O for jam-syncing between cameras: you can set the camera’s timecode generator to generate or to match a reference, but the camera itself doesn’t genlock to a master clock nor does it follow external timecode continuously. Dual 3.5mm stereo jacks supply audio-out and headphone feeds. Two input ports allow connection of wired remotes: one for zoom and start/stop control, one for focus and iris. A coax jack accepts the cable from the supplied AC power adapter.
The focus control available by wire is fully repeatable; if you need a cine-style follow-focus, electronic control is the way to go. Varizoom and Bebob both make focus and zoom controllers for Panasonics, and as far as I know these controls should work with the DVX200 just as they have with the DVX200’s predecessors (but I haven’t tested them myself, so I can’t guarantee it).
Power
The camera uses an internally-carried battery. The supplied unit is a 7.2 volt, 5800 mAh VW-VBD58. The battery has a four-LED charge indicator on it so you can check its charge without firing up the camera.
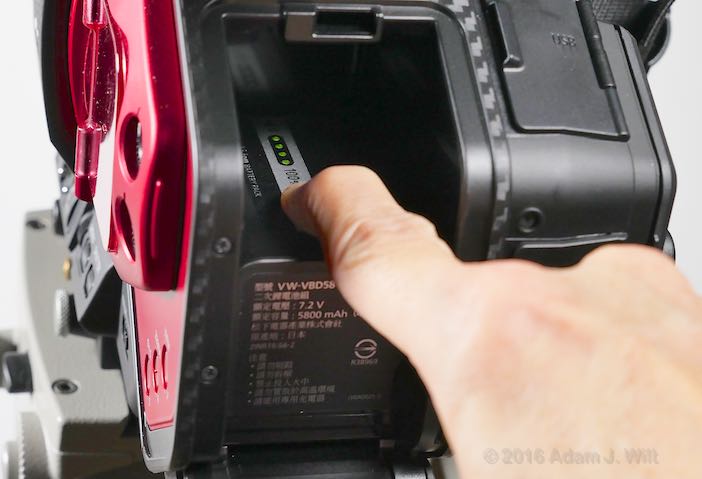
The battery charges externally in its own, single-slot charger, and I was even able to charge it in the charger that came with my DVX100 (though, sadly, the DVX100’s original batteries can’t be used in the DVX200). Panasonic states that the battery charges in about six hours 20 minutes and drains in two and a half hours; I didn’t test this directly but those numbers aren’t out of line with the sorts of discharge rates and recharging times I experienced.
IDX is also making batteries for the DVX200.
[I had previously said that the supplied battery “is the same 7.2 volt, 5800 mAh VW-VBD58 used on other Panasonic camcorders like the AG-HPX171 and HPX250.” Barry Green tells me I’m mistaken; he says:
The batteries from the 171 and 250 will not work in the DVX200, nor will the DVX200 battery work with the older camcorders. The battery from the DVX200 is compatible with the HC-X1000 and the PX270, yes. And those cameras can also use the older DVX/HVX/HPX batteries. But the DVX200 can’t. The only battery it can use is this new battery (and batteries made for the PX270 or X1000, like those from IDX and Swit).
I regret the error.]
The DVX200 comes with a separate AC adapter, and the camera seamlessly switches between battery and line power. I frequently plugged and unplugged the adapter while the camera was on, even while recording, and never had a glitch.
In long-standing Panasonic tradition, the DC cable on the adapter isn’t quite long enough to reach the floor from a tripod-mounted camera:
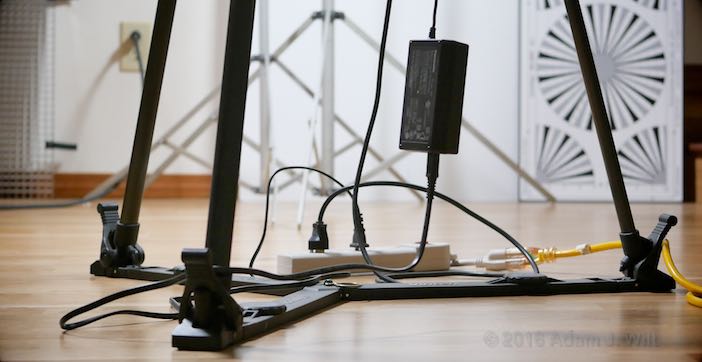
(Professional AC adapter in closed studio: do not try this at home)
In practice I use a velcro strap to secure the adapter halfway up a tripod leg to avoid stressing the cable and plug when using Panasonics, but that’s a step I don’t need to take with AC adapters for other manufacturers’ camera.
User Interface
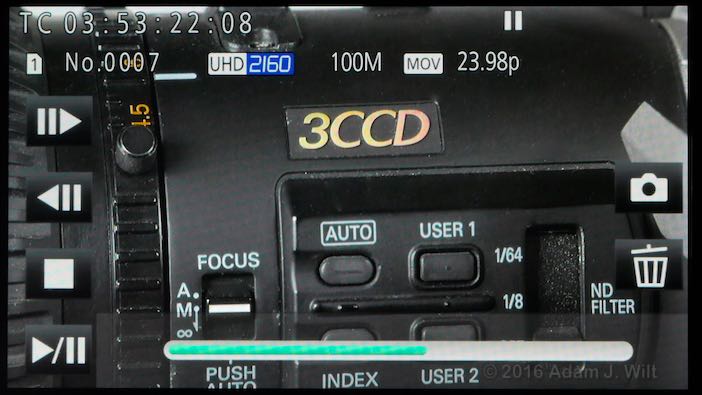
The DVX200’s operations center around its LCD and EVF displays. Almost all the information you might want is available: recording format, space, and timecode in the upper left, camera parameters in the lower right, audio in the lower left.
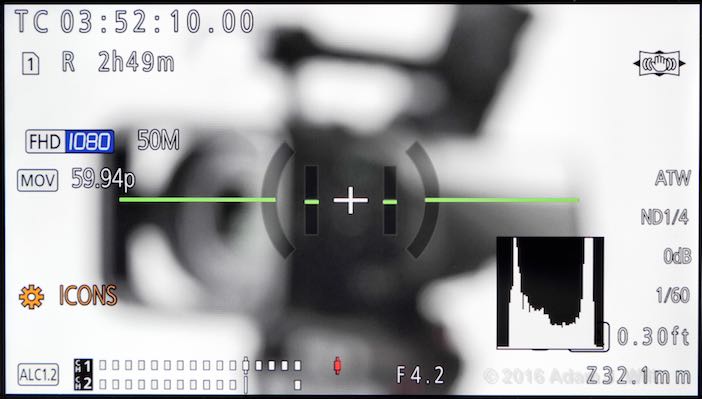
When the camera is on battery power, a four-segment battery meter appears in the upper right corner, though the DVX200, like other Panasonics, does not have an estimated time remaining indicator.
A variety of safe-area markers and a center cross are available, along with Panasonic’s excellent “artificial horizon”: the outer two green lines tilt to stay level with the earth if you roll the camera to one side or the other, while the central two green lines move up and down if you pitch the camera off-level. Most of the displays can be individually disabled if you find them distracting, and the screen can be fully decluttered with the DISP / MODE CHK switch on the side panel.
The histogram updates fairly slowly, taking nearly a second to fully refresh. Unfortunately it overlays the macro and focus-mode indicators, just barely visible beneath the histogram’s lower edge (I’m told it can be dragged anywhere else you’d like, but I didn’t think to try this when I had the camera). Pressing the WFM button (normally user-assignable button 7) swaps all the onscreen displays for a realtime waveform monitor or vectorscope:
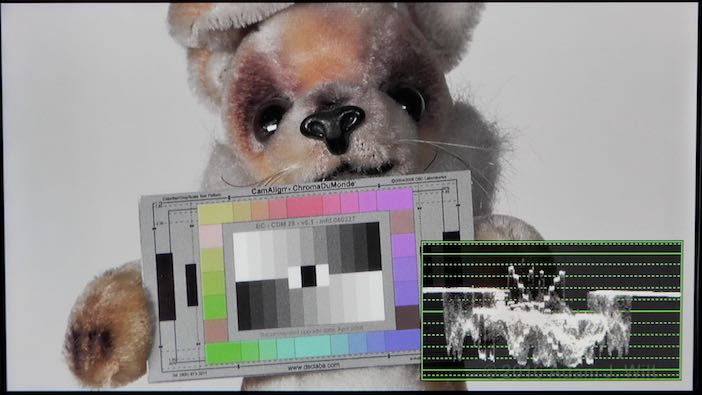
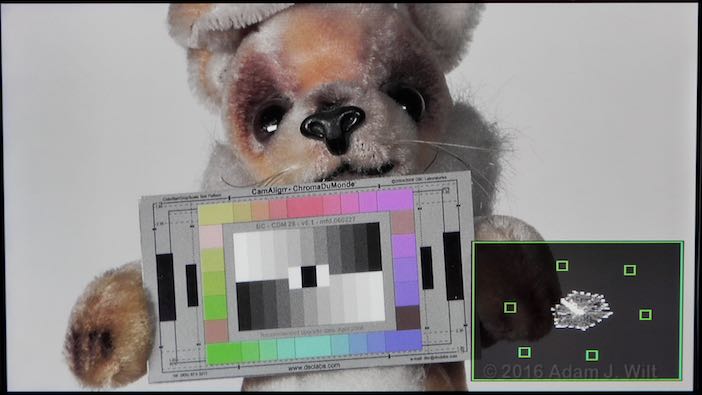
These ‘scopes update in real time and are probably the most detailed in-camera ‘scopes I’ve seen. You can place them in any corner of the screen. They demand so much computational effort that they supersede other display functions, and can’t be shown for freeze frames or while using Focus Assist.
If ‘scopes aren’t your thing, the DVX200 also has spotmetering built in: it’ll report the brightness in percent of a box in the middle of the picture.
There’s a seven-level EVF/LCD DETAIL setting in the Display Settings menu as well as high/low peaking frequency settings, so you can fine-tune the screen’s sharpness for easier focusing. If that’s not enough, Focus Assist allows peaking-in-color (with a variety of color choices) as well as a zoomable, repositionable focus magnification area (sadly unavailable while recording):

Focus Assist with image magnification and blue peaking
Focus Assist while recording; peaking only
Focus Assist’s colored frame not only tells you that it’s engaged, but reminds you what color is used for peaking—an excellent visual status indicator that reduces cognitive overhead and makes things easier.
The orange gear, shown above with the word ICONS beside it, indicates what will happen if you press in the thumbwheel on the camera’s side. Rotating the wheel selects between various options, depending on how the camera is configured:
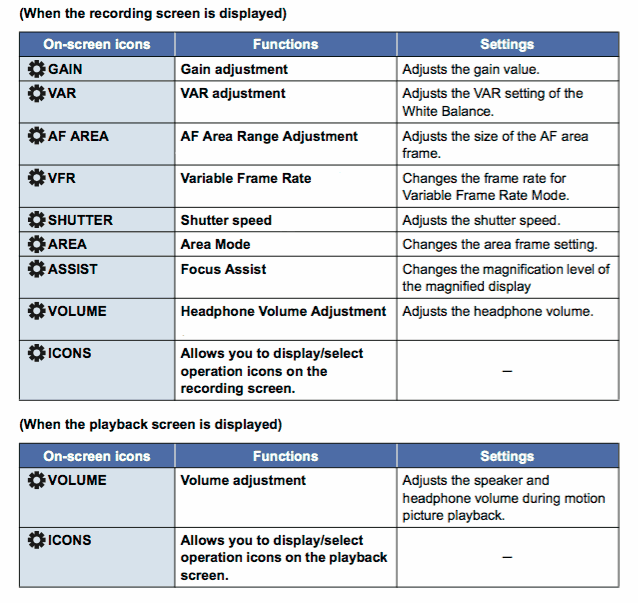
What the “gear” choices are, from the DVX200‘s operating instructions
ICONS displays the “icons” screen:
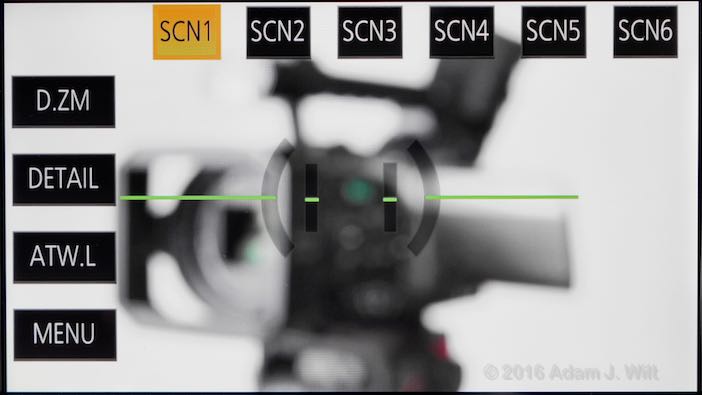
This is how you get to the six Scene File settings, the final four user-assignable buttons, and the onscreen menu button. The “icons” view is also accessible by tapping on the main screen.
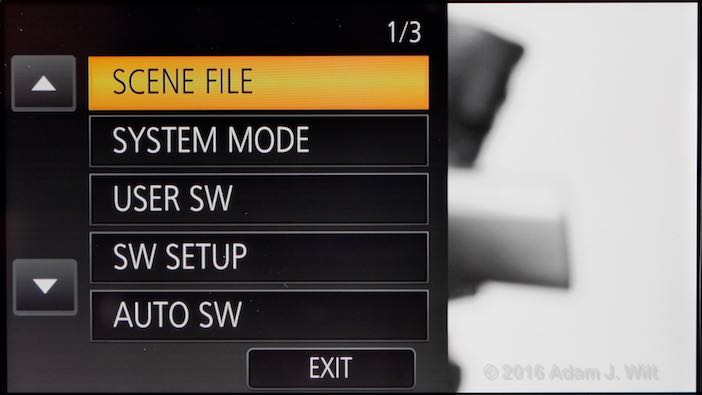
Tapping the MENU button (or pressing the physical MENU button on the side panel) calls up the camera’s comprehensive multi-level menus:
Tapping any of these choices (or using the thumbwheel to choose one and pressing it in to select it) calls up the next-level menu, delayed a fraction of a second with a choppy “slide in” animation. It’s enough to throw you off your rhythm, as everything else in the camera’s navigation (including the deeper levels of the menu) happens with quick cuts.
This isn’t just a Panasonic thing: I’ve had the same problem with RED and Sony cameras. Memo to camera UI designers:
(1) By all available evidence, the wheezy little embedded processor and/or compositor in your camera never has the horsepower needed to pull off animations smoothly, so please don’t bother: a fancy animation poorly executed always looks worse than a straight cut performed smoothly.
(2) It’s a flippin’ camera interface, not some fancy smartphone or game-console UI. We don’t need to be “engaged” or “delighted” by “immersive interaction”, we’re just trying to get something done, usually with other people standing around waiting for us to do it. Kindly don’t waste our time being excessively clever: plain text menus that pop up instantly beat fancy shaded graphics staggering slowly onscreen every time: please remember, design is how it works.
That slight hiccup aside, menu navigation is fast and straightforward, if you can keep track of where any given setting is. While Panasonic’s organizational structure is fairly logical, there are so many different things you can tweak, set, toggle or enable, it’s easy to get lost wandering around until you learn the neighborhood. Even if you’re the type who never opens a manual, it’s worth spending a few moments just staring at the “Menu Structure” pages in Volume 1 of the operating instructions (yes, there are two volumes of operating instructions) to get an idea of where things live.
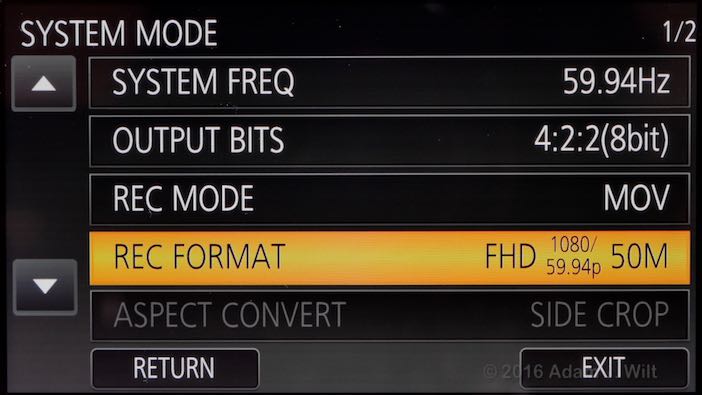
SYSTEM MODE contains high-level settings, like base frequency and imaging/recording format
SW SETUP contains just about every setting controlling the UI of the camera
With all that configurability and twelve (!) user-assignable buttons, it’s good that downward flicks of the DISP / MODE CHK switch cycle through several status screens:
Playback mode is engaged by pressing the THUMBNAIL button under the flip-cover on the LCD housing.

You’re shown all the clips and stills compatible with the current recording format (you can also choose to see all those in a different format, but only one format’s clips can be shown at one time). When you play a clip, you get a lot of control: not only can you use onscreen buttons to play / pause / rewind / fast-forward / single-frame/ slow play, you can tap and drag on the progress bar to shuttle though the clip. When you find a frame you like, you can save it as a still image.
Handling and Operations
The DVX200 looks like a big, fat, heavy camcorder:
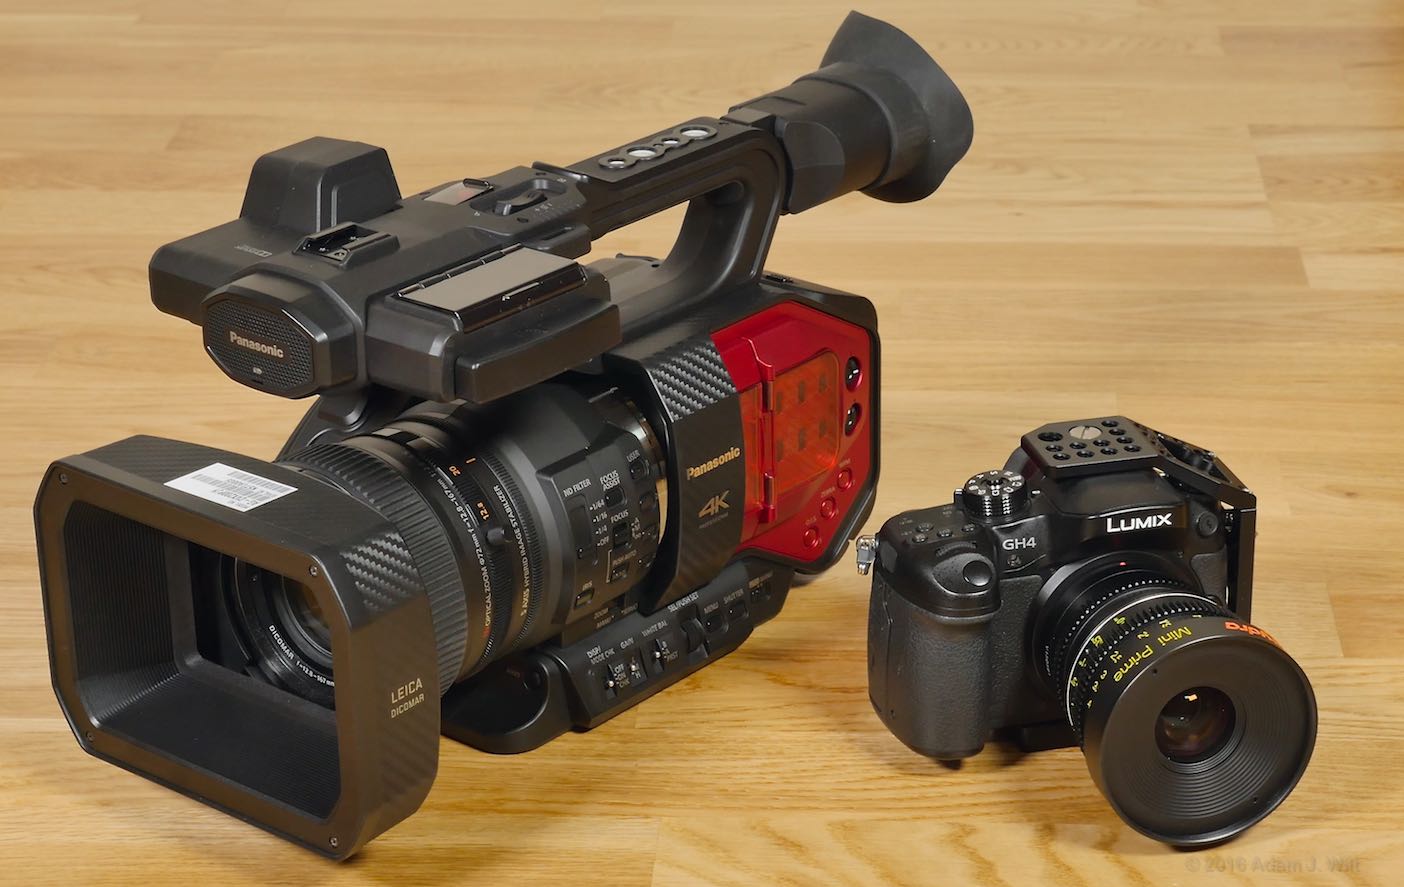
DVX200 alongside a DMC-GH4 MFT camera
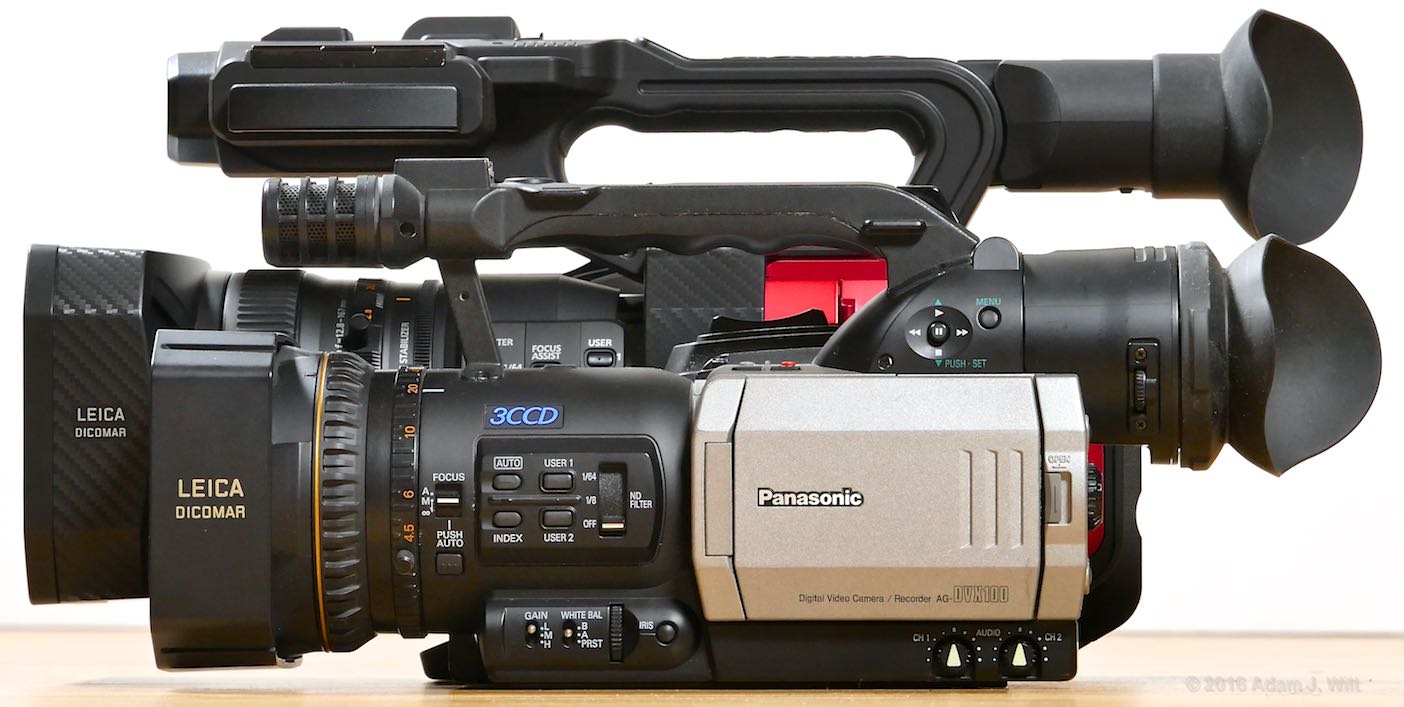
DVX100 and DVX200

DVX100 and DVX200
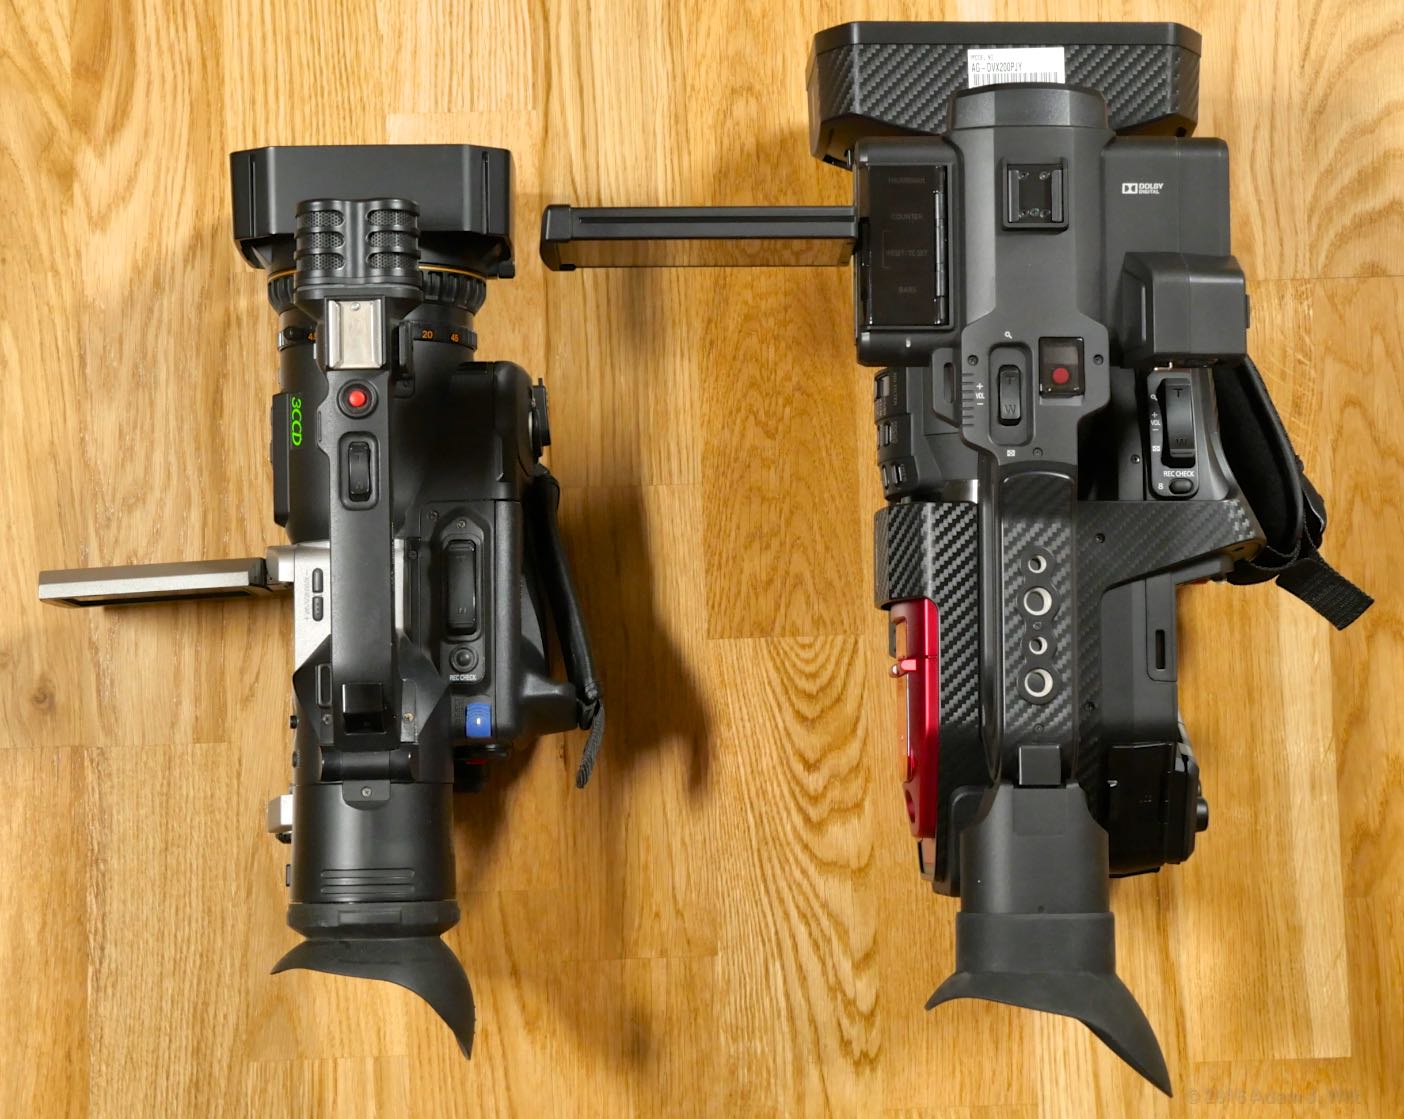
DVX100 and DVX200
Surprisingly it’s about the same height and only 3/4” wider than the AG-AC160 and HPX250 1/3” HD camcorders, and is nearly three inches shorter; its stubby proportions and bright coloration make it look more portly than it is.
Even so, while at six pounds (2.7kg) it’s only 10% heavier than the AC160 or HPX250, it’s far harder to handhold: the handgrip’s lateral offset makes the camera annoyingly side-heavy. I was fine supporting the DVX200 for five minutes, but holding the beast aloft any longer than that made my wrist decidedly unhappy. For mobile work I’d definitely want something like the DVTEC JuniorRig belt-pod support and/or the Protech / Acebil shoulder-mount adapter.
Control feel is well-tuned; the various buttons and switches take just the right amount of force to activate, so they neither trigger falsely from accidental taps nor do they need Herculean efforts to operate.
The lens rings are easily turned with a single finger so you can adjust the lens without wobbling your shot, yet are well enough damped to avoid inadvertent changes. With the zoom switched to MANU, the zoom ring has a light touch and can be snapped from end to end very quickly. Setting the switch to SERVO leaves the zoom motor engaged, where it acts like both a damper and a flywheel to smooth out slow manual zooms.
Focusing in SPEED mode has a very slight lag, perhaps 1/4 second between the time you start turning the focus ring and focus starts to change (I didn’t test COARSE or FINE focus modes because I didn’t know they existed before I returned the camera).
The focus ring is always live, even when in autofocus mode, so you can grab control away from the camera should you disagree with its focus choices. You can also enable “manual assist”, in which the camera runs in manual focus mode, but after you stop turning the ring the camera will briefly engage autofocus to fine-tune your final position.
The main zoom rocker is fully proportional. The slowest zoom I could coax from it took three and a half minutes to traverse the zoom range. The fastest normal zoom takes four seconds in normal mode, but enabling Fast Zoom in the menus shortens this to three seconds, at the expense of slightly more motor noise.
Touchscreen taps took a bit more force than I was expecting, due to the screen’s resistive sensor, but I soon grew accustomed to it. I found touchscreen navigation to be considerably faster than using the thumbwheel; aside from that animation delay in the top-level menu, I was able to bop through the menus and settings pretty much at the speed of thought.
If you’re worried about touchscreen taps wiggling the camera, grab the screen between thumb and forefinger and squeeze gently instead of jabbing at a control.
The camera powers up in about six seconds, and the transition from playback mode to camera mode takes nine. On power-up and during certain mode or recording format switches, various disturbing grinding and thunking noises emanate from the center of the camera. And with power off, tilting the camera causes the optical image stabilization module to clunk back and forth inside the lens—just like the OIS module in the original DVX100.
When powered up, the camera’s cooling fan draws air through the right side intake. It’s audible in a silent room but it’s muted enough that it’s unlikely to cause any audio issues in most situations. The fan cannot be switched off.
The camera offers both optical and digital image stabilization. When shooting FHD (but not UHD or 4K) the DVX200 even stabilizes roll about the lens axis (“dutch tilt”). Stabilization is very good: while it’s not quite as glassy smooth as Canon’s OIS, it’s close—and it’s head and shoulders above the OIS in my GH4’s stabilized lenses. The digital stabilization doesn’t appear to have any noticeable impact on image quality.
Features and Functions
Panasonic has crammed so many things into the DVX200 that it’s easier to list what’s not there than what is. Here’s a quick list of what the DVX200 doesn’t do:
- Formats smaller than 480i SD or larger than cinema 4K.
- Interchangeable lenses.
- Live streaming over Ethernet, WiFi, or bonded cellular.
- Genlock.
- Stereo3D, lightfield capture, depth maps, or camera-motion metadata capture.
- In-viewfinder anamorphic-lens desqueezing.
- Weather sealing, as best I can tell (well, as best I can tell without spraying it with a hose and seeing if it fails, that is).
Here’s a partial list of the things it can do—partial because I’m sure I’ve forgotten a few:
- Worldcam capability: shooting in 59.94 Hz (“NTSC”), 50 Hz (“PAL”), and true 24.00 Hz (cinema) formats.
- Image resolutions from 480i / 576i through 720p, 1080i, 1080p and 2160p at frame rates from 23.98fps to 59.94fps, and true 4K (4096×2160) at 24fps. Starting with version 1.25 firmware, released in November 2015, UHD can be recorded in “Fast Scan” mode for reduced rolling shutter skew; both “normal” and Fast Scan modes are available in the menus.
- Capture stills while recording clips or without recording clips. Still are saved using the current recording resolution.
- Relay recording between SD cards; pre-record (with a 3 or 4 second pre-record buffer); recording UHD on one card while recording full-quality 50 Mbit FHD on the other; recording UHD on one card while recording a lower-bitrate HD proxy on the other; background recording (recording on one card whenever the recording is stopped on the main card); dual recording (same format and codec on both cards, for backup purposes).
- Interval recording (timelapse from 1 sec/frame to 2 min/frame).
- Variable frame rates in FHD mode, from 2 fps to 120 fps.
- Synchro Scan: finely-adjusted shutter speeds for flicker elimination.
- Focus Transition: an onscreen “shotbox” for preprogrammed focus pulls, where you can register up to three focal distances and transition between them with a tap on a button (very handy when you’re lacking a 1st AC, assuming your subjects are good at hitting their marks).
- 10-bit, 4:2:2 output (internal recording is disabled in 10-bit mode).
- UHD and 4K output on HDMI.
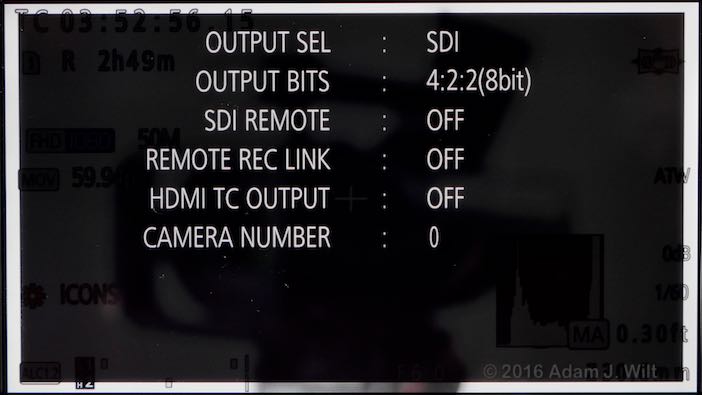
- Remote recorder control over SDI or HDMI.
- Six scene files, each adjustable for gamma curve, color matrix, master detail, vertical detail, detail coring, skintone detail, knee level and slope, chroma level and phase, three levels of DRS (Dynamic Range Stretcher, like an automated highlights-and-shadows tone mapping), Flash Band Compensation (adjacent frame stitching to eliminate partial-frame flashes from camera strobes).
- V-Log L log recording, with a log viewing LUT assignable to a button.
- Oh, yeah: don’t forget that each scene file has a sixteen-vector color corrector:

Color Correction schematic, from the DVX200 operating instructions
- Customizable OIS: you can fine-tune the blur frequency and amplitude that OIS will work to eliminate.
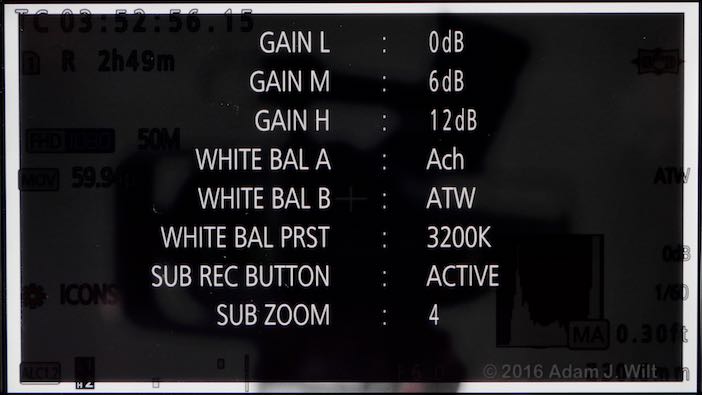
- White balance: you can manually set the preset value; enable ATW (auto-tracking white) and adjust its speed and targeted color bias; set which switch position ATW is activated for.
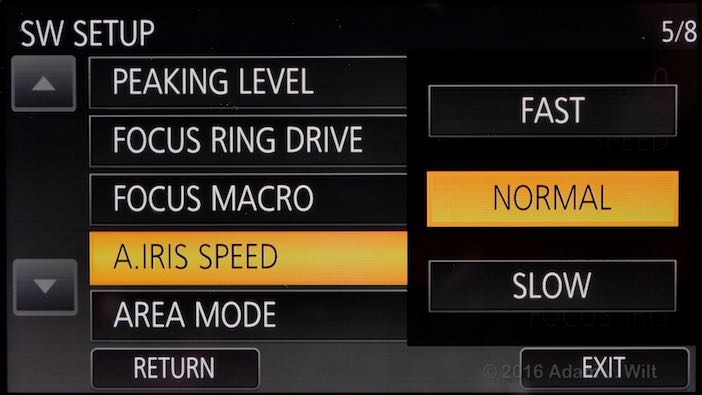
- You can adjust the speed at which auto-iris and autofocus work, set the area (image center vs. full-screen) in which autofocus detects targets, and vary AF sensitivity to focus changes.
- Set two different zebra levels, and whether zebra is displayed continuously or just for five seconds when the zebra button is pushed.
- Choose SMPTE, ARIB, or full-field colorbars.
- Enable digital zoom up to 10x with the usual blown-up detail softening; or for FHD or smaller formats, “i.Zoom” allowing a 20x total zoom range with no apparent loss of image sharpness.
- Display a variety of onscreen composition grids and safe areas in various aspect ratios.
- Enable or disable any viewfinder data item; change which functions get auto-controlled in AUTO mode; set ISO and shutter speed limits for auto-ISO and auto-shutter modes; display focal distances in imperial or metric units; display shutter as a speed or as an angle; display video sensitivity as ISO numbers or as dB gain values.
- Burn a timestamp into the recorded image (great for legal depositions, forensic documentation, and the like).
- Turn audio ALC on or off, and/or link ALC across channels 1 & 2; adjust mike and line input levels (upstream of the gain pots on the side panel).
- Record infrared images by moving the internal IR filter out of the optical path:

I always knew the iPhone had an IR LED for proximity detection. Now I know where it is
- You can even, in this day and age, turn analog composite setup on and off: yes, you can party like it’s 1999!
Mind you, not all of these features can be mixed ‘n’ matched: you can’t output over SDI and HDMI at the same time; you can’t use Focus Assist and the ‘scopes simultaneously; you can’t shoot VFR with relay recording, IR imaging, pre-rec, or digital zoom; and so on. One reason you can get all this stuff in a $4200 box is that the DVX200 is a “soft” camera; its capabilities come from flexible FPGA programming that allows it to do all sorts of things. It just can’t do ‘em all at the same time, any more than you can ride a bike, play badminton, beat the bongos, and bake biscuits all at the same time, even if you can do each one perfectly well on its own.
That’s what it does. How well does it do it? Performance and Conclusions on the next page…